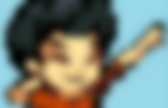
Hjalmar doet Fotosoep. Hjalmar maakt Geluid… Hjalmar doet Fotosoep 7 April 2008 Illegale Pyjamaparti… Iedereen kan tekenen. Gewoon de punten verbinden. Stap 1 Begin met een goede foto. Stap 2 Nu openen we de foto met Adobe Photoshop, kopiëren hem twee keer en verbergen de achtergrond. Stap 3 Maak nu alle zichtbare layers grijs met SHIFT+CTRL+U (of Image>Adjustments>Desaturate). Stap 4 Selecteer de bovenste layer en inverteer hem met CTRL+I (of Image>Adjustments>Invert).
Stap 5 Selecteer weer/nog de bovenste layer en zet de ‘Blending mode’ op ‘Color Dodge’. Stap 6 Ik heb geen idee wat ‘Color Dodge’ precies doet, maar dat maakt niet uit. Stap 7 Nu komt er toch een beetje kunde bij kijken. Stap 8 Selecteer de bovenste layer nog eens. Stap 9 Nu hebben we een wazige afbeelding die er al aardig tekenachtig uit ziet. Stap 10 Nu denk je natuurlijk; had ik maar niet zoveel troep op de achtergrond! Klaar! ----------------------------------- Lachen trucje, heb je dat zelf bedacht of van een wesite afgeplukt?
Create a Print Ready Business Card Design in Illustrator. Illustrator has fantastic tools available for creating small print designs such as business cards. Follow this walkthrough on how to create a fun business card design complete with illustrated character. We’ll start by creating our sketchy figure from a profile shot with hand-drawn linework, then lay out the design with background pattern and textual information in a print ready template with margins and bleed areas. The design we’ll be building is of traditional business card proportions, making use of both sides of the card. Just two colours are used in the design – Cyan and black – Cyan being the blue used throughout the design, and black being used at a very low percentage as the grey grid background. The use of single inks for each colour (C for Cyan and K for black from the CMYK model) will ensure a crisp end print.
Let’s start with the sketchy linework of the illustrated character. Double click the Pencil tool to alter the settings. Create a new document in Illustrator.
Annapurna Expedition Retro Poster. Combine stock photos, triangle shapes and textures to create an awesome retro poster that takes inspiration from climbing expedition to Annapurna in 1970. By mixing up simple shapes with old and grungey textures we’ll create a retro poster design for “Annapurna 1970″. Let’s not waste any more time and get started! This is what we will be designing. From wikipedia: Annapurna (Goddess of the Harvests) is a series of peaks in the Himalayas, a 55 km (34 mi)-long massif of which the highest point, Annapurna I, stands at 8091m, making it the 10th-highest summit in the world and one of the 14 “eight-thousanders”. Annapurna I was the first 8,000-metre (26,200 ft) peak to be climbed. The south face of Annapurna was first climbed in 1970 by Don Whillans and Dougal Haston, members of a British expedition led by Chris Bonington.
Open up Adobe Photoshop and create a document with desired poster dimensions. Fill the background with white color (#ffffff) using Paint Bucket Tool. keep adding … All done! Funky Stickers. Written by RossAugust 14, 2008 This will show you how to create that slapped on sticker effect I’m sure you’ve seen popping up around the internet. Its simple to make but looks really good in pieces of art and also on webpages for example as an image link to an RSS feed. Read on to discover how to create these in only a few steps and learn a really easy way to achieve a 3D text effect at the same time.
Tutorial Files If you are a PSD PRO member then download the PSD file and much more by going here. Introduction This sticker effect looks great when slapped on web pages, I’m sure you’ve noticed them for RSS feeds or post comments or something along those lines. Step 1 Start by creating a new document with dimensions; 10x10px. Step 2 Select a blue color, something like #0b7dac should work well then select the line tool and make sure in the main toolbar that the fill pixels button is active, the weight is set to 1px and that anti-alias is checked. Step 3 Step 4 Step 5 Step 6 Step 7 Step 8 Step 9.
Jumbotron Effect. Vintage effect. Back in October I took this photo, in front of our house. A cool scene, bright colors and a double rainbow. After seeing this picture on my Flickr page, I received an e-mail from Marco who asked me about the post process of this image. Now here is my answer… Choose your image carefully First of all I need to mention that some pictures are better suitable than others. It's a good thing to experiment a lot and find out if the result is to your liking. Add contrast and saturation Place the image in a separate layer. Adjust curves Add another adjustement layer. Select Green from the Channel dropdown menu and adjust the curve as shown in the image above.
Now select Blue from the Channel dropdown menu and adjust the curve as shown in the image above. Add Vignette effect Select the layer with your photo and go to the Filter menu and select "Convert for Smart Filters". Now go to the Filter menu and select Distort > Lens Correction. Add some Colorisation The final touch Before and after. How to Animate a GIF. In this tutorial, we'll take a look at the Photoshop animation feature to create a nice animated GIF.
I'm sure all of you already noticed the ads at the right side of this page. For some of you, they are annoying, others even click on them, which is why they are there. I personally think there's nothing to be said against them, so I thought why not creating a nice 125 pixel by 125 pixel ad to demonstrate how easy it is to create nice animations inside of Photoshop.
All we need to do is open up Photoshop, create our final image and animate it the way we want it to move the single elements to achieve the final effect. Additionally, we'll stop by at the beautiful GraphicRiver website, where we'll download their logo, which we'll use to create our GIF. Final GIF Preview Take a look at the animated GIF we'll be creating below. Step 1 First, open up Photoshop and create a new 125 pixel by 125 pixel document. Step 2 Step 3 Step 4 Step 5 First, select the Rectangle Tool (U). Step 6 Step 7 Step 8 Step 9.