
The Rule of Thirds in Real Life: 21 Perfectly-Composed Photos. It’s a popular saying: “Rules are made to be broken.”
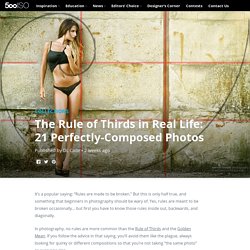
But this is only half true, and something that beginners in photography should be wary of. Yes, rules are meant to be broken occasionally… but first you have to know those rules inside out, backwards, and diagonally. In photography, no rules are more common than the Rule of Thirds and the Golden Mean. If you follow the advice in that saying, you’ll avoid them like the plague, always looking for quirky or different compositions so that you’re not taking “the same photo” as everyone else.
But the truth is that many the most popular photos EVER uploaded to 500px follow the Rule of Thirds and Golden Mean to a T. Have an example of when you followed these two rules perfectly? Adobe Photoshop Tutorials from Beginner to Advanced. Tutorials. Rens - Updating the Classics. Advanced Colorization Techniques. » Retoque profesional de piel con photoshop.
Estamos acostumbrado a ver en las fotografías de los anuncios cosméticos, o en las revistas de moda, unas modelos que muestran una piel perfecta, sin ninguna imperfección, con un tono uniforme y de un aspecto totalmente natural.

Está claro que es el resultado de un retoque profesional de la piel usando Photoshop, pero… ¿cómo lo hacen?. Existen muchas técnicas y una infinidad de tutoriales en internet pero la inmensa mayoría de ellas no consiguen un resultado natural, ya que eliminan gran parte de la textura del volumen del rostro. El retoque que realizan los profesionales (retoque PRO, utilizando el argot extendido en el mundillo) lo guardan como un gran secreto, lo que les permite diferenciarse de la competencia y evitar que se cualquiera con un poco de práctica pueda realizar su trabajo. En este tutorial descubrimos una de las técnicas usadas por los profesionales del retoque en sus encargos de alto nivel. Creamos una nueva capa. Veamos el resultado de este primer paso: ¿Un Desastre? Efecto 300 de Frank Miller en tus Fotos.
Videotutorial Photoshop CS4 - Separacion De Frecuencias. Symmetrica - Retouching Time Lapse. Tilt-Shift Photography Photoshop Tutorial. This tutorial will walk you through how to create a tilt-shift image in Photoshop. It has been produced using Photoshop CS2 on a PC. Once you finish your tilt-shift image, make sure you upload your image for everyone to see. You should also check our our gear page to find all of the latest gear you need to create tilt-shift images. Gear PageSubmit Your Images Step 1: Photo Selection When choosing a photograph for the tilt-shift effect, bear in mind that you want to give the impression of a miniature model. For this tilt-shift photography Photoshop tutorial, we are using a picture of Times Square during a typical day: Even before the tilt-shift effect has been applied, it’s not too hard to imagine the scene as if it were a model. To find an appropriate image, we suggest you browse through the flickr tilt-shift fakes pool.
Step 2. Open the image in Photoshop and enter Quick Mask Mode by pressing Q on the keyboard, or select the Quick Mask icon as shown in the Tool Palette below: Step 3.