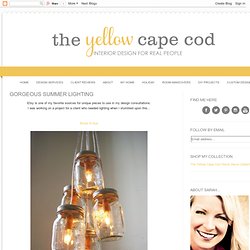

How to Trick Out a Dungeon-Like Dorm Room. Gorgeous Summer Lighting. Etsy is one of my favorite sources for unique pieces to use in my design consultations.

I was working on a project for a client who needed lighting when I stumbled upon this... You have to visit their Etsy shop, this is just a sample of what they offer. Uh Huh...I know... these are AMAZING. Every piece is magical and unique. These lights speak to me in such a way that I must have one. For the same price as off the shelf retail store lighting, you could have a beautiful piece of art.
Check out the outdoor lights... colored lights... and table lamps... I was even more excited to discover these amazing Artisans are local (Ann Arbor, Michigan). Crafty Friday. This craft project was inspired by something almost identical I saw in a fancy shop here in NYC. It cost almost $500, and I thought to myself, "hey, I can make that". And so I did! Start by printing out butterflies.
I found mine online, simply google butterfly prints and millions comes up. Cut them out. Hot-glue or super-glue a small branch to a vintage saucer. Fold the butterflies a little, so they look more alive and simple hot-glue them all to the branches. Photos by Alexandra Grablewski. DIY Doily Light: Simple Suspended-Sphere Lace Lamp Shade. So simple a child could make it – and have fun in the process, too.

And the result? A shining example of how light and shadow can work together to brighten up a room. Swedish craftswoman Isabelle Dos started with a simple party-shop balloon, blown up big and wrapped in white lace place settings painted with wallpaper glue. The soaked material sticks readily to the sides of the inflated sphere, overlapping to form a contiguous shell, suspended and left to dry overnight like a plaster cast. Pop the balloon and presto: a little cut in the top lets you drop in a bare bulb and create your own chandelier, potentially using whatever pattern you want (if lace feels a little too old-fashioned) to frame the outside and filter the light.
Silk-Dyed Eggs {aka TIE-Dyed!} I posted this tutorial a few years ago and it has become somewhat of a tradition to bring it back every year!

One of our family Easter traditions is dying eggs with pieces of silk. I saw a cute lady show Martha how to do it a few years ago and I ran upstairs right then to steal a tie! It’s way cooler than those cups of neon liquid that end up all over your clothes, your furniture and your hands plus it gives you an excuse to rid a man’s closet of ugly ties. Here’s the run-down: You need 100% silk for this to work. I try to find an assortment of colors and patterns. Usually it will tell you if it’s 100% silk right on the main label of the tie, but a lot of them don’t, and if that’s the case, check that little tiny end, it’s usually hiding there.
The first step is to deconstruct the tie. Next you cut a piece large enough to cover an egg. Now, notice how I tied the eggs in the above photo- with the tie on the top of the long side of the egg. I wish eggs came like this at the grocery store.