
Crochet Ribbed Scarf. It’s like knitting, only better! December 1, 2010 by admin Knitted scarves are beautifully and soft, but they take FOREVER to make (to a crocheter anyway) Crochet scarves are often kinda ugly and kinda stiff; crochet is more dense than knitting, and doesnt have the nice soft drape.
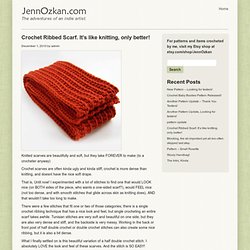
That is, Until now! I experimented with a lot of stitches to find one that would LOOK nice (on BOTH sides of the piece, who wants a one-sided scarf?) , would FEEL nice (not too dense, and with smooth stitches that glide across skin as knitting does), AND that wouldn’t take too long to make. There were a few stitches that fit one or two of those categories; there is a single crochet ribbing technique that has a nice look and feel, but single crocheting an entire scarf takes awhile. What I finally settled on is this beautiful variation of a half double crochet stitch. What this half double crochet variation does is allow the top of the crochet stitch, which looks like a line of knitting, to appear on the work: Here’s how it’s done: EASY. EASY Crochet Patterns by Tara Murray This blog and these free patterns have moved!!
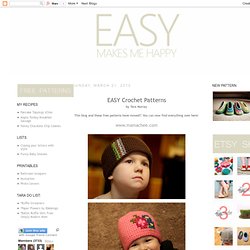
You can now find everything over here: www.mamachee.com. Calm Cowl pattern by Suzana Davidovic. Jagged stripe scarf tutorial. Jagged stripe scarf crochet tutorial. Crochet with white wool and black wool. Round 1: white color, making 452 loops. Round 2: white color, Crochet 1 dc at each 1 loop on the round 1 (452dc) Round 3: white color, Crochet 1 dc at each 1 dc on the round 2 (452dc) Round 4: black color, (2 hdc, 1ch) making the same way until the end of this round. Round 5: crochet the same round 2 with black color.Round 6: crochet the same round 2 with white color.Round 7, 8, 9, 10, 11, 12, 13, 14, 15, 16, 17, 17: repeat the round 5 & 6. The Boston Cowl pattern by Heidi May. Infinity Hooded Scarf. When working in the chian a BLO will be considered going through just the center loop.
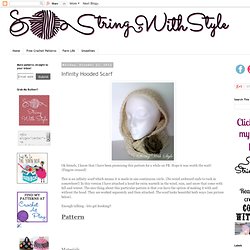
The one that lies between or behind the "v" looking part of the chain. {I really hope that this is making sense..} This helps to make the hdc's that are worked into the chain move forward and back. I have done this throughout the scarf so that as it turns and flips when worn there is no obvious front or back. I hope this next picture is clear. DirectionsScarfWith K hook.
HoodCh 60.Row 1: In second ch from hook work hdc in FLO, *hdc in BLO next stitch, hdc in FLO in next st* repeat from * to * across. Crochet - Collar Pattern. Crochet Collar Pattern This pattern is for an adult version *If you would prefer to print/save this pattern there is now a downloadable PDF file at the end of the pattern.
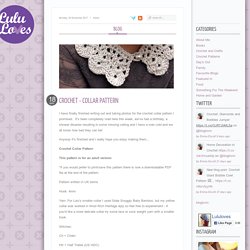
Pattern written in UK terms Hook: 4mm Yarn: For Lulu's smaller collar I used Sidar Snuggly Baby Bamboo, but my yellow collar was worked in Wool Rich Heritage 4ply so feel free to experiement - If you'd like a more delicate collar try some lace or sock weight yarn with a smaller hook. Stationery Set. Nocturnal KnitsNocturnal Knits - Ruminations on knitting at 3 a.m. and home of the Giganto-blanket. Buy the tutorial and pattern on Ravelry Buy tutorial and pattern on Etsy Want me to make you one?
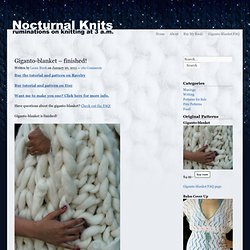
Click here for more info. Have questions about the giganto-blanket? Check out the FAQ! Giganto-blanket is finished! It’s squishy and huge and pretty amazing, if I do say so myself. If you read my previous post about giganto-blanket, you may notice that the gauge is much different from how it started. But the broomsticks proved to be just too small for this project. The cats really love it. A friend of mine asked for a video of the knitting process, so I recorded a (low-quality) video of this madness. Facebook. Picc. Spraymålade burkar – Spray painted cans & jars. När Karin & Freja på Pysselbolaget skapade sin lyxiga småförvaring härom dagen fick jag inspiration att göra något fint av mina gamla smink- och syltburkar.
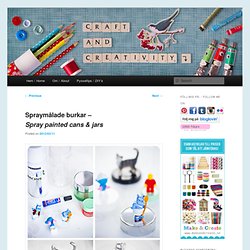
Du behöver: Gamla burkar, leksaksfigurer (t ex lego, plastdjur eller KinderEgg-prylar), superlim och sprayfärg. Gör så här: Rengör burkarna (plast- eller glasburkar spelar ingen roll), ta bort gamla etiketter och limma fast dina figurer på locken med superlim. När limmet torkat är det bara att börja spraymåla. Läs instruktionerna på sprayburken. Vanlig torktid är ca 10 min om man sprayar ett relativt tunt lager. When Karin & Freja at Pysselbolaget created their luxurious small storage the other day I got the inspiration to make something pretty out of my old cosmetic containers and jam jars. You will need: Empty cans or jars, toy figurines (such as Lego, plastic animals or KinderEgg-stuff), super glue and spray paint.
Do like this: Clean the jars (plastic or glass doesn’t matter) and remove old labels.