
Limitations - No Support Linux Hosting - cPanel Powered Linux Web Hosting.
8 Kanal Channel 5V Relais Relay Konverter Modul für Arduino DSP PIC ARM AVR AR. Versand nach: Weltweit Ausgeschlossen: Guatemala, Fidschi, Vatikan, Papua-Neuguinea, Salomonen, Guadeloupe, Sierra Leone, Marshallinseln, Nauru, Wallis und Futuna, Französisch-Guayana, Anguilla, Gambia, El Salvador, Guam, Mikronesien, Dominikanische Republik, Mayotte, Kamerun, Guyana, Taiwan, Macau, Suriname, Tonga, Kenia, Argentinien, Neukaledonien, San Marino, Guinea-Bissau, Togo, Senegal, Eritrea, Armenien, Bhutan, St.

Relais mit dem raspberry pi schalten : onkeloki. 23 Dez 2013 Marko Ich habe ja schon einiges über das ansteuern von Funksteckdosen geschrieben.

Die eine Möglichkeit zu funken, ist das direkte senden von 433mhz. Wenn ihr aber keine kompatibles Funksteckdosen System habt oder z.b. 868mhz senden wollt kann man auch eine bereits vorhandene Funkfernbedienung an den pi anlöten um diese zu schalten. Hierzu benötigt Ihr zuerst einmal ein Relais. Kompatible Platinen gibt es in verschiedene Ausführungen. 2 Relais auf einer Platine *4 Kanal Relais auf einer Platine * oder8 Relais auf einer Platine* Im Beispiel verwende ich das 8 Relais Modul*: Schauen wir uns das Modul mal an:(Da ich nie irgendetwas elektrotechnisches gelernt habe, werde ich wahrscheinlich nicht ganz korrekte Begriffe verwenden.
8 Kanal 5V Relay Relais Module Modul für Arduino 8051: Amazon.de: Baumarkt. Mit dem Raspberry Pi 230V schalten - Seite 4. Kategorie: Projekte 230V mittels Triac schalten Um 230V mittels dem Raspberry-Pi steuern zu können benutze ich einen Optokoppler (MOC3041) mit Triac-Ausgang und einen Triac (TIC206D).

Der Optokoppler sorgt für die galvanische Trennung zwischen dem Raspberry-Pi und der 230V-Seite. Ausgangsseitig besitzt der Optokoppler einen Triac-Ausgang an dem ein Triac direkt angeschlossen werden kann. Ich benutze hier den TIC206D. Schaltplan Rasp-IO-230V Auf dem Steckboard funktioniert die Schaltung richtig gut. Im Datenblatt des Optokopplers findet man auf Seite 4 eine ähnliche Schaltung in der ein RC-Glied (Snubber) parallel zum Triac geschaltet ist.
Das ganze ist im Prinzip ein SSR (Solid State Relais).
Hausautomatisierung FS20. Da sich mit relativ günstigen Mitteln eine Hausautomatisierung umsetzen lässt habe ich mich nun mal zum Winter hin an diese Thema begeben.
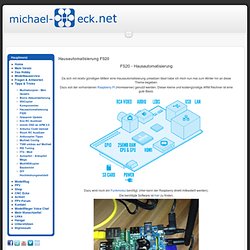
Dazu soll der vorhandenen Raspberry PI (Homeserver) genutzt werden. Dieser kleine und kostengünstige ARM Rechner ist eine gute Basis. Dazu wird noch ein Funkmodul benötigt. (Hier kann der Raspberry direkt mitbestellt werden). Die benötigte Software ist hier zu finden. Das Modul wird einfach oben aufgesteckt. Vorbereitung Raspberry PI Zunächste lädst du die aktuelle Debian Version für den Raspberry herunter. In meinem Fall war das Wheezy. Als nächstes benötigt man ein Tool mit dem man Debian auf der SD karte installieren kann. RFM12Pi V2 Raspberry Pi Expansion board - Shop. The cookie settings on this website are set to 'allow all cookies' to give you the very best experience.

Please click Accept Cookies to continue to use the site. OpenEnergyMonitor Shop Advanced Search | Search Tips Categories RFM12Pi - Raspberry Pi Base Station Receiver Board Loading zoom Price:
Sensors. HYT 271 Digital Humidity Element With I2C Interface. Description The HYT 271 combines the advantages of a precise, capacitve humidity sensor with the high functionality of an ASIC.
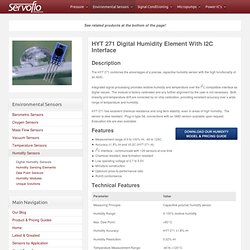
Integrated signal processing provides relative humidity and temperature over the I2C compatible interface as digital values. The module is factory calibrated and any further alignment by the user is not necessary. Both linearity and temperature drift are corrected by on chip calibration, providing excellent accuracy over a wide range of temperature and humidity. HYT 271 has excellent chemical resistance and long term stability, even in areas of high humidity. Features Measurement range of 0 to 100% rH, -40 to 125CAccuracy ±1.8% rH and ±0.2C (HYT 271-H)I2C interface - communicate with 126 sensors at one timeChemical resistant, dew formation resistantLow operating voltage of 2.7 to 5.5VMiniature constructionOptimum price-to-performance ratioRoHS conformance Technical Features Applications HVACAutomotiveConsumer productsHousehold appliancesInstrumentation.
AM2302 (wired DHT22) temperature-humidity sensor ID: 393 - $15.00. Soil Temperature/Moisture Sensor [SHT10] ID: 1298 - $49.95. Take your gardening project to the next level with a SHT-10 based soil sensor.
![Soil Temperature/Moisture Sensor [SHT10] ID: 1298 - $49.95](http://cdn.pearltrees.com/s/pic/th/temperature-electronics-74951099)
The sensor includes a temperature/humidity sensor module from Sensiron in a sinter metal mesh encasing. The casing is weatherproof and will keep water from seeping into the body of the sensor and damaging it, but allows air to pass through so that it can measure the humidity (moisture) of the soil. It is designed to be submersible in water, but it's always best to avoid long-term (over 1 hour at a time) submersion, if you need something that can be submerged for over an hour you may want to find a different sensor. It can also be simply placed outside for exterior weather sensing. Home of FHEM. RPi Tutorial Easy GPIO Hardware & Software. Back to the Hub, or the Tutorials page.

GPIO Hardware & Software Tutorials: Warnings While most of these circuits may interface directly to the RPi, the use of a buffered interface (such as the one supplied by the Gertboard) is recommended which will help protect against damage. Alternatively, experiment with one of the #Alternative Test Platforms. The GPIO pins connect directly into the core of the ARM processer, and are static-sensitive, so you should avoid touching the pins wherever possible.
Extreme caution should be exercised when interfacing hardware at a low level, you may damage your RPi, your equipment and potentially yourself and others. Aims This tutorial is based on this thread and aims to introduce basic circuits which can be used with the RPi's General Purpose Input/Output (GPIO). It is highly recommended that additional GPIO Protection Circuits are used to protect the delicate GPIO pins if interfacing to RPi hardware. Useful Links/Resources Protection Circuits Basic Circuits.