
Zegar LED + DS18B20 + kalibracja chodu - elektroda.pl. Building an Illuminated LED Skull Cane. DIY Wood and Leather Trellis Plant Wall. Its PLANT WEEK!!!!!!!!

Do you even know how exciting this is?!? Its like Shark Week but WAYYYYY better and with a lot less fear (mostly). Every day this week I have got an amazing project for you that will make the love in your plant-lovin heart swell to massive proportions. You.GUYS!! I hope you are enjoying this fun weeklong series as much as I am. I am not exaggerating when I tell you that today’s project is one of my most favorite EVER. About 6 months ago I pinned this awesome picture because hello I want to move in there yesterday. This wall in my kitchen eating nook was the perfect spot. Also this was majorly one of those make it up as you go projects, so if you are going to recreate it make sure that you read all the words, and not just skim the pictures.
Every one’s wall dimensions will be different but the basic premise is the same. There were a handful of long boards that extended the width of several diamonds. But they looked so… Bigger on the inside: Knitty Spring+Summer 2012. Lace Section Cast on 1 st.

Row 1 [WS]: Kfb. 2 sts. 1 st increased. Row 2 [RS]: Knit. Row 3 [WS]: K1, kfb. 3 sts. 1 st increased. Row 4 [RS]: Knit. Row 5 [WS]: K2, kfb. 4 sts. 1 st increased. Starting with a RS row, work rows 1 to 24 of the Time Vortex Lace Increase chart 7 times until there are 52 sts, incorporating an additional horizontal repeat after each vertical repeat. Starting with a RS row, work rows 1 to 8 of the Time Vortex Lace Center chart 3 times, working the 6-st repeat 8 times across row.
Starting on a WS row, work rows 1 to 24 of the Time Vortex Lace Decrease chart 7 times until 9 sts remain, removing repeats of the 6-st pattern across row as st count decreases. Final decrease section Row 1 [WS]: K2, p to last 3 sts, p2tog, p1. 9 sts. 1 st decreased. Cut yarn and pull through final st to secure. TARDIS Section With RS facing, rejoin yarn and pick up and knit 311 sts evenly distributed along the right (curved) edge of lace section.
DIY Grass Bed Offers a Cozy Green Oasis. Many people love to relax by lying on the grass and taking in the warm sunshine.

But what if your yard is made of concrete? With this obstacle in mind, Jason Hodges, a landscape gardener on the Australian TV show Better Homes & Gardens, has come up with a clever solution. He demonstrates how to bring some green onto the pavement by building a grass day bed. Complete with pillows and a headboard, the lounger offers a great place to soak up some sun and read a good book. The DIY shows you how to build your bed from start to finish. Jason Hodges: Website via [Contemporist] Very nice mice : pattern and instructions (and it’s free!)
I’ve made you something!
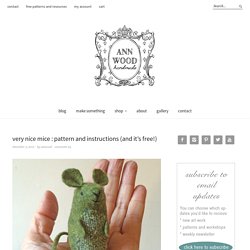
A free sewing pattern for some very nice mice. You can download the pattern here and all the instructions are below. So little – just 3 inches tall. They are quick and very easy. And they love to go boating – they are the perfect size to captain my little felt boats. pattern notes: I designed this pattern specifically for hand sewing and felt. Material list: pdf pattern felt ( wool or wool blend) matching sewing thread ( I think cotton works best) embroidery thread stuffing ( I like wool) pencil or disappearing fabric marker and – optionally – pink colored pencil. Make A Thing: Veneer Chandelier. Welcome to a hijacked installment of Make A Thing, where we make handmade gifts for people.

Or ourselves. Who doesn’t need something special in their life? Join in on the DIY fun and avoid the unnecessary consumerism of the world (and I promise you’ll save a few dollars while you’re at it). Header by Rory Midhani Today’s a Very Special Episode of Make A Thing where we make our own chandelier! Goddamnit why you so pretty via LZF I’m a huge fan of wood grain, my girlfriend’s a huge fan of warm diffuse lighting and our cat is a huge fan of anything vaguely yarn-like.
So spirally and/or full of splinters! Today we’re going to use all of your mad crafting skills that you’ve built from all of the previous times you’ve made things. DIYke: Hanging Flower Vase and Iced Chai Latte. Welcome to the new DIYke Club!

Some friends and I started a DIY/crafting group that gets together a couple of times a month. We try a fun drink recipe and do a craft we haven’t made before. We’re having a blast and thought you might want to get in on the action. Maybe you’ll start your own local DIYke chapter? Let’s all get liquored up and make things! Header by Rory Midhani So you’ve been cooking for that cute vegan girl you just met. Rustic Hanging Vase Supplies needed: +3 recycled spice jars +Twine +Key ring +Gorilla glue -or- hot glue (White glue will work as well but it is not usually water proof which would make it difficult to wash out your vases) +Filling of choice (I used black pebbles and fresh flowers that were definitely not from my neighbors yard) +Scissors Step 1: Remove the labels on your spice jars. Step 3: Put a dab of glue on your key ring and attach twine. Step 4: Apply a ring of glue to the rim of your first spice jar.