
7 best Arduino simulators for PC. Sigrok. ExpressPCB - Free PCB layout software - Low cost circuit boards - Top quality PCB manufacturing. Cargar NiCd 600mAh 8.4V con el SkyRC iMAX B6AC. Netduino for beginners turorial. Electronica Basica. A Maker's Dream Factory. Touch Control Panel. Small 4-wire resistive touchscreens are now amazingly cheap: they are produced in such enormous quantities for mobile phones, PDAs, and particularly handheld games such as the Nintendo DS that they can be bought brand new for under US$10.

Larger touchscreens are also rapidly falling in price. The popularity of netbooks with screens between 7" and 10" in size has resulted in a healthy market for touchscreens that can be retrofitted to them and plugged into an internal USB port. Despite the fact that they come with control electronics and a USB interface those screens are also predominantly 4-wire resistive devices, so if you dump the control module that comes with them and interface to the screen directly you can have a 10" touchscreen on your Arduino! And if you want to go even bigger there are often 15", 17", and 19" touchscreen kits available on eBay for under US$150.
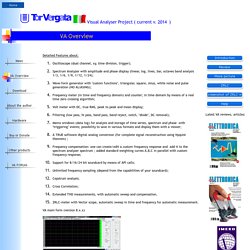
Note however that what is advertised as a "touchscreen" is not actually a complete screen including an LCD. Source Code. Using a touch screen from a phone. Building Your Own 3D Printer. Visual Analyser details. Detailed Features about: VA main form (version 8.x.x) (1) - Oscilloscope Dual channel Bandwith : depends from your soundcard (typical 20 Khz) up to 96 Khz (192 Khz sampling frequency) Resolution from 8 bit (S/N 46 dB) up to 24 bit (S/N >120 dB) Time division adjust according the sampling frequency and sample resolution Trigger (positive/negative slope) independent for both channels Complete software D/A of digital samples : the Nyquist theorem allows reconstructing exactly the input signal Utilities for quick frequency determination (hold left mouse button down and move mouse to get frequency/amplitude) Y-axis in Volt and percent full scale Auto calibration of scope (and spectrum) in volts (need an input signal of known amplitude)

Utilizar el pc como osciloscopio. Con este sencillo tutorial construiremos una entrada al ordenador para ser utilizado como osciloscopio.

Transformaremos nuestro pc en un osciloscopio. El osciloscopio es quizás el instrumento de medida más deseado por todo aficionado/a a la electrónica. Más deseado, porque es un instrumento caro y no todo aficionado se puede permitir ese gasto. Sin embargo podemos convertir nuestro ordenador en un osciloscopio "casero" con prestaciones aceptables. Lo que vamos a hacer es utilizar la tarjeta de sonido de nuestro ordenador como entrada, y un software especial para mostrar las señales que apliquemos a esa entrada. Vamos por partes; En cuanto al hardware lo que necesitamos es: CONECTROL.COM. Cables de RED 100/Gigabit -Tutorial de armado -resubido. Titulo : Tutorial de armado cables de redes.

Hola taringueros, como siempre dejandoles algo de conocimiento, puede ser que algunos o muchos sepan como armar un cable de red; pero muchos no lo saben y estan en la duda de como armar su propio cable de red. Alicate (preferible de corte recto/puede ser que no sea necesario) Pinza para crimpear cables red/telefonico Cutter (Trincheta en algunos lugares) Tester (Puede ser no necesario) Probador de Lan (Puede ser no necesario) La pinza de crimpear tiene cuchillas para cortar el cable de red y del otro lado cuchilas para pelar el cable en la longitud necesaria. Introducimos el cable un poco y cortamos Ahora podemos comenzar el trabajo prolijo, introducimos ese cable cortado por la parte de las cuchillas de pelado y miramos que el cable haga tope en la cuchilla de corte Presionamos un poco la pinza para hacer solo un corte en la vaina del cable de red, en mi caso solo toco la vaina y la voy girando para que se corte solo la envoltura.
Netduino. "Netduino - Getting Started with *" Series. The final Hardware Friday post of the year can't just be on one project now can it?

Let's get ourselves set for another great year and get set to hit the ground running building some fun Netduino projects with a great set of Getting Started series by Jeroen Swart Netduino - Getting Started with LCD If you want to show more output then blinking LED’s, an LCD module is a good and usually affordable option. They come in different sizes, from 2 numeric-only digits to 40x4 alphanumeric dot-matrix modules. You can also get graphic LCD’s, that range from modules with small resolutions (e.g. 122x32 or 240x128 pixels) to more professional LCD screens (e.g. 5” or 7”), but I will stick with alphanumeric LCD’s for this post.
Netduino - Getting Started with steppermotors, shieldless In my previous post, I explained how I used the Adafruit motorshield to control a steppermotor. Real time control of a stepper motor using netduino and node.js.
Web/Internet of Things | Technology Topics. Internet of Things Platform Connecting Devices and Apps for Real-Time Control and Data Storage. Pistola AIRE CALIENTE - Soldar - Desoldar -