
Craftaholics Anonymous™ I work with a group of 8-11 year old girls at church.
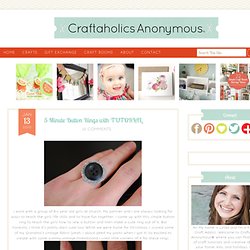
My partner and I are always looking for ways to teach the girls life skills and to have fun together. I came up with this simple button ring to teach the girls how to sew a button and then make a cute ring out of it. Rit Dye - StumbleUpon. Dyeing buttons and beads is fun and easy to do, enabling you to get the exact color you want whether using the buttons and beads on a coat, a pillow cover or in a necklace.

They also look beautiful in a vase as part of a flower arrangement, helping the flowers to stand tall. Most buttons and beads are made out of nylon and Rit is one of the few dyes that will color these materials (it also dyes wood buttons!). That means you can transform plain buttons and beads into colorful accents that match or coordinate with whatever you are making. Prep, dye and rinse time: 30 minutes You’ll Need White nylon-based plastic buttons or beadsRit Dye, liquid or powderMeasuring cupMeasuring spoonsPlastic containersSpoonRubber glovesPlastic table coverPaper towels Step by Step.
Simply Vintagegirl Blog & Blog Archive & Tutorial: How to Make... - StumbleUpon. 29 May 2010 These elegant fabric flowers are very simple to make . . . and only take a few basic supplies.
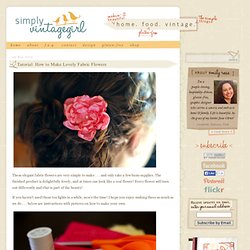
The finished product is delightfully lovely, and at times can look like a real flower! Every flower will turn out differently and that is part of the beauty! If you haven’t used those tea lights in a while, now’s the time! I hope you enjoy making these as much as we do . . . below are instructions with pictures on how to make your own. Supplies: · Synthetic Silky Fabric · Scissors · Candle (preferably a tea light) Additional supplies: · Needle and Thread, Glue Dots or Glue Gun · Buttons and/or Beads Directions: 1. Make the largest one’s diameter about half an inch larger than you want the diameter of the flower, as the petals will end up shrinking a bit. 2. You can also cut around the pattern and skip the drawing part, it just might not be as uniform . . . but with these, uniform isn’t necessary.
Perfect Summer Bangle. Here's a fun tutorial on how to make a message bangle that's one-of-a-kind, done in the sun, waterproof and weatherproof.

Even after several trips to the beach, it won't fade or wash off! Essentially, it's the Perfect Summer Bangle. Used in this tutorial: Inkodye Red Prepare. All you'll need for this project is a raw wooden bangle (we got ours from DIYBangles.com), a black paint marker, plastic wrap, and some Inkodye! Transcribe. Perfect. Pour. Braided Headband Tutorial.
It's chilly outside here today and I'm loving it!
I enjoyed every minute of reaching into the closet and pulling out soft cozy blankets, snuggling up on the couch with my blanket and laptop to check my e-mail this morning... Don't get me wrong, I'm not a fan of temps below 40 degrees, but a high of 65, I'll take it! Anyway.... on with the tutorial. Here is what we are making today! What you need- Thick hair tie Six 1" strips of fabric Bulldog clip or safety pin Sewing machine (or needle and thread) Fabric tac I ripped my fabric strips so they were a bit frayed on the edges, personal choice.
Tack each end of the braid just enough that it doesn't come undone . Then tack both braids together on each end, be careful not to twist the braids. Cut your hair tie so it's one strip of elastic. Sandwich your elastic ends between the ends of your braids on each end, again, careful not to twist the braids. Sew over the elastic so that it's secure. V and Co how to: jersey knit bracelet. I don't know what it is about this time of year that makes me just want to have my bare feet in the sand, be watching the sun setting into the ocean, and breathing in the warm salty air of the beach...as i get older, more and more i find myself missing that place i used to go to almost every.single.day. as a teen.

{macramé: half knot spiral} washer & wingnut bracelet. By Kate on October 25, 2011 Hello there!

I finally got around to posting after a hectic few weeks. I’ve been working on a big project which is all done and dusted now so I will be making more frequent updates between now and Christmas…phew! I sincerely wish there were more hours in the day! I’m hoping to post another Halloween craft in the next day or so. It’s comprised of a’half knot spiral’ (and is even easier than the square knot bracelet I showed you previously).
A few people left comments about the last bracelet saying it looked like it may take too long to make. By the way thanks to all you lovely people who ‘liked’ my facebook page. Full tutorial after the jump! How-to.