Crochet Projects & Resources. How to make a magic ring in crochet [video] Link easily to this tutorial in your patterns: www.planetjune.com/magicring My magic ring tutorial seems to have become pretty much the definitive photo guide that people link to in their crochet patterns, but it’s not enough for everyone.
![how to make a magic ring in crochet [video]](http://cdn.pearltrees.com/s/pic/th/planetjune-gilbank-crochet-42947038)
It’s taken a while, but the much-requested magic ring video tutorial is finally ready. Now, I know that 99% of my regular readers probably already know how to make a magic ring, but it may be worth your time to watch my video anyway – I have a special little tip that makes the technique much easier! If you’re new to crochet, let me explain that the magic ring (also known as an adjustable ring) is an essential technique for crocheting in the round when you want to avoid the hole in the middle that you see when you start with a slip knot and chain and work into the chain.
Wanna make a monster? * UPDATE to this pattern!
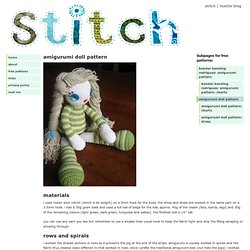
See below! * Time for another tutorial! I made this lineup of baby monsters for my Basic Amigurumi class at The Knitting Nest. Free Animal Crochet Pattern Link Directory. Super easy. Amigurumi Dolls, Free Amigurumi Crochet Patterns & More - Craftster. Free Crochet Pattern 70594AD Amigurumi Guy. Free Crochet Pattern 70594AD Amigurumi Guy. Stitch » amigurumi doll pattern. Amigurumi doll pattern materials i used rowan wool cotton (which is dk weight) on a 3mm hook for the body. the dress and shoes are worked in the same yarn on a 3.5mm hook. i had 6 50g gram balls and used a full ball of beige for the hair, approx. 40g of the cream (face, hands, legs) and 30g of the remaining colours (light green, dark green, turquoise and yellow). the finished doll is 14″ tall. you can use any yarn you like but remember to use a smaller than usual hook to keep the fabric tight and stop the filling escaping or showing through.
Free Amigurumi Crochet Patterns with love for the Nerdy » » Amigurumi Kirby with Pattern and Bonus Smash Brothers hats! Kirby Amigurumi Pattern My Kirby pattern has been a long time coming, mainly because I got too ambitious with Super Smash Brothers versions to finish and post it.
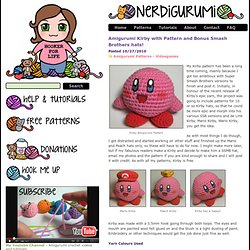
Initially, in honour of the recent release of Kirby’s epic yarn, the project was going to include patterns for 10 or so Kirby hats, so that he could be more epic and morph into his various SSB versions and be Link Kirby, Mario Kirby, Wario Kirby, you get the idea. As with most things I do though, I got distracted and started working on other stuff and finished up the Mario and Peach hats only, so these will have to do for now.
Hook and Needles: Knitting and Crochet Blog (cool stuff, techniques, and things I find) Hook and Needles: Knitting and Crochet Blog (cool stuff, techniques, and things I find) In part 1 of the Amigurumi Tutorial I showed some of the basic crochet techniques needed to make an amigurumi.
In part 2, I’ll go over amigurumi patterns and how to read them. There are three basic kinds of patterns for amigurumi: Regular patterns: much like knitting patterns, they explain what to do in each row. These patterns are easier for beginners. Most patterns are written in this manner. Hook and Needles: Knitting and Crochet Blog (cool stuff, techniques, and things I find) In the first amigurumi tutorial I went over the basic crochet techniques needed to make amigurumis.

In the second installment, I explained the most common types of patterns, and how to read them. In this final amigurumi tutorial I’ll cover some additional techniques often used when making amigurumis. Other Crochet Stitches Although most amigurumis are made with the single crochet stitch shown in the first tutorial, you are often required to use other stitches to shape your doll. The following is not an inclusive list (for that go to Nexstitch’s crochet video tutorials), but simply some of the stitches that you are likely to encounter when crocheting amigurumis. Slip Stitch (sl st) The Magic Adjustable Ring: A Better Way to Begin Crochet in the Round. Invisible Decrease. Invisible Decrease Link easily to this tutorial in your patterns: www.planetjune.com/invdec If you’ve been making amigurumi, you may be lamenting the gap or bump that forms when you decrease.
The standard methods of decreasing are to sc2tog, which can leave a bit of a bump and a small gap, or to skip a stitch, which leaves an obvious gap. There has to be a better way… and there is! The invisible decrease really is as good as its name claims – it’s almost impossible to see, even if you know what you’re looking for. The invisible decrease method will probably take a few attempts to master, but, just like the magic ring, it’s one of those techniques that’s so good, you’ll wonder how you ever crocheted without it! March break fun with tater tots « genuine mudpie. It’s March Break!
Time for cartoons in the AM, all-day craft experiments, and luncheons with hot dogs and tater tots! Actually, my mom never bought us tater tots, and I don’t really eat them a lot as an adult. But I think there’s just something really cute and funny about tater tots. Well, the fact that they’re called tater tots. And they’re short and round.
It’s designed with a flat bottom too, so it doesn’t always need to be carried around – it can stand on its own like an independent little tot, on a desk or countertop or whatever. If you, too, would like to make a tot to carry around in your pocket, here’s what I did. I used: A bit of worsted weight yarn in yellow 3.5mm crochet hookStuffing (I used yarn ends)Two small black beads for eyesEmbroidery thread and needle for mouth Edit 08/29/11: Row 1 is to achieve an oval base by working sc’s into both sides of the beginning ch. Complete row with sl st in the first sc of round. Completed row 1 (an oval base): Sew on eyes and mouth. Piña! Colada! « genuine mudpie. Finally getting around to post the pattern for Piña Colada :D They’re about 3 inches tall, and I’ve attached magnets on the back for mine.
This is not a complicated pattern, but it has many parts to it, and I apologize in advance if there’s any mistake – please let me know if you see any! Your feedback is greatly appreciated :) Free Crochet Pattern FunkyBunny Mr Funky Bunny In A Dress. Free Crochet Pattern 70587AD Amigurumi Panda. Free Crochet Pattern 80018AD Amigurumi Heartfelt Bunny. Free Crochet Pattern 80019AD Amigurumi Heartfelt Bear. Free Crochet Pattern 70590AD Amigurumi Mouse. Free Crochet Pattern 81012AD Amigurumi Penguin. Free Crochet Pattern 80444AD Felted Siamese Cat. Free Crochet Pattern 60480A Best Bunny. Free Crochet Pattern justGifts Scott The Bear. Zequi the bear :) You will need:Little amounts of brown and cream worsted weight yarnA little piece of brown felt for nose (optional)Plastic eyes with safety backings (optional)Brown embroidery floss, tapestry needleSize F/5 (4 mm) crochet hookFiberfill or stuffing of your choice Finished measurements:Zequi’s height is approx 5.5 inches.
Abbreviations:ch = chaindec = decreasehdc = half double crochet (UK: htr half treble)R = roundsc = single crochet (UK: dc double crochet)sl st = slip st (UK: sc single crochet)st(s) = stitch(es)* = repeat directions between * * as many times as indicated Muzzle:R1– Ch 2, 6 sc in second chain from hookR2- 2 sc in each sc around (12 sts)R3- *1 sc, 2 sc in next sc*, repeat 6 times (18 sts)R4 to R6- Sc 18.Bind off leaving long tail for sewing.Cut a triangular piece of felt and sew to top of big nose/mouth piece, embroider mouth like in the picture. Stitch » amigurumi doll pattern. Baby Chick Amigurumi. Remember Jenny And Teddy Etsy shop that I mentioned in my How-To Amigurumi tutorial? Jane, the girl behind the shop who sells amigurumi patterns and the finished dolls is here to teach us how to amigurumi a little cutie baby chicky. I heart it when Jane showed me the photo and can’t wait to share this easy pattern that she specially designed for Craft Passion with you.
She used light weight acrylic yarn with a matching 1.25mm hook size to make this 3- 3 1/2″ little baby chick. You can always substitute with other yarn and a matching hook size (read here on how to choose a correct hook size for amigurumi). Jane has a personal blog under the same name “JennyAndTeddy” where she journals the amigurumi tips together with her amigurumi designing journey. Besides, Jane is so generous that she is going to giveaway one her finished doll : Lady Bug Sofia, designed and made by herself. Baby Chicky Amigurumi Crochet Pattern by jennyandteddy. Head: make 1 piece with your choice of yarn color. Koala Bear Amigurumi. I found a Koala Amigurumi Pattern in the Woman’s Day website and I have some off-white and gray organic cotton yarns on hand, so I made a pair of these small little stuffed koalas for my kids in reverse color.
Some ideas to make it differently: 1. This adorable little koala is about 3-5″ tall only (depend on your yarn and the matching hook size), install a key ring on it’s head and turn it into a key chain, hang it to the bag’s zipper. 2. If we sew the limbs closer to the center of the body and insert 4 small strong magnets to the tip of each limb, you can make it “huggy” and hug on a tree branch or at the edge of your curtain or your pencil, ruler etc… 3.