
Travel Duffel by StudioCherie. Fantastic & easy to follow pattern !

June 22, 2013 tropicals1396629 I absolutely loved making this bag, The pattern was very clear and easy to follow step by step. I love my finished product! I can't wait to show it off to everyone. Reducing Large Tees. Craftster tutorial. Upcycled Tie Statement Necklace {Repurposed. Circle Zip Earbud Pouch Tutorial. I use a little zippered pouch to carry around my earbuds since they are the fancy microphone ones and I don’t want them to break or get tangled.
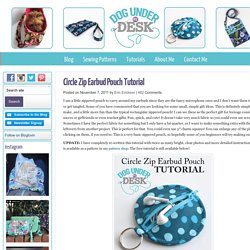
Some of you have commented that you are looking for some small, simple gift ideas. This is definitely simple to make, and a little more fun than the typical rectangular zippered pouch! I can see these as the perfect gift for teenage cousins or nieces or girlfriends or even teacher gifts. Fun, quick, and cute! It doesn’t take very much fabric so you could even use scraps! UPDATE: I have completely re-written this tutorial with twice as many bright, clear photos and more detailed instructions and it is available as a pattern in my pattern shop.
First, download the pattern template HERE. Cut from main fabric: 1 circle 2 half circles 1 tab. Simple Bow Tie Top. I'm so happy about how this turned out.
This is one of those projects that's been on my to do list forever and now that I finally got it done, I wish I had done it a long time ago. This is such a simple project. One of the easiest I've ever made. Don't have much sewing experience? Give this a go, I promise it's a piece of cake and any mistakes made are hardly noticeable because of the gather. Materials: 5/6 + yard knit & 1/3 yard silk, cotton, etc. Petite Purls - Fall 2010. 4” (10 cm) wide x 4 ½” (11.5 cm) deep.

Linen (shown: natural) 1 rectangle measuring 5 ¾" x 10 ¼" (14.5 x 26 cm) for the shell Various cotton 1 rectangle measuring 5 ¾" x 2" (14.5 x 5 cm) for the front band 2 rectangles, each measuring 6 ¼" x 2" (16 x 5 cm) for the frame casing 1 rectangle measuring 5 ¾" x 10 ¼" (14.5 x 26 cm) for the lining Fusible Fleece 1 rectangle measuring 5 ¾" x 10 ¼" (14.5 x 26 cm) 4" (10 cm) purse flex frame 1 large cover button for decoration Hera marker Note: All seam allowances are 1/4” (6 mm) unless otherwise indicated.
Step 1: Fuse the fleece to the linen piece per the manufacturers instructions. Step 2: On the front band piece, fold over the long sides by ¼" (6 mm), toward the wrong side, and press; set aside. Step 3: Place the linen shell flat in front of you so that the short edges are at the top and bottom and the long edges are to the side. Step 5: Topstitch the cotton strip to the other layers along both folded edges, 1/8” (3 mm) from the edge; set aside. Pleated Zippered Pouch Tutorial. This pleated pouch tutorial shows you how to make the perfect home made gift.
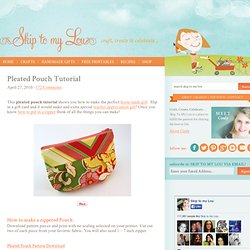
Slip in a gift card and it would make and extra special teacher appreciation gift! Once you know how to put in a zipper think of all the things you can make! Download pattern pieces and print with no scaling selected on your printer. Cut out two of each piece from your favorite fabric. You will also need 1 – 7 inch zipper. Pleated Pouch Pattern Download Mark fabric from pattern where it should be pleated. Place outer top piece face down on pleated piece, line up edges and stitch across 1/4 inch from the edge. Make a zipper sandwich. With a zipper foot sew across the top between the edge of your zipper sandwich and the zipper teeth (closer to the zipper feet). Bring lining and outer fabric to the same side. Make another zipper sandwich on the other side of the zipper. Open up and it will look like this. Bring both pieces of lining to one side and both pieces of the outer fabric to the other side.