
DIY Cutlery Holder from Tin Cans and Wood - Creative Ideas. Animal Shaped Pottery. Marta Turowska is the creative mind behind these cute whimsical pottery creations, aka Clay Opera.

She creates pottery mostly, but not only. Also sculptures and actually everything that is possible from clay and glaze. From sinks and tiles, to the jewellery, plates and many more. Based in Warsaw, Poland, her ceramic bowls and plates resemble different kinds of animals—cats, hedgehogs, whales and others – whith astonishing simplicity.
Faceted Wood Light Shades. These simple, modern light shades are a great way to start out working with wood if you’ve never tried it.
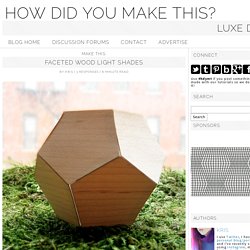
They require no power tools or specialized equipment and can be made in an afternoon or two. Wood veneer is simply very thin wood – about 1/40th of an inch thick. It’s an efficient way to use a tree and it can be found in all sorts of beautiful grains. Most of the time you can cut it with the same kinds of tools you would use for things like card stock and illustration board. *Important Safety Information* These are made from wood and paper. If you wish to avoid any fire risk completely you can add a bottom to it and use it as a container! Materials and Equipment - Wood veneer – you want a standard, thin, NOT paper backed wood veneer in any species you prefer, this is maple.
. - Paper – a block printing or mulberry paper is a good choice for this. . - “Yes!” - Scissors, Utility Knife and a Cutting Mat – for cutting paper and veneer. - Brush – for applying the glue. Cut 5 pieces from paper. Paper Crafting. Set of 3 Himmeli Prism Tree Geometric Sculpture by HRUSKAA. Personalised Prints Chopping Boards by SoakStudio. Design Belysning AS - Bloomingville Blank Kobber Pendel - Bloomingville - Produsenter. Słoik z muszelką, mały - North&South Home. Vintage Marquee DIY. This series of Movie Night Posts is sponsored by Skinny Cow.
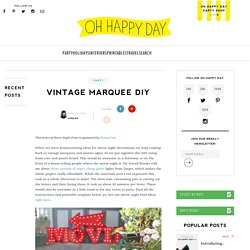
When we were brainstorming ideas for movie night decorations we kept coming back to vintage marquees and movies signs. So we put together this DIY using foam core and poster board. This would be awesome in a driveway or on the front of a house telling people where the movie night is. My friend Brooke told me about these strands of super cheap globe lights from Target, which makes the whole project really affordable.
While the materials aren’t too expensive this took us a whole afternoon to make. Complete instructions and dowload are after the jump. Materials Needed: 1/8″ Foamcore, Box Cutter and Exacto, Poster Board, Free Printable template (download here), scotch tape, packing tape, ruler, string of lights (take the box apart for the circle template), spray paint. Step 1: Download the free template It has the word “MOVIE” and an arrow. I love clay - an album on Flickr. Concrete spoon rest lid sealed concrete salt sugar by kreteware. Balsa Wood Diamond Ornament.
Hey, it's Laura again!

I don't know about you, but I love seeing all the cool 3D things people create with paper. There are tons of clever little boxes and animals you can make, but I got extra excited when I discovered all the gemstone templates that exist online. Make my own diamonds?! Yes please. My Scandinavian Christmas Day 4. Day 4 of My Scandinavian Christmas is by Pinja of Pinjacolada based out of Helsinki, Finland.

Pinja has a wonderful blog showcasing her beautiful photography and fantastic DIYs complete with touches of bright colors and bold patterns. This year I wanted to make a piece of Christmas decoration Inspired by the Finnish traditional Himmeli, which is an ornament made of straw and is hung form the ceiling at Christmas time. I wanted to keep it natural and simple by using the straw and wooden beads that I decorated with a little bit of white paint. The ornament hangs now on our tiny Christmas three but after Christmas it could still stay around somewhere in the house. p.s. Make a DIY Modern Wooden Christmas Tree Set. Curbly-Original Things are starting to get real festive around these parts!

If you're looking for some fun tabletop trees that lean a bit towards the modern side, I've got just the project for you! These wooden trees are super easy to make and can be left plain or customized to your heart's content. How To: String Art Christmas Tree & Card Display. This is a sponsored post for 3M via Digital Parents Collective.
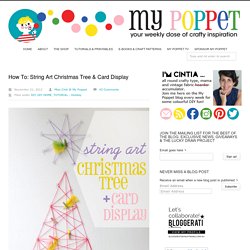
As always, projects and opinions are my own. Receiving a Christmas card in the mail these days is quite a treat, so why not display them beautifully on this colourful String Art Christmas Tree. I’ve always loved the idea of string art, but making holes in my walls for a temporary project is not ideal. That’s where 3M Clear hooks are perfect, they stick to most surfaces, then come off cleanly. When the box arrived with the full range I couldn’t wait to get started. Geometric straw ornament tutorial. Geometric straw ornament tutorial December 2nd, 2010.
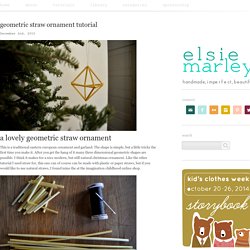
Pas à pas : Suspensions de Noël en Origami. DIY: ferm living inspired diamond. Schon lange schaue ich mir die tollen Stabwerke von Ferm Living an und war einmal schon kurz davor, mir einen solchen Aufbewahrungskorb zu kaufen.
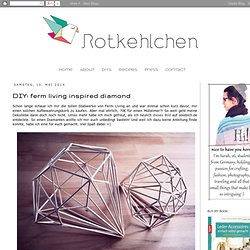
Aber mal ehrlich, 70€ für einen Mülleimer?! Domek drewniany w kolorze szarym - North&South Home. Wieszak POROŻE, rozmiar M - North&South Home. The Figurines.
2012 – March. Today’s DIY project created by the lovely Belinda of MoonmuM.
Belinda makes amazing paper based products Paperwork for me is the most dull thing EVER. I truly dislike it and avoid it at all costs, which isn’t so great when running a small business. I do, however, love pretty stationery. Nomon. Rotkehlchen: DIY: Origami Wood Engraving. Irgendwie bin ich heute extrem unkreativ, was das Schreiben eines schönen Einleitungsabsatzes angeht. Nach 15 Minuten Überlegen habe ich es jetzt aufgegeben und schreibe einfach nur, dass ich euch heute ein neues kleines DIY-Projekt zeige, das seit ein paar Wochen in meinem Kopf herumgeistert und heute endlich zur Umsetzung gekommen ist: Bilderrahmen bestückt mit Balsaholztafeln (schon wieder Balsaholz, ich weiß!)