
Welcome. Projects. Fixing Linux firmware issues on Arduino Mega 2560. Early adopters of the new Arduino UNO and Arduino Mega 2560 using the Linux operating system seemed to have a number of bizarre issues with the serial port connectivity.
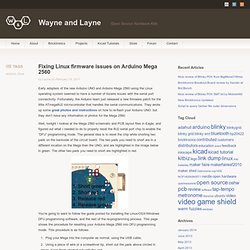
Fortunately, the Arduino team just released a new firmware patch for the little ATmega8U2 microcontroller that handles the serial communications. They wrote up some great photos and instructions on how to re-flash your Arduino UNO. but they don’t have any information or photos for the Mega 2560. Well, tonight I looked at the Mega 2560 schematic and PCB layout files in Eagle, and figured out what I needed to do to properly reset the 8U2 serial port chip to enable the “DFU” programming mode.
The general idea is to reset the chip while shorting two pads on the backside of the circuit board. The two pads you need to short are in a different location on the Mega than the UNO, and are highlighted in the image below in green. Now, if you check in your Arduino menu, the board’s serial port should no longer show up in the menu. Playground - 2B. Python 2B 2B is a simple protocol used to receive and send messages to Arduino, it provides a convenient method to use the device in conjunction with a PC It uses a two ASCII chars based protocol to represent port address and value.For example, to set port 11 to 65 (pwm port), the first char will be "VT"(vertical tab) and the second one "A". see extended version of ASCII tableIn this way, the analog ports had been limited to 255 values.
Any sign of 127 to 255 in ASCII table will correspond to the sign by the table as: Windows 1251 (Cyrillic), ISO 8859-7 or Windows 1252 (Latins). The protocol uses two separate one way channels to set and read device ports. With this protocol, you can treat it as a post processor Arduino through RS232. Playground - Python. Arduino and Python Talking to Arduino over a serial interface is pretty trivial in Python.

On Unix-like systems you can read and write to the serial device as if it were a file, but there is also a wrapper library called pySerial that works well across all operating systems. After installing pySerial, reading data from Arduino is straightforward: >>> import serial >>> ser = serial.Serial('/dev/tty.usbserial', 9600) >>> while True: ... print ser.readline() '1 Hello world! \r\n' '2 Hello world! Writing data to Arduino is easy too (the following applies to Python 2.x): >>> import serial # if you have not already done so >>> ser = serial.Serial('/dev/tty.usbserial', 9600) >>> ser.write('5') In Python 3.x the strings are Unicode by default.
>>> ser.write(b'5') # prefix b is required for Python 3.x, optional for Python 2.x Note that you will need to connect to the same device that you connect to from within the Arduino development environment. Complete Numpties Guide to Arduino on Ubuntu 32 & 64 bit. Big on Pictures, low on words, apologies to those without a decent internet connection.
This is a blow by blow walkthrough on installing the latest official Arduino IDE on Ubuntu 10.10. Do not use the one in the repositories especially if you have a later Arduino (Uno or Mega2560) as its out of date and does not work with these later boards. This is a newly installed,all default options, fully updated Ubuntu 10.10 32bit running on a 10 year old heap of junk. (650 Mhz AMD Duron, 256Mb of Ram, 20Gb HDD) It ran Windows XP like a slug on Valium, its not exactly greased lightning running Ubuntu but it borders on usable. Since I first produced this, I have confirmed that the same process works for 64 bit Ubuntu 10.10 with the 64 bit Linux Arduino IDEs This works on a new install, it may not if it has a lot of stuff already added to it,especially if you've been messing around with the repository version or trying to do installs involving root (sudo).
On with the plot. And again : Success !! [PoBot] Schéma et circuits électroniques avec Fritzing. Les étapes pour concevoir un circuit imprimé sont généralement : le schéma électrique de principe la sélection des composants réels le dessin du circuit imprimé Nous allons présenter dans cet article l’utilisation de Fritzing, un outil de conception innovant qui propose une nouvelle première étape : la visualisation des composants réels comme sur une platine d’essai.
![[PoBot] Schéma et circuits électroniques avec Fritzing](http://cdn.pearltrees.com/s/pic/th/circuits-electroniques-11523120)
Installation J’ai essayé plusieurs versions au fil de l’année écoulée, avec plus ou moins de succès, donc je conseille de vérifier régulièrement la dernière version disponible. Le lien de téléchargement est disponible sur Vous y découvrirez une vidéo en anglais : Ils présentent clairement cet outil comme destiné "aux artistes et aux hackers" (au sens bricoleur). La dernière version que j’ai testée est la v0.3.12b du 26 novembre 2009. Circuit des composants Le premier contact est très sympa car l’interface reconnait la langue du système d’exploitation et propose un résumé en français.
Le schéma.