
...love Maegan: * Leather Lanyard Bracelet Maeg-it Yourself * Fashion+Home+Lifestyle. If you went to Summer Camp as a kid, you’ll totally remember making lanyard keychains with that brightly colored plastic lace {I had tons of them!}
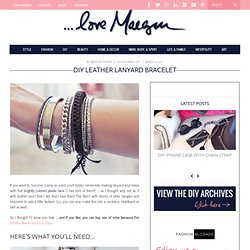
…so I thought, why not do it with leather lace? And I did. And I love them! Pair them with stacks of other bangles and bracelets to add a little texture! {p.s. you can also make this into a necklace, headband or belt as well} So I thought I’d show you how …and if you like, you can buy one of mine because I’ve listed a few in my Etsy shop. Here’s What You’ll Need… * Leather lace * Chain * Clasp * Needle nose pliers/Scissors NOTE: There are tons of lanyard making videos on youtube if these instructions are a bit confusing!
Steps… * Cut 2 strips of leather lace. . * To begin, find the middle of one of your laces and wrap it twice around your finger. . * To secure the end knot, leave your last box stitch loose then with each lace, loop around your nearest loop/under/up through the center …all the way around. Voila! Have Fun! Find all my DIYs here! {macramé: half knot spiral} washer & wingnut bracelet. By Kate on October 25, 2011 Hello there!

I finally got around to posting after a hectic few weeks. I’ve been working on a big project which is all done and dusted now so I will be making more frequent updates between now and Christmas…phew! I sincerely wish there were more hours in the day! I’m hoping to post another Halloween craft in the next day or so. It’s comprised of a’half knot spiral’ (and is even easier than the square knot bracelet I showed you previously). A few people left comments about the last bracelet saying it looked like it may take too long to make. By the way thanks to all you lovely people who ‘liked’ my facebook page. Full tutorial after the jump! How-to Please note: I have used different colored cord in the tutorial so that it’s easier for you to figure out whats going on! 1. 2. 3. Note: You fasten this bracelet as you would a friendship bracelet. DIY Friendship Bracelet. For several months now, we’ve been receiving emails requesting a friendship bracelet DIY.
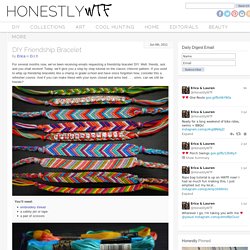
Well, friends, ask and you shall receive! Today, we’ll give you a step by step tutorial on the classic chevron pattern. If you used to whip up friendship bracelets like a champ in grade school and have since forgotten how, consider this a refresher course. And if you can make these with your eyes closed and arms tied . . . umm, can we still be friends? You’ll need:embroidery threada safety pin or tapea pair of scissors Start by cutting several strands of embroidery thread at about 24 inches each. Start on the left side with the outermost color (shown here in red) and make a forward knot by creating a 4-shape over the 2nd color, loop it under and back through the opening.
Pull up and to the right to tighten. Now pick up the outermost color on the right side (show here in red) and make a backward knot, creating a reverse 4-shape over the 2nd color, loop it under and back through the opening. Perfect Summer Bangle. Here's a fun tutorial on how to make a message bangle that's one-of-a-kind, done in the sun, waterproof and weatherproof.

Even after several trips to the beach, it won't fade or wash off! Essentially, it's the Perfect Summer Bangle. Used in this tutorial: Inkodye Red Prepare. All you'll need for this project is a raw wooden bangle (we got ours from DIYBangles.com), a black paint marker, plastic wrap, and some Inkodye! Transcribe. Perfect. Pour. Brush. Wipe. Wrap. Tape.