
She's Crafty: DIY Multi-Chain & Ribbon Necklace. Due to the resounding success of her last She’s Crafty, my friend Pandora from Accessory Source is back with another lovely necklace DIY tutorial that would make a fantastic christmas present for a friend or relative!
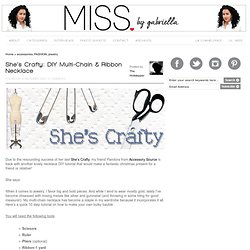
She says: When it comes to jewelry, I favor big and bold pieces. And while I tend to wear mostly gold, lately I’ve become obsessed with mixing metals like silver and gunmetal (and throwing in some bling for good measure!). My multi-chain necklace has become a staple in my wardrobe because it incorporates it all. Here’s a quick 10 step tutorial on how to make your own bulky bauble. You will need the following tools: ScissorsRulerPliers (optional)Ribbon-1 yardTwo jump rings (the size of a nickel). Supplies I chose a mix of metals in various colors and sizes and a few strands with rhinestones.
All of my materials were purchased at Toho Shoji. Cut your first strand of chain to 12 inches Step 1: Cut your first strand 12 inches long. Holder for Charging Cell Phone (made from lotion bottle) My husband and I both have cell phones.

And both of us have phone chargers. And that means lots of obnoxious cords. You never know when one of us may be moving phone cords around, to give our phones an extra charge while we’re chatting away……… or trying to charge our phones up before running errands or something. Needless to say, those phone cords seem to be everywhere…..and are generally in the way and hanging all over the floor.
(Okay, and how about when you’re in a hotel or visiting family/friends. I was looking around on the internet for a solution and found this. It made the perfect little holder for my cell phone while it’s being charged. Holder for Charging Cell Phone And no more phone hanging down from the outlet while in this room or that room……..the cord and phone are now up off the ground, and tucked away into the little holder, while the phone drinks up a full charge.
If you look closely, you can see that the orange print is fabric. And turns out, it’s pretty useful. How To Style Lace Braids. After the wedding I got tons of questions about styling braids with lace and styling beehives (as seen on Rachel's hair here).

Here is part one... the braids! Lace braids are so fun and easy to wear. They are perfect for Spring/Summer and can be styled casual or dressy! Here's how I do it... 1. Cute as can be! A second styling option is to pin them up and wear them as pretty buns. PS. How To Style a Beehive. I'm so excited to share this hair tutorial!

Beehives can be intimidating, but they are actually pretty simple to style when you have the right supplies. The first time I tried this technique was in this video shoot and I've been a believer ever since. Here's what you'll need: A bath loofa (any color), A piece of fabric that matches your hair color (just large enough to cover your loofa), a rubber band, bobby pins and hair spray (I use Got2b Glued Step 1: Cover a bath loofa in a solid fabric that matches your hair color.
Step 2: Pull one small section of hair forward (leave unteased). Step 3: Add the loofa to your hair. Step 4: Pull pieces from the sides of the hair back to cover the sides of the bump. Step 5: Choose to pull the back of the hair up or leave it down (a la Amy Whinehouse). A few tips: If you have shorter hair use just the fabric (tied in a big knot/ball) and skip the loofa. Enjoy your new beehive! XO. How To Style a Fishtail Braid.
We love the look of fishtail braids!

This trend is incredibly easy to style, even on your own hair. Kinsey and I photographed the steps so you can try it out for yourself... Here's how to style a fishtail braid... 1. Part your hair into two even sections. 2. Take a small strand of hair (preferably from underneath so that it wraps around the entire seciton) from one section and bring it over to the other side. Next, we had a crazy idea... weave pieces of yarn into the braid? 1. We thought it was pretty cute!