Www.abeautifulmess.com/2011/11/modern-wall-art-with-paint-swatches.html. Looking for a way to fill that blank wall but don't have permission to paint?
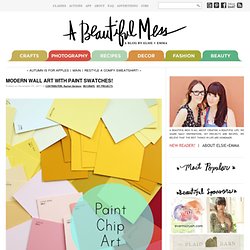
All you need is a trip to a major hardware store and an afternoon in front of a good movie to take care of that little dilemma. Supplies Needed: Large frame with paper insert, a ton of pretty paint chips, double-sided tape squares, and vinyl letters appropriate to the size of your frame or phrase (4" - 6"). I went with a color scheme that involved a variety of tones from some of my favorite colors. It's basically a muted rainbow with plenty of lighter shades to keep things from getting too busy. 1. 3. Paint chip art is a great option for renters looking to fill a big space without spending a small fortune! Hanging String Balls. Whattya need?
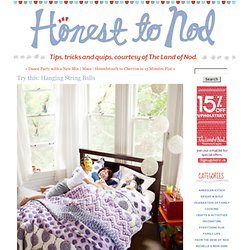
BalloonStringScissorsGlueJar How do I make glue string balls? Step 1: Hang inflated balloon from ceiling. Step 2: Put string and glue in the jar with a hole in the lid. Next, pull string from hole while wrapping around the balloon. Step 3: Wait until dry (try to contain yourself). Created by Dane Holweger. Paint chip calendar. A few weeks ago, I saw this paint chip calendar on my friend David’s blog Cheltenham Road and knew I had to make one!
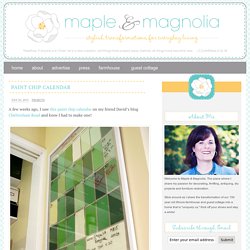
It combines two things that I love…stylishness and organization. And the fact that it utilizes paint chips? Even better. I mostly followed David’s tutorial with just a few modifications. That’s the beauty of this project…it’s totally customizable. Since I planned for this calendar to hang in my office, I chose paint chips that would coordinate with the room and with the pin board that hangs on the adjacent wall. Here’s my version. DIY storybook paper roses. DIY storybook paper roses You’re going to love today’s DIY project so much that you’re going to want to start tearing pages out from old books tonight!
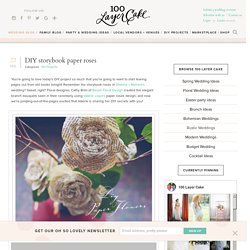
Remember the storybook roses in Shanna + Richard’s wedding? Sweet, right? Floral designer, Cathy Brim of Bloom Floral Design created the elegant branch bouquets seen in their ceremony using Valerie Lloyd’s paper roses design, and now we’re jumping-out-of-the-pages excited that Valerie is sharing her DIY secrets with you! <img class="alignnone size-full wp-image-17711" title="diy-paper-flowers-1" src="<a pearltreesdevid="PTD650" rel="nofollow" href=" class="vglnk"><span pearltreesdevid="PTD651">http</span><span pearltreesdevid="PTD653">://</span><span pearltreesdevid="PTD655">www</span><span pearltreesdevid="PTD657">.
Craft Supplies:Paper Grosgrain Ribbon, ½ Width cut to 4 inch lengths 16 Gauge Wire cut to 15 inch lengths Glue Gun Glue Sticks (low temp) Scissors Wire Cutters Step 1: Gather materials. Step 2: Cutting. Step 3: Shaping. Leather Lanyard Bracelet Maeg-it Yourself & THE YESSTYLIST. Okay, not the best shot of the bracelet, but I couldn’t resist!
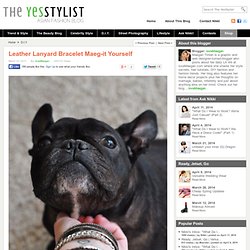
If you went to summer camp as a kid, you’ll totally remember making lanyard keychains with that brightly colored plastic lace {I had tons of them!} .So I thought, why not do it with leather laces? And I did. And I love them!