
How to Make Marshmallow Fondant. This time I decided to make it with those mini fruit flavored marshmallows.

I had to sort them by colour first. I figured they would add a little bit of flavor to the fondant so I wouldn't have to add much flavoring oil. I use gel colours to dye my fondant but regular food colouring will work too. You won't be able to get really dark colours without making your fondant sticky, but for lighter colours you can just even it out with more icing sugar. I also had lemon oil and coconut flavoring on hand.. oh la la the value brand (which still works fine). Step One: Take a couple of handfuls of marshmallows and put them in a microwave safe bowl.
I like to make smaller batches because its easier to add the colour to the melted marshmallow than it is to work the colour into the fondant later. Step Two: Stick the marshmallows in the microwave for ten seconds at a time until the are puffed up and easily stir into a goo with a wooden spoon. Step Three: Step Four: Fondant with the icing sugar kneaded in. These are cakes? Great examples of creative bakery. At the Highland Bakery in Atlanta GA these amazingly detailed cakes are made by Karen Portaleo.
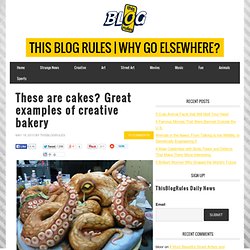
She got inspiration to be a cake decorator one day when she noticed that the cakes in her friend’s bakery didn’t have any creations. With a background in clay sculpturing she taught herself how to create spectacular decorations for cakes. Portaelo has made cakes that look like a giant octopus, Darth Vader, a rhino and many other. Speaking of being creative with food, check out how food can be transformed into landscapes for tiny human figures. Blame The Moon: March 2009. Oh man, this was a really, really bad week. And you know it must be bad, because I'm usually not so text-happy here on my "Blame the Moon" blog. First off, my left hand is killing me. Too much squeezing of the piping bag can lead to a very sore, swollen hand. I thought it would go away, but it's getting worse. I tried to just use my right hand, but I'm definately a lefty, and my right-handed piping attempt looked pretty darn bad.
Also, for the last 2 months my husband have been in the process of trying to buy a house in Carlisle Township. But here's the worst of it...... I have a degree in Spanish Education, but I originally started off as an Art major. Years later I knew there was an artistic void in my life where I had desperatly missed creating. I also started this blog as a personal way to log my art projects, to display them to a public audience (though at first just my mom and dad were reading this---but still!).
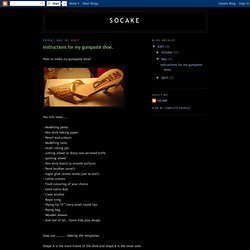
How to Make a Gumpaste High Heel Shoe. Begin with a small 1"- 1-1/2" ball of firm gumpaste.
Start pulling a cord from one end of the ball until you get the desired length of your heel. Using the guide below, find a design for the type of heel you want to make. Using your hands, form heel to desired size and height. I usually form a 2 – 2 ½ inch heel. Then place the ball end of your heel on the board and flatten. Once it is formed, insert a tootpick or thin skewer through the heel leaving some of the skewer extending from both ends. Pushing the skewer into your styrofoam, Secure the heel in place upside down and allow to dry. Once dry, you will cut and attach your sole to the shoe. Kerry Vincent, in her book "Romantic Wedding Cakes", makes a form for her beautiful gumpaste shoes using an aluminum soda can. Shoe Cake. Instructions for my gumpaste shoe. How to make my gumpaste shoe!
You will need……. · Modelling paste· Non stick baking paper· Pencil and scissors· Modelling tools- small rolling pin- cutting wheel or sharp non-serrated knife- quilting wheel· Non stick board (a smooth surface)· Paint brushes (small)· Sugar glue (water works just as well)· Letter cutters· Food colouring of your choice· Gold lustre dust· Clear alcohol· Royal Icing· Piping tip “0” (very small round tip)· Piping bag· Wooden skewer· And last of all.. Some kids play dough. Step one ………...Making the templates.
Shape A is the main frame of the shoe and shape B is the inner sole. Shape C is the top of the shoe. Shapes D, E, F and G are thedecorations on the top of the shoe. Shape H is the tip of the heel. These templates are only a guide and should look like this when layed on top of each other. Step 2 ….Use the Kids play dough to make a drying platform. Lay a piece of non stick baking paper over the play dough so that the modelling paste and the play dough NEVER TOUCH. Studio Cake Design. Andi+Foster. Baby Diapers - Cookies! by antonia74 on CakeCentral. New armadillo cake. Little Bird Cake. Armadillo Cake. Big-cake1308.