
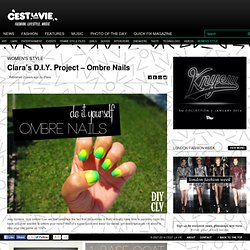
Tutorial: Easy Sponge Gradient. Happy Sunday! Today, I wanted to show you guys how I did the Tropical Gradient from earlier this week. It's very easy and I like that it has that seamless look. You'll need: -two or more polishes. Here, I've used Zoya Sooki and Zoya Arizona* -disposable cosmetic sponge wedges -nail polish remover and qtips for clean up Start out by painting your nails with your base coat and your base color. You might want to cut the sponges down to size, to make it easier to use. Bounce the sponge against your nail. When you're finished, apply your top coat and carefully clean up the skin around the nail with your polish remover and qtips. A few tips: -Creme finishes seem to work the best. Tutorials. Clara's D.I.Y. Project - Ombre Nails.
Hey hombre, nice ombre!
Can we just celebrate the fact that it’s summer & that I actually have time to paint my nails! 27 Nail Hacks For The Perfect DIY Manicure. Doll Me Up! Beaded Nails Tutorial. Beaded nails are quickly becoming the new "hot" mani which is awesome because it's so easy to do!
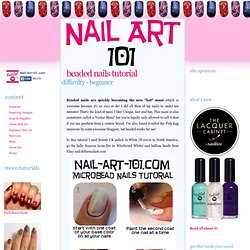
I did all then of my nails in under ten minutes! That's the kind of mani I like! Unique, fast and fun. This mani is also sometimes called a "Caviar Mani" but you're legally only allowed to call it that if you use products from a certain brand. I've also heard it called the Fish Egg manicure by some awesome bloggers, but beaded works for me! In this tutorial I used Beauty UK polish in White (If you're in North America, go for Sally Hansen Insta-Dri in Whirlwind White) and bullion beads from Ebay and dollarnailart.com Tips & Tricks Work over a folded piece of paper so it's easy to put the excess back into your container.I mixed three different colors of beads to get a pastel look. With top coat. Other bloggers doing the "Fish Egg" manicure (Linkup closed) Back to Tutorials Still have some questions?
Copyright 2012 Lisa Bailey © Nail-Art-101.comAll Rights Reserved. DIY Drippy Nails. We were immediately inspired the moment we saw bare nails with blood-like, drippy polish accompany Prabal Gurung‘s spring collection at New York Fashion Week.
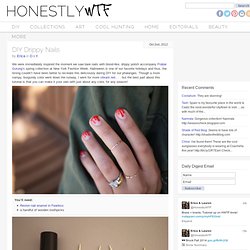
Halloween is one of our favorite holidays and thus, the timing couldn’t have been better to recreate this deliciously daring DIY for our phalanges. Though a more vampy, burgundy color went down the runway, I went for more vibrant red . . . but the best part about this tutorial is that you can make it your own with just about any color, for any season! You’ll need: Dip the toothpick into the nail polish bottle so that the tip collects a round bead of polish. Place the bead of polish on a bare nail and drag it upwards, creating a tapered line.
Create two to three more tapered lines, re-dipping the toothpick into the polish each time. Reload the toothpick with polish and drag a line across the tip of the nail. Repeat the steps on the other nine fingers and voila, you’re done!! (all images by HonestlyWTF) Useful tips on DIY nails. The Beauty Department: Your Daily Dose of Pretty. Photos + post design by Kristin Ess Who doesn’t love a soft, faded floral pattern?

Its because I think too much: Galactic Manicure. I loved how my glittery gradient mani turned out so much that I decided to do a variation on it, using the night sky as my inspiration!
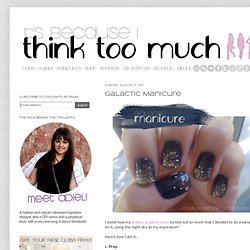
Here's how I did it: 1. Prep I grabbed deep navy, silver glitter, and gold glitter polish along with my favorite top coat. I also grabbed an orange stick and some nail art rhinestones. 2. 3. 4. 5. 6. 7. Beyond Pink Polish: A Rainbow of Nail Colors. LoveIt. Follow the Trend With Colorblocked Nails! Why not try it out on your nails instead?
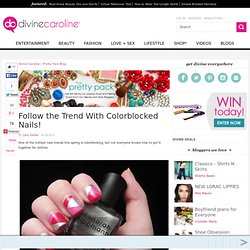
You can keep it simple within the same color family or go bold and crazy—whatever suits your mood! Step 1: Get Your Supplies Together To start, make sure you have all of your supplies handy. For this manicure, you will need three different nail polishes (make sure that at least two of them are thick enough that they can cover the base color), Scotch tape, and a fast-dry topcoat like Seche Vite. For this manicure, I used two colors from the new Minnie Mouse Collection by OPI, If You Moust You Moust and The Color of Minnie, along with my favorite silver nail polish, Stardust by Deborah Lippmann. Step 2: Paint a Base Color Start with your favorite basecoat and paint your nails the base color. Step 3: Start Taping Next, pull off a small piece of Scotch tape (you won’t need more than an inch at a time) and put it against your hand and pull it off several times until most of the stickiness is gone.
Step 4: Apply the Second Color. 12 Amazing DIY Nail Art Designs Using Scotch Tape.