
Shadow Box Photo Display for Photographers - StumbleUpon. Need help turning your post-vacation keepsake clutter into a divine display?
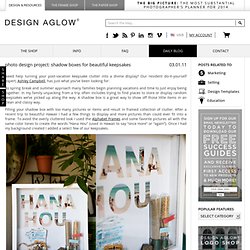
Our resident do-it-yourself expert, Ashley Campbell, has just what you’ve been looking for: As spring break and summer approach many families begin planning vacations and time to just enjoy being together. In my family unpacking from a trip often includes trying to find places to store or display random keepsakes we’ve picked up along the way. A shadow box is a great way to show off those little items in an clean and classy way. Filling your shadow box with too many pictures or items and result in framed collection of clutter. Supplies: 12×12 Shadow Box 12×12 print a select few of your keepsakes double sided tape craft supplies (clothespins, masking tape, decorative labels, hot glue gun, etc.) Step 1: Create your background using the Alphabet Frames templates. Step 2: Remove the label inside the shadow box and attach your 12×12 print using the double sided tape.
Bird and Text Collage Wall Art. [ Close Privacy Policy ] Privacy Policy / Your California Privacy Rights Revised and posted as of March 4, 2013 Prime Publishing, LLC ("Company," "we" or "us") reserves the right to revise this Privacy Policy at any time simply by posting such revision, so we encourage you to review it periodically.

In order to track any changes to this Privacy Policy, we will include a historical reference at the top of this document. This Privacy Policy will tell you, among other things: Your California privacy rights. ACKNOWLEDGEMENT/YOUR AGREEMENT Company websites are not intended for use by individuals under the age of 18 or those who are not legal residents of the United States. HOW DO WE COLLECT INFORMATION AND WHAT INFORMATION DO WE COLLECT?
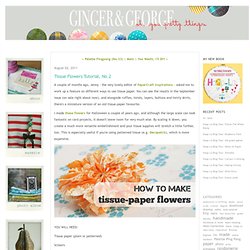
Distribution Partners Website operators that license our ad serving technology pass information to us so that we may serve advertisements to you. Website Registration Forms We collect information about you when you register on one of our websites. DIY tissue paper flower wedding centerpieces. I’ve been keeping this secret to myself for a little while know, but I am so excited to finally announce Anna Bond of Rifle Design is our newest DIY contributor.
I’ve been a huge fan of her amazing invitations for quite some time now, and when she accepted my invitation to create wedding projects for Once Wed I was of course thrilled. Anna will be joining us on Tuesdays which I’m sure will quickly become my favorite day of the week. Welcome, Anna! This centerpiece is based on one that I created for my own wedding. It’s easy to make and can be customized by using different colored tissue paper, patterned paper, fabric flowers, painted branches, and so on. -Anna, RIFLE design Supplies: 1. gallon size glass jar; 2. sheet moss; 3. found branches; 4. pom poms; 5. scissors; 6. tissue paper; 7. hot glue gun. Fill the bottom of each jar with moss and trim the branches to your desired shape. Create the paper flowers by layering the three sizes on top of each other and then: 1.
Online Resources: Tissue Flowers Tutorial, No.2 - gingerandgeorge - StumbleUpon. A couple of months ago, Jenny - the very lovely editor of PaperCraft Inspirations - asked me to work up a feature on different ways to use tissue paper.
You can see the results in the September issue (on sale right about now), and alongside ruffles, twists, layers, buttons and twirly skirts, there's a miniature version of an old tissue-paper favourite. I made these flowers for Halloween a couple of years ago, and although the large scale can look fantastic on card projects, it doesn't leave room for very much else. By scaling it down, you create a much more versatile embellishment and your tissue supplies will stretch a little further, too. This is especially useful if you're using patterned tissue (e.g. Decopatch), which is more expensive. Tissue paper (plain or patterned) Scissors Ruler Pencil Thin wire (e.g. fuse or jewellery wire) Small button or circle of card PVA glue Measure and cut out two strips of tissue paper, each around 20cm long and 5-6cm wide.