
Phung Dinh Dzung. Meats Meier Artist. Animata. Pixologic Release: ZBrush Learning Series - Modeling With Your Texture. Pixologic Release: ZBrush Learning Series - Texturing with Photoreference. Anatomy ZBrush. Maya - Making eyelid rig with driven keys and expressions. Here’s simple eye region model with eyeball. Goal for this tutorial is to make few blend shapes for 4 position of eye and drive that blend shapes automatically as eye ball rotating. Also on the end of tutorial we will learn how to make expressions and rig to control rotation of eye over translation of one nurbs circle.
First we need to make 4 blend shapes for all eyeball positions. For position where eye ball looking : up, down, left and right. Easiest way to do that is to use clusters. And than make a cluster : Create deformers / cluster. Now if you select object and go to edit deformers/paint cluster weights tool you’ll get black/whit feedback on model. First go to side view and select cluster. Now we need to paint influence nice to drive upper eyelid correctly. Tip : First pain in white just upper eye lid and in black all other parts.
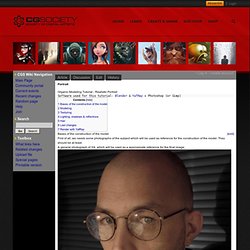
If you painted all nicely when you rotate cluster you should be able to close your eye like an blink. Now do the same procedure for lower eyelid. 1. 2. Senior Character Artist. Art of Toni Bratincevic. Portrait - CGWiki. Organic Modeling Tutorial - Realistic Portrait Software used for this tutorial: Blender & YafRay + Photoshop (or Gimp) Bases of the construction of the model First of all, we needs some photographs of the subject which will be used as reference for the construction of the model.

They should be at least: A general photograph of 3/4, which will be used as a approximate reference for the final image: Both a side and a front view, which will be used as backgrounds for modeling. A few notes about using an image as reference in a 3D view: It is possible to place an image or a blueprint as background in a 3D view with the Use Background image option. First of all, we will make an approximate 'template' from front and side view, using bezier curves. Bezier curves options: Click E (extrude) to duplicate a point. (You have to enable the option “3D” in the Curve and Surface panel to edit Bezier curves in 3D) A wireframe view of the final sketch: Modeling We are now going to start the modeling part. Hair. Realistic face modeling by PhungDinhDzung. By using our site, you consent to this privacy policy: This website allows third-party advertising companies for the purpose of reporting website traffic, statistics, advertisements, "click-throughs" and/or other activities to use Cookies and /or Web Beacons and other monitoring technologies to serve ads and to compile anonymous statistics about you when you visit this website.

Cookies are small text files stored on your local internet browser cache. A Web Beacon is an often-transparent graphic image, usually no larger than 1 pixel x 1 pixel that is placed on a Web site. Both are created for the main purpose of helping your browser process the special features of websites that use Cookies or Web Beacons.
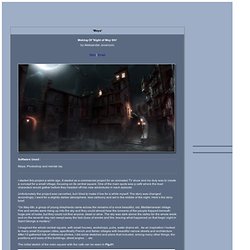
The gathered information about your visits to this and other websites are used by these third party companies in order to provide advertisements about goods and services of interest to you. Welcome to The Computer Graphics Society. Lighting Challenges. MAKING OF // NIGHT OF MAY 6TH // DRAGON VILLAGE SCENE. I started this project a while ago.

It started as a commercial project for an animated TV show and my duty was to create a concept for a small village, focusing on its central square. One of the main spots was a café where the lead characters would gather before they headed off into new adventures in each episode. Unfortunately the project was cancelled, but I tried to make it live for a while myself. The story was changed accordingly; I went for a slightly darker atmosphere, less cartoony and set in the middle of the night. Here’s the story brief: Homepage. Textures library. Welcome to Digital-Tutors. Tutorial ITA advanced Zbrush texturing part1. Itchy animation - illustration and tutorials by Richard Yot. Light: A very detailed article, in several sections.

Part 1: The basics Part 2: Light direction Part 3: Natural Light Part 4: Artificial and indoor light These articles are the basis of a book which is out in spring 2011. Digital inking: How to ink digitally and get good results (a little out of date now, but still useful) Good Wacom technique: How to avoid the shakes when drawing with the tablet One point perspective trick: How I did the floorboards in Rufus and Rex Three point perspective trick: Block models as a drawing aid Lighting in passes: A 3D technique applied to 2D. The Monster Makeover: A Photoshop painting tutorial, featuring overlay layers. Fliege.jpg (JPEG Image, 1592x750 pixels) Computer Graphics Portal for Digital Artists, Animators and Visual Effects Professionals. Textures : leather skin.