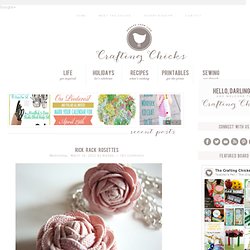

Wall-E Art. Rick Rack Rosettes. A friend gave me this flower ring and necklace, when she handed them to me I thought they were porcelain–there’s a very vintage feel to them.

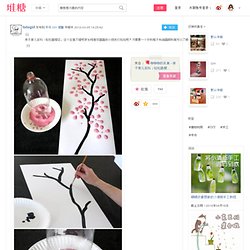
From a distance you really can’t tell that they’re made out of rick rack! Yes, rick rack! She shared how to make them with me, and now I’m sharing with all of you readers! The wow of the rosette comes from a few simple steps! She found this tutorial, in Portuguese I believe. First, cut 2 strips of rick rack. Then twist the two pieces of rick rack together, like this. And then run a stitch down one side to hold it all together. Like so. And to make the flower, you just start from one end and roll it up. Keep rolling. Until you have this–and then tuck the little tail under and hot glue it down. You’ll notice all of the petals are closed, so to open them up you just peel them back one by one. And here it is on my finger. Awesome. (Please excuse my hands, my hand model moved to Indiana, so I’m left using what I’ve got. 亲子育儿百科:轻松画樱花,这个主意不错吧家…_来自totogirl的图片分享. 堆糖网 分类 首页 热门 最新 良品购 特卖惠 家居生活 美食菜谱 手工DIY 时尚搭配 美妆造型 婚纱婚礼 设计 古风 插画绘画 壁纸 头像 文字句子 旅行 摄影 人文艺术 影音书 人物明星 动画漫画 植物多肉 生活百科 搞笑萌宠 搜索含 的内容 搜索含 的商品 搜索含 的专辑 搜索含 的糖友 新浪微博腾讯 QQ 淘宝腾讯微博豆瓣 关联账号登录: 登录 注册 totogirl 发布到 手作 DIY 借鑒 专辑中 2012-03-05 14:25:42 亲子育儿百科:轻松画樱花,这个主意不错吧家长陪喜欢画画的小朋友们玩玩吧!

关注 查看完整专辑11061076 来自: 咖咖咖的采集 - 亲子育儿百科:轻松画樱… 查看来源 收集 腾讯微博 豆瓣 人人网 赞6 评论 5 添加评论... 评论 BeBeTimes03-19 11:08 很有创意,可以废物利用回复 芊芊郡主08-14 这个创意好,学习了回复 冯UU04-10 这个太有才了啊回复 荷怡09-24 赞一个! 公仔思乐冰03-06 心思真系细啦! 你可能感兴趣 还被收集在 > 默认专辑600DIY2710默认专辑2301 标签 廢物利用DIY手工手作 活动. Creativity Prompt #22 – The “One-Sheet” Mini Album. October 24th, 2008 by Avital This week’s Creativity Prompt is to make a cute mini album, or journal - what ever you wish to use that for - using a single sheet of cardstock and a couple of chipboard squares (or recycled cardboard…).

For a special touch I covered the chipboard squares with fabric, and it turned out fabulous Supply - Instruction - Score the cardstock at: 3″, 6″ & 9″ (every 3″). If you happen to cut the cardstock in the wrong direction (e.g. cutting from top to bottom consecutively) don’t worry. Fold each score line in an accordion fold (once up and once down) until you are left with a 3″ by 3″ booklet. Enjoy!!! If you have any question, suggestion or remark – don’t hesitate to contact me – either leave a comment, use the contact form or start a new thread on the Creativity Prompt Flickr Group!!!
I would also be very happy to see your own creations, so don’t be shy and share Tags: creativity, creativity prompt, Tutorial. Happybird's Crafting Haven: Make A Cute Little Bow With A Fork...Tutorial For You! I made this fork bow tutorial for you. It's very easy and makes cute little bows that can be tied to favors, small earring boxes, homemade Christmas ornaments and more! I used an old, big serving fork to demonstrate, but you can use a regular size fork or dowels glued on a wooden base. Picture 1 Below: All you need is some kind of 4 pronged fork, ribbon and a pair of scissors.
Picture 2 Below: First off, start by weaving the ribbon in and out of the fork. Leave a little extra ribbon on the left and just let it lie there. Picture 3 Below: Take the ribbon on the right hand side over the top of the fork and weave the ribbon in and out. Picture 4 Below: Then, do the same thing again on the left hand side of the fork, weaving the ribbon in and out, coming the opposite direction. Picture 5 Below: Now, finish weaving in and out until you almost reach the top of the fork. Picture 6 Below: Take a separate piece of ribbon and slide it through the bottom in the middle of the fork.
HOW TO: Create a Home Made Wax Seal (16 Pics.