
Upcycling Ideas. Whether you call it upcycling, reusing, refurbishing or reimagining, today's Top 5 Friday is all about finding decor inspiration and doing it yourself.

Headboard From Wooden Skids (aka Pallets) This idea came courtesy of Julia Black from Pure Design, who hosted a video series for us called The Green Geek. Watch how she transformed three skids and some salvaged wood into a beachy white headboard for a queen size bed (three skids are the perfect size!). Chair Turned Bathroom Caddy Image: Pink to Green blog (via French Charming, originally from Country Living) This is one of those "Why didn't I think of that?
" Large Wooden Spool Turned Art Table/Coffee Table Image: Design*Sponge I was actually inspired last night at the bus stop (in front of a condo construction project) by four large wooden spools just sitting around, just the perfect size and shape for my current coffee table conundrum. Vintage Crates Turned Storage Images: Apartment Therapy This isn't a new idea, but it's a good one! HulaHoop Rug. Spraypainted Wheat Pillows. As seen last week on sytyc...here are my wheat pillows and the easy steps on how to make them!
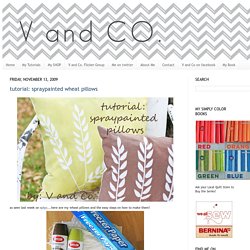
You will need:spray paint ( i had ivy leaf, and brown)freezer paper.muslinscissorspencil first cut some muslin. next trace your own drawn pattern (or you can download my pdf here)make as many of your stencil as you need next you are going to cut out your wheat. and for the stalks you just cut long skinny strips of freezer paper. place your stalks onto your muslin...SHINY SIDE DOWN!
Iron on your freezer paper. next get your "wheat" part and place it on top of your stalk(shiny side down)...not overlapping too much. iron the wheat down. get your spray paint can. and evenly distribute the paint.repeat if you have any area that needs a little more paint.do not over paint! Pallet Table. Max with the new Succulent Table.

Can you believe that our latest DIY project was once just a couple of junky pallets and some scrappy table legs? Crazy…if I didn’t have photos, I wouldn’t believe it myself. Not too long ago, we whipped out a coffee table sized succulent table out of an old shipping crate. Now we scaled it up. The pallets. First bit of advice, deconstructing pallets are a big pain unless you have the right tools…and our hammer and wall scrapper wasn’t quite doing the trick.
Couple good planks. Love the scares of time left on these chunks of pallet wood. Felting Project: A Rug! This is the most beautiful felt project we’ve seen.

Strips of felt are wrapped around each other with hot glue to create this amazing swirled effect. What a great project for a snowed-in weekend and a movie marathon with the family. The kids could even help cut strips and decide on color combination while you operate the hot glue gun. Would you attempt something like this? Keep reading to see more pictures and find out where to find more details about this beautiful felt project!
You can see all the instructions and details here on The Crafts Dept blog A few other fun pictures of the process: Images: Martha’s Crafts Department Blog Other post of mine you might like: The Best Thing to Happen to Your Baby’s Feet This Winter! Zara Kids Winter Collection. 20 Cool Lego Items for the Ultimate Lego Home. 20 Cool Lego Items for the Ultimate Lego Home When I was young (aka when my imagination was still vivid and Lego was still the only thing I need to be happy), I used to dream of living in a house made of Lego pieces.

Children's Art Desks from Cabinet Doors. Hi friends! I can't tell you how excited I am to be a creative guest on Ucreate today! I've been bubbling with excitement for weeks and have been scheming over what project would be Ucreate-worthy. I hope this one fits the bill...! First of all, I'm Autie and my friend Jen and I blog over at iCandy handmade. I'm a busy mom of 2 cute little kids and during nap time and bed time, I love to work on projects! The project that I thought I'd share with you today started out with these.
The drawer does not open, but the cupboard door does...and it leaves about an inch of space to keep something in it...like art masterpieces of a few sheets of homework paper...hmmmm. Bottle Cap Table with Poured Resin Surface. Wipe Off Weekly Menu Board. I am a meal planner.
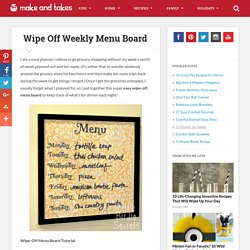
I refuse to go grocery shopping without my week’s worth of meals planned out and list made. (It’s either that or wander aimlessly around the grocery store for two hours and then make ten more trips back during the week to get things I forgot.) Once I get the groceries unloaded, I usually forget what I planned for, so I put together this super easy wipe-off menu board to keep track of what’s for dinner each night! Wipe-Off Menu Board Tutorial Supplies: Picture frame with glass front (I love these 12×12 frames I found at Ben Franklin for only $7!) 1. 2. 3. 4. Now everyone in the family knows what’s for dinner each week! I decided my frame would look better black in my kitchen, so I spray painted it black.
Little Birdie Secrets are regular contributors to Make and Takes and was born from the crafting obsession of three friends living in the Pacific Northwest. Wooden Hotel Key Rack.