
Wedding Ideas: The Rustic and Vintage Wedding. According to TheWeddingReport.com, 'Rustic Weddings' are the new trending wedding theme!
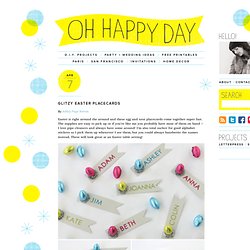
It seems that brides-to-be are in love with the charm, vintage feel and simple elegance of barn yard venues and wildflower bouquets that embody this theme. Search Results glitter eggs. Apr 7 Glitzy Easter Placecards By Ashley Page Norton.
>How-To: Newsprint Manicure « A Pretty Penny. I saw this newsprint manicure over on The Daily Nail and thought it was adorable (especially for bookworms and word lovers like myself).

I did a little Google detective work to see how to recreate it, and was surprised at how easy it is! All of the tutorials I found called for vodka or other clear distilled spirits, but we were fresh out. I used isopropyl alcohol instead, and it seemed to get the job done. Global Food Disparity: A Photo Diary. In an increasingly globalized world, it’s still sometimes shocking to see just how disparate our lives are compared with other human beings around the world. A book of photographs by Peter Menzel called "Hungry Planet: What the World Eats" ("©Peter Menzel www.menzelphoto.com. Ten Speed Press, published in 2005) makes a relevant point with great irony: at a time when hundreds of millions of people don't have enough to eat, hundreds of millions more are eating too much and are overweight or obese. In observing what six billion eat for dinner the authors note, "Today, more people are overweight than underweight.
" It is these cultural differences, emphasized and reinforced by the author, which exemplifies the lifestyles and dietary habits of people around the world. You can buy the book here. Meet the The Manzo family of Sicily. Germany: The Melander family of Bargteheide Food expenditure for one week: 375.39 Euros or $500.07.
Wisdom in few words: best motivational quotes. Throughout last couple of years I’ve been collecting my personal favorite quotations from various inspirational people in my Evernote.
As a result I got quite a long list of sayings which I personally consider to be one of the smartest, wittiest, daring and positive at the same time. Moscow, 2008. So, I thought why not to share them with you? Assuming I have a lot in common with my readers, you might enjoy them too. If you don’t then you might just skip the post and excuse me for wasting your time. “First they ignore you, then they laugh at you, then they fight you, then you win.” ~ Mahatma Gandhi“Life isn’t about finding yourself.
“Interviews I conducted with more than 70 CEOs and other leaders point to 5 essentials for success — qualities that most of those C.E.O.’s share and look for in people they hire. “Pause now to ask yourself the following question: “Am I dreaming or awake, right now?” You might also like:Thoughts, pictures, music. Sayonara, Cellulite! Silk-Dyed Eggs {aka TIE-Dyed!} I posted this tutorial a few years ago and it has become somewhat of a tradition to bring it back every year!
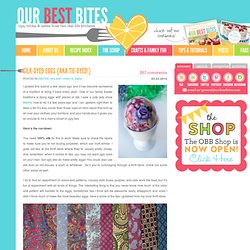
One of our family Easter traditions is dying eggs with pieces of silk. I saw a cute lady show Martha how to do it a few years ago and I ran upstairs right then to steal a tie! It’s way cooler than those cups of neon liquid that end up all over your clothes, your furniture and your hands plus it gives you an excuse to rid a man’s closet of ugly ties. Here’s the run-down: You need 100% silk for this to work. I try to find an assortment of colors and patterns. Usually it will tell you if it’s 100% silk right on the main label of the tie, but a lot of them don’t, and if that’s the case, check that little tiny end, it’s usually hiding there. The first step is to deconstruct the tie. Next you cut a piece large enough to cover an egg. Now, notice how I tied the eggs in the above photo- with the tie on the top of the long side of the egg. I wish eggs came like this at the grocery store. DIY Wrap Headphones. I got the idea to make these from the DIY wrap bracelets I made a little while ago.
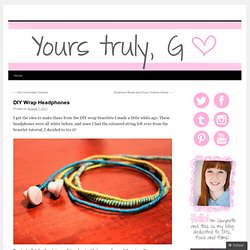
These headphones were all white before, and since I had the coloured string left over from the bracelet tutorial, I decided to try it! To start off, take the string and tie a knot with it around one of the wires. You can use one colour, or as many colours as you want. Once you have the knot set, start wrapping. Design, Life and Happy Accidents. Unruly things » guest post: hand printed fabric gift wrap tutorial. Diy {bird nest necklace} I have been seeing a lot of bird nest jewelry around lately.
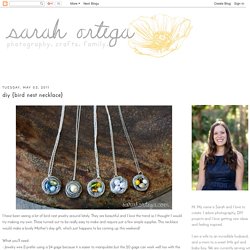
They are beautiful and I love the trend so I thought I would try making my own. These turned out to be really easy to make and require just a few simple supplies. This necklace would make a lovely Mother's day gift, which just happens to be coming up this weekend! What you'll need: - Jewelry wire (I prefer using a 24 gage because it is easier to manipulate but the 20 gage can work well too with the help of some round nose pliers) - pearls or glass beads - necklace chain - jump ring and a clasp Select the beads you want, string them onto your wire and arrange them as you'd like. then simply wrap the wire around the beads wrap some wire in the space between each bead (I like the look of three loops but you could just do one or two if you prefer) this is what the back looked like.