background preloader

Nails

Facebook Twitter

Mani Monday: 5 Bright Ideas to Beat the Winter Blahs. NAILED IT! Photos + post design by Kristin Ess While you’re all probably busy decking the halls right now, perhaps you’ll be able to take a break to get fancy, festive + fun with this manicure tutorial from Lady Conrad! She wanted to string some lights across her nails and so she did… Literally! Here’s how she created these lil’ cuties: TOOLS: base & top coat, green polish & red polish (you can use any colors you want), white or off-white polish, cuticle nippers or small scissors, black cotton string, a small brush or pointed q-tip. On clean nails, do a solid coat (or two thin coats) of white or off white polish.After the white polish dries, do one clear coat. Tags: bright, brite, christmas, DIY, do it yourself, holiday, how to, kristin ess, lauren conrad, light, lighting, lights, lite, mani, manicure, nail art, nails, string, the beauty department, thebeautydepartment.com, tutorial, xmas Related posts:

Water Marble Nail Art Tutorial. Water marble nail art creates a fantastic look but it's a tricky technique to master. I get so many compliments when I marble my nails, but it can be a little messy and time consuming. One bonus is that you don't need any brushes, dotting tools, rhinestones or anything. All you need is a shallow bowl of room temperature water and some vaseline (or lip chap) or tape. You can either rub vaseline onto the skin around your nail bed or tape it, so when you dip your finger into the water you can remove the polish from your skin. But I'm getting ahead of myself! My first tutorial ever! Tips & Tricks If your first drop doesn't spread out as much as you want, you can gently pull the sides out.

My Water Marbles Reader Submissions Back to Tutorials Still have some questions? Copyright 2012 Lisa Bailey © Nail-Art-101.comAll Rights Reserved. NAILED IT! Photos + post by Kristin Ess If you’re a fan of pretty shiny things, you’re going to love our first spring mani of the season. We all know everything looks better dipped in gold, so we thought this should do the trick. I decided to use gold leafing sheets to accent the corners of these turquoise nails.

Here’s how you do it: TOOLS: Turquoise nail polish, gold leafing sheets (available at your local art supply stores or see link below), clear top coat, nail file, q-tip (regular or pointed). Select a good turquoise polish. Related posts: Tutorials. I don't create tutorials for every manicure I do, but if I have, this is where you'll find them! 
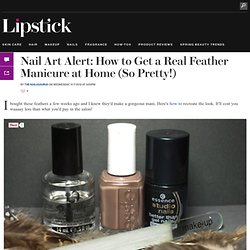
Explore the manicures and tutorials attached with them by clicking on the images below! If you try it out, let me know, I'd love to see your recreations. If there are any past manicures you'd like to see a tutorial for, drop me a line! DIY Nail Designs We Love! Nail Art Alert: How to Get a Real Feather Manicure at Home (So Pretty!): Girls in the Beauty Department. I bought these feathers a few weeks ago and I knew they'd make a gorgeous mani. Here's how to recreate the look. It'll cost you waaaay less than what you'd pay in the salon!

You will need: A base color. I chose Essie's Glamour Purse. Before you start, prepare all of the feathers you plan to use by cutting off the ends. Paint on your base color, let it dry, then add a coat of your thick clear top coat. While the clear coat is still tacky, carefully place the feather on to your nail. When that's completely dry, apply a few coats of your fast drying top coat. Once that's dry, use scissors or cuticle clippers to trim off most of the excess feather hanging off the end of your nail. You can remove what's left with a nail file which also leaves you with a nice smooth edge. I like to clean up around my cuticles with pure acetone and a small paintbrush, especially after piling on all that top coat! And here's the result... What do you think of this manicure idea?

Create Ombre Nails With Just One Polish. After progressing from hair to fashion, the ombré trend has made its way to your manicure. The look is simple to recreate at home, and you don’t even have to track down five sequential shades. The secret: you only need color. To get a gorgeous gradient, just pick a single pretty hue and then create your own lighter and darker shades using white or black polishes.

Here’s how to get the effect: Step 1 Select your base polish. Step 2 Grab a paper plate, a piece of foil, or an empty egg carton to use as your palette. Step 3 Dab four drops of colored polish onto your work surface. Step 4 Now that you have four new shades, paint the nails on each hand from light to dark. Step 5 Add a glossy top coat to for shine and protection. No time for DIY polish mixing? Anna Norman Anna Norman is a Brooklyn blogger and nail art expert.

Cool Paintings 2. Heynicenails. Spring Nail Art. Courtesy of Miss Pop Nails Nail art is hot this season, and while you might fret that it isn’t office-appropriate (there are some major designs out there!) , you can definitely find the right balance between 3-D stacks and pale pink. Nails are the new statement accessory that can take you from salon chitchat to conference room meetings, if you do it right. I personally understand the delicate difference, because before I became a professional nail artist (see my designs here!) , I worked at one of the country’s largest and most conservative companies. I can attest that, even if your boss is buttoned-up, you can still fun up your fingers with an amazing mani. PHOTO UPLOAD: See Yourself With Perfect Skin The Reverse French The usual French Tip is at the edge of the nails, but the Reverse French (also known as the Ruffian French) is flipped. QUIZ: How Quickly is Your Beauty Aging? The Glitter Fade This nail look is like the dress that takes you from work to a night out on the town.

The Half-Moon. STUFF I PUT ON MYSELF: a makeup blog: Fix That Nail. My nail issues are well-documented. I'm basically a recovering cannibal. I've had a pretty good handle on it for the past couple years, but the million years I spent eating myself resulted in some pretty funky ridges in a couple of my nails. Most of them are just minor, and polish will cover them. My ring finger on my left hand, though, was apparently my favorite one to eat, because it has a pretty terrible ridge, and my nail will always break down the ridge. Recently, I cut my nails down and grew them back so I could get rid of some of the staining and a couple spots where I picked polish and shit was a little peel-y.

I finally have enough nail to paint, and I noticed that my ridge broke. Usually, I will just cut my nail and file it down, but this one ripped to the quick, and I wanted to paint them and be glamorous instead of having farmer hands for another week or two. OK, so here is my busted-ass nail. Here is my teabag. Next, I get my nail glue, preferably the kind with the brush. At-Home Manicure. Raise your polished hand if you’ve spent hard-earned dough on a salon manicure, only to have it chip or fade after a few days. And how about those cuticles that started off smooth, but are now as ragged as a saw’s edge? Turns out, there are a few reasons (beyond the temptation to update your Facebook status while drying) your nails don’t stay a perfect ten for long.

Follow this guide to make the most of your next mani. Thoroughly wash your hands and feet, then scrub cuticles and the undersides of nails with a soft baby toothbrush and a gentle antibacterial soap to get rid of dirt and other debris. Pat dry. MORE: Hepatitis C From a Manicure? Next, remove traces of old polish with an acetone-based solution that’s free of glycerin or vitamin E, ingredients that serve to moisturize skin around nails, but actually leave the nail bed too slick for color to adhere. If the edges of your nails extend beyond their bed, trim them straight across, leaving each squared off to prevent in-growns.

How? 27 Nail Hacks For The Perfect DIY Manicure. Nail Care Tips - How to File Nails at WomansDay. Flaunting pretty fingernails makes just as much of a statement as your other beauty decisions. But you don’t need monthly appointments at the manicurists to keep that pearly luster. Heed these experts’ at-home maintenance tips for pretty, healthy nails that let your fingertips do the talking. 1. Avoid metal nail files. 2. 3. 4. 5. Nail Polish Color: What Does Your Nail Polish Color Say About You? Wish We'd Known: 7 Things No One Told Us About Getting a Manicure. By: iVillage Getting a manicure might seem like perfect excuse to just sit back and relax, but it turns out there are some pretty ugly dangers lurking inside the salon.

Sephora nail and gel expert Terri Silacci tells you what to watch out for. Ever notice that some people have wavy nail beds? This permanent condition can sometimes be caused by over-clipping cuticles. Nail fungus, nasty viruses, staph...who knows what infections the person ahead of you at the nail station had? "Filing in one direction with a fine grit file instead of using an aggressive back and forth motion, is important for the integrity of the front edge of the nail, where so many people have problems with peeling and splitting," says Silacci. A jaundiced-looking French manicure isn't exactly très chic-but it is a common consequence of using a sub-standard product for your final step. If your salon doesn't use a base coat specifically designed as a first layer, watch out. Photo Credit: Getty Images.

Idea's. Amazing Nail Art -- ♥ Holiday / Seasonal. 25 Fun and Flirty Spring Nails. By Jaime Morrison Curtis | Painting my nails has become my go to option for keeping in style without rushing to stay on top of clothing trends. Seriously, it gets exhausting (and expensive) trying to keep up with the new color of the season, pant style, hot new shoe and then there’s accessories on top of it all. Spice up your nails this spring with new patterns like chevron and plaid, or stick to solids and paint each nail a different color.

If there’s one thing I’ve learned from painting my nails it’s that you really can’t go wrong with a bold new look, as long as you have the confidence to rock it. Check out the new nail trends this season with these 25 Fun and Flirty Spring Nails… nggallery id=’122511′ Pastels and Patterns Seem to be all the rage this spring season. Springtime French Tip This is a great way to celebrate spring, while still being subtle. Water Marbling Find out how to get this fashion forward look. All Patterned Up Spice up those nails with bright and intricate patterns. Fashion Friday: Winter Wonderland Nail Style. 12 Amazing DIY Nail Art Designs Using Scotch Tape. Ruffle Manicure Tutorial | Chalkboard Nails.

Hey guys! Today I have a tutorial for you that I wrote a really long time ago for a collaborative nail art guide that I was asked to be a part of. That kind of fell apart I think, so I'm posting it now! The tutorial is for the ruffle nails that you may have seen on here way back when. I called it the "Carmen Miranda" manicure back then. Maybe we should call this a Carmen Mirandicure? You will need: a large number of polish colors (this example uses 9)a large-ended dotting tool or other dotting tool substitute (like the large plastic end of a sewing pin stuck into a pencil) 1. 2. 3. 4.

That’s it! Cutepolish. DIY Nude Nails With A Touch Of Sparkle. Go nude or go home. That’s my motto. Not really. But it’d be a great sign for a nudist beach! I love nude nails. And nude nails on a bride are tres chic. But they don’t exactly scream ‘it’s my wedding day!’ As discussed in this post, your wedding day is a great opportunity to add a bit of sparkle and luxury to your fingertips. With the nail art movement in full swing (don’t you feel like 2012 is the year of jazzy nails?) Time for a little nail maths (or math as all you American lovelies would say) Essie Wedding Collection ’Like To Be Bad’ + Deborah Lipmann ’Boom Boom Pow’ | top photo via CatBird NYC | bottom photo: For Smart Chicks photo by Yuna Leonard from this gorgeous shoot featured right here on Bridal Musings Essie Wedding Collection ’Like To Be Bad’ + Sephora Jewelry Top Coats in ‘Meet Me At The Disco’ and ‘Flurry Up’ | top photo via Ugly Duckling | bottom photo via The Sense and Sensibility Maths has never been so pretty!

Top Tips So what do you think of these subtle DIY nail art ideas? PRETTY POLISH IDEA. Photos + post by Kristin Ess First of all, sorry for the lack of posts this week. By now you know that Lady Conrad has a brand new book called THE FAME GAME. We joined her on her book tour and that busy schedule left little time for much else. But we’re back and bringing you the ombre stain mani!

We’ve seen lots of ombre techniques in the past, but this one is pretty cool because it’s done on your bare nails and has more of a stain effect than looking like actual nail polish. You will need: 3-4 gradient nail polish colors (dark to light and all in the tonal family), a clear top coat, a triangle makeup sponge, a cup of water, a piece of paper for blotting the polish, a paint brush + nail polish remover for clean up. Unscrew the lids of your 3 or 4 gradient colors so they’re ready to go. Try it in other colors. Tags: DIY, do it yourself, how to, kristin ess, mani, mani monday, manicure, nail art, ombre, paint, polish, spring, stain, style, summer Related posts: Nail Art Ideas. The Best Nail Art For Teen and Tween Girls.