
Cool DIY T-shirt Redesign Ideas. Don’t throw or give away the T-shirts in your closet.

31 T-Shirt DIYs That Are Perfect For Summer. Drab to fab! 5 DIY ideas for t-shirt remakes. Posted by ScrapHacker.com on tisdag, juni 5, 2012 · 5 Comments With temperatures rising so is the annual epidemic of fashion fever, making many of us feverishly hit the high street (although our wardrobes are already stuffed full…).
This post celebrates the power of re-invention of a wardrobe staple – old t-shirts. Infusing and old tee with some contemporary style means that fashion quick fix is waiting in the dusty corners of your wardrobe…When you’ve found yourself a remake candidate, get crafty asap! Here are 5 easy peasy drab-to-fab projects from the D.I.Y blogosphere to get your own ideas flowing – enjoy! D.I.Y from ‘Free People’, check out the full DIY TUTORIAL HERE. DIY. Trash to Couture original DIY tutorials Click on the links below the pictures to see the page.

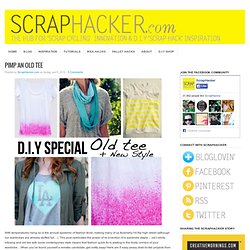
DIY Bleach Tie Dye. Last summer, we were obsessed with shibori indigo tie dying.

No, really . . . we just about dyed anything white in sight. So when Free People asked us to include a DIY in their guest blogger series, we knew a new tie dye project was absolutely in order. And as the weather is beginning to warm up, what better time than now to start experimenting with reverse tie dye using bleach! Black tees and tops: watch out! To make a grid-like pattern, fold the shirt like an accordion and bind it between two pieces of wood or other flat shaped objects. Before you start bleaching, make sure you are wearing gloves and working outdoors or in a well ventilated area. The rusty brown color will slowly fade into a beautiful lighter shade as it begins to set. Your reverse bleach tie dye shirt is ready to wear! (top image from here, rest of images by HonestlyWTF) Stenciling with Bleach. So here’s tutorial #3 in the bleach series!
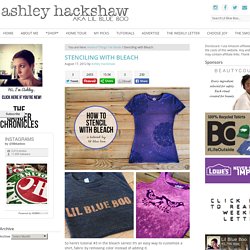
It’s an easy way to customize a shirt, fabric by removing color instead of adding it. For my first project I used a $1 doily as my stencil. I placed it on a navy t-shirt and sprayed a mist of bleach over top: I moved the stencil to another location and sprayed again. THE SUN WAS HIGH: DIY // Galaxy Jeans. I don't want to enter in a "I liked galaxies before it was cool to like them" monologue, but I've always been obsessed with outer space!

Bracelet. DIY Macrame Bracelet. Growing up by the beach in Southern California, the ability to knot a macrame bracelet was practically a right of passage.

Although those days are long behind us, we’ve never forgotten the ever-so-simple square knot technique. This time, however, we’re replacing hemp and wooden beads for more updated elements like colorful nylon cord and glossy metal charms. Happy knotting! You’ll need: Start by cutting the knotting cord into two 30 inch, two 20 inch and one 10 inch lengths. Center the 30 inch cord under the two middle strands. Pull tightly and slide the knot up to the top. Finish the 2nd half of the square knot by folding the left cord over the middle strands and under the right cord. Pull tightly and repeat the steps – left, right, left, right . . . To finish the knots, thread one of the cords onto a needle and sew up the center of 3-4 knots along the backside. Repeat the same step on the other cord. After sewing up both knotting cords, trim away any excess. 5 Ways to Turn Zippers into Awesome Arm Candy.
UPDATE: By popular demand, Zipper Bracelet Kits ($15) and readymade Zipper Bracelets ($20) are now available in the Brit + Co. shop!

You know we love turning unconventional materials into wearable accessories. Perfect Summer Bangle. DIY Wrap Bracelet. You should all know by now that we are all about stacking bracelets on our wrists.

The more, the better. In fact . . . the most, the best! With that being said, we’ll show you how to master a version of the ever so popular wrap bracelet. Find Out How to Easily Make Your Own Necklaces. Planet of Women- Health, Fashion & Beauty Latest Woman Health News, Fashion Trends, Beauty and Wellness tips Find Out How to Easily Make Your Own Necklaces March 18, 2013 by admin 2 Comments There are really a lot of reasons to start creating your own jewelry; first, jewelry will cost you quite a lot because the elements used to create it are hard to find and so the products can be very costly, and the second, you surely want to have a unique accessory that will make you very proud.
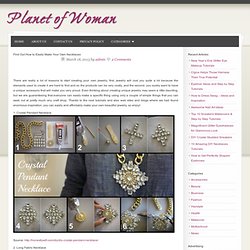
Even thinking about creating unique jewelry may seem a little daunting, but we are guaranteeing that everyone can easily make a specific thing using only a couple of simple things that you can seek out at pretty much any craft shop. 1. Source: 2. Source: 3. Source: