
25 HairStyle TUTORIALS & EXTRAS! Looking GOOD!

With the holidays also come a bunch of parties! Some of them are just family gatherings, some other ones are work related and some are hosted by great friends. Whatever the occasion is I think we ladies deserve to look good, regardless of our age, size or taste. So I put together for today’s Sunday Best 25 tutorials of hair-styles and some few other EXTRAS for inspiration! The Messy Side Updo. What I like about this hair is that you can wear it casually or dress it up with some cute hair pieces for a more formal look. I love it! Tutorial The Gibson Tuck Elegant, simple, chic… perfection! Her beautiful hair makes me want to color mine… I love the red!
Tutorial EXTRA: Greenlicious! I thought it would be fun to throw in this list some eye makeup tutorials also. This color palette is perfect for the Holidays! It would look great with brown eyes also… How do I know? I have done it! Tutorial The Side Chignon You La La! So pretty and romantic! Tutorial Side Knot Two minutes and you look fabulous! Splatter Nails Tutorial.
Splatter nails are super cool and easy to do, but they make a huge mess!
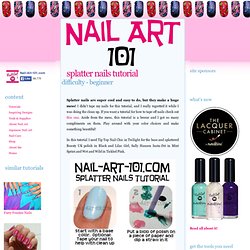
I didn't tape my nails for this tutorial, and I really regretted it while I was doing the clean up. If you want a tutorial for how to tape off nails check out this one. Aside from the mess, this tutorial is a breeze and I got so many compliments on them. Play around with your color choices and make something beautiful! In this tutorial I used Tip Top Nail Chic in Twilight for the base and splattered Beauty UK polish in Black and Lilac Girl, Sally Hansen Insta-Dri in Mint Sprint and Wet and Wild in Tickled Pink. Lay out newspaper to work over. Back to Tutorials Still have some questions? Copyright 2012 Lisa Bailey © Nail-Art-101.comAll Rights Reserved.
Destroyed. DIY - MAKE YOUR OWN WAX FOR HAIR REMOVAL. I was chatting with someone on my flight back from my vacation.

She lived in another country where salons are hard to come by or if they are around, they aren't very good. So, sometimes a girl has got to depend on herself. You can make one on your own so easily. So when I described it to her, she loved it and she said I just have to put it up online. So here goes: Wax recipe Ingredients 2 cups sugar ¼ cup water ¼ cup lemon juice Method Pour the sugar, water and lemon juice in a saucepan, and heat it over a low flame. How do you know it is done? Take a glass of water and put a drop of wax into it. Benefits of making your own WAX: 1. Waxing strips: We used to do this in college all the time. NOTE: The inner facing fabric of the jeans should be the one touching your skin otherwise if you use the opposite side, your skin will probably get blue with the denim color.
Waxing technique Test the temperature before applying the wax to your skin. 20 Creative Guest Book Ideas For Wedding Reception. I w i l l m a k e.. 52 Little Changes for Big Weight Loss Results. A Cup O' Joe: DIY Facial Scrub.
The following article was written by PETA intern Sofia Hueter.
Many of us are accustomed to the daily ritual of guzzling cup after cup of coffee to stay awake because it is so ingrained in our society that habitually drinking something with caffeine in it every few hours is the best way to fight fatigue. Caffeine does, in fact, help to ward off our lingering morning drowsiness, but drinking coffee, though often delicious and enjoyable, is not the only way to get the caffeine fix that your body craves. Did you know that your body can absorb caffeine through the skin? Although the exact concentrations of caffeine that can permeate the layers of your skin is still being researched, scientists do agree that, even if soaking your body with coffee doesn’t deliver the same kick that several cups of coffee do, it can provide you with a nice energy boost.
In addition to giving you a pick-me-up, coffee has other benefits. Mix the coffee grounds and olive oil. How to: pore strips.