
DIY Sweetheart Cupcake DIY Projects. 100 Back to School DIY Projects and Dorm Goodies. Parties. Re.cycle, re.purpose, and re.love. Gift ideas :) How to Make Leaf Skeletons - The Idea Room - StumbleUpon. I wanted to share with you a project from one of my readers who shares with us how to make leaf skeletons.

I LOVE this! I have several leafs in various forms displayed in my home and knew I needed to make some of her leaf skeletons to add to my decor. I love how a pattern of leaves can enhance the beauty in your home. So I asked Heather if she would mind sharing her project with you. You can find more great projects from Heather at her blog The Other White House. I have spent hours and tried various ways of making these. You need washing soda, not baking soda! Gather your leaves. Washing soda is a strong base so you may want to wear gloves when handling the leaves. You will add 3/4 cup of washing soda and 4 cups of water to your pot of leaves. Keep going, you will need to add more water so your pan doesn’t dry out. When 1.75 hours are up fill a glass baking dish with cool water.
I carefully removed them and rinsed with water and added clean water to the pan. 37.1Kstumbleupon.
Websites. Candles and crayons. Stationary. Roses. Lanterns. How to make a Wire Heart Finger Ring. Howdy!
This gurl thought she'd share the process of how to make a wire heart finger ring, just in case ya have a sweetie who'd like one. You'll need wire (I used 20 gauge), round nose and cutting pliers and a glue stick or lip balm in order to shape the ring to fit your finger. You can always use your finger too! It may take you a few times to master this, so I suggest using scrap wire if you don't want to use up your red colored wire or precious metal wire. Cut a piece of wire apprx. 5 inches. Shape the wire on the glue stick or lip balm. Now you have a 'U' shape.
Bend the left side with your round nose pliers just a bit above where the ring will hit the top of your finger. Make a larger bend using your round nose pliers. Pull the wire down for the first side of the heart and flatten it so it is on the top where it would lie on your finger. Repeat for the other side. Using your round nose pliers, connect the left side of the wire to the base with a small loop. Your heart is shaped. Yer Done! Tall Painting. The Technique Zone: Acrylic Paint Transfer - StumbleUpon.
Supplies needed: Acrylic dabbers, photocopy of an image, water spritzer bottle, paintbrush, card stock, craft sheet and heat tool (optional) Take the lid off the dabbers and brush the paint onto the card stock, ensure you get a good coverage Take your photocopied image ( remember that you will get a reverse of the image, so don't use bold words), flip it over and place it in the acrylic.

Lightly press it down making sure it's smooth and not wrinkled Leave to air dry for at least 15 minutes and then if you wish give it a blast with the heat tool Only move onto this step when you are sure your paint is completely dryTake your water filled spritzer bottle, spray the back of the paper no more than two squirts, you don't want it too wet Next start to rub the paper very gently with your finger.
How to Transfer a Photograph Onto a Block of Wood. Kelli Murray's Blog » Blog Archive » GOLD LEAF PAPER MACHE BOWLS. So, I think this might be my favorite DIY to date.

It’s just so practical and pretty! A few friends and I decided we would get together once a month for an all day craft day. Just to create pretty things, simply for the sake of creating. Weather it be something we wear, or something for our homes, decorations for the holidays, or even little somethings for our babies. DIY Hollow Out A Light Bulb at TeamDroid. When I was growing up I had a keen interest in the sciences.
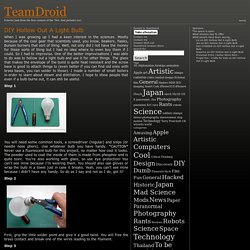
Mostly because of the cool gear that scientists used, you know, beakers, flasks, Bunsen burners that sort of thing. Well, not only did I not have the money for those sorts of thing but I had no idea where to even buy them if I could. So I had to improvise. One of the better improvisations I was able to do was to hollow out a light bulb and use it for other things. The glass that makes the envelope of the build is quite heat resistant and the screw base is good to attach things to (even better if you can find old ones with brass bases, you can solder to those). Step 1 You will need some common tools, a screwdriver (regular) and snips (or needle nose pliers).
Step 2 First, grip the little solder point and give it a good twist. Step 3 Once the contact has been pulled out, carefully crack the glass insulator.