
The Magic of Photoshop’s Content Aware Tools (And Practical Examples of How to Use It) Despite the fanfare over the introduction of content aware tools in Photoshop CS5, its predecessor, CS4 introduced the first real content aware tool in the form of scaling.
Content Aware tools have become a powerful and important part of modern photoshop work and can dramatically increase the speed at which certain tasks can be accomplished. It’s impossible to explain exactly how these tools work but put simply, as their name suggests, the tool analyses the areas around the point that you wish to work on, an by the use of complex algorithms, predicts how that part of the image should look when manipulated. In this tutorial we are going to have a practical look at three of Photoshops content aware tools, scaling, fill and move.
Lets start with scaling – This is a very interesting yet often underused tool. It allows you to simply resize only certain elements within an image. To do this, first we need to expand the canvas at the top. Expand the Canvas by Jason Row Photography, on Flickr. How to Use Drop Shadows in Photoshop. Photoshop layer styles are a popular way to add effects, such as drop shadows and strokes, to layers in a non-destructive way.

With the right knowledge and experience, any effect can be achieved. A Guide to Guides (Part 1) How to Apply the Satin Setting to Layer Style Effects. Photoshop layer styles are a popular way to add effects, such as drop shadows and strokes, to layers in a non-destructive way.

With the right knowledge and experience, any effect can be achieved. To achieve these effects, however, you need to understand what each setting does and how they can be combined to create a certain look. In this series by John Shaver from Design Panoply, we will explain every aspect of Photoshop's layer styles feature and show you how to unlock their potential.
The Spot Removal Tool in Camera Raw in Photoshop CC « Julieanne Kost's Blog. #CreativeFriday – Adding a Mask to a Locked Background Layer. #CreativeFriday – Content Aware Scale. I’d like to rejuvenate a feature that made it’s debut in Photoshop CS4.
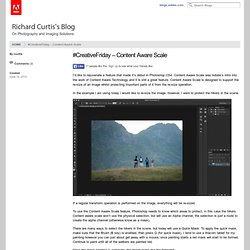
Content Aware Scale was Adobe’s intro into the work of Content Aware Technology and it is still a great feature. Content Aware Scale is designed to support the re-size of an image whilst protecting important parts of it from the re-size operation. In the example I am using today i would like to re-size the image, however, I want to protect the hikers in the scene. If a regular transform operation is performed on the image, everything will be re-sized. How-To: Shoot Epic Landscape Photos Of the Night Sky. Photoshop Compositing Secrets: Extracting Hair. Home > Articles > Adobe Photoshop > Technique 📄 Contents If you've ever worked on compositing multiple graphical elements into one glorious image, you know how maddening it can be trying to make hair look as natural with a new background as it did in its original location.
Matt Kloskowski, author of Photoshop Compositing Secrets, shares some great tricks he uses to get even the wispiest of baby-fine hair to cooperate in Photoshop (no matter how badly it behaves in real life). If you want to get into Photoshop compositing, one of the first features you'll have to conquer is selections. If you've ever tried selecting people (especially people with wispy hair) from one background and placing them onto another background, you know that it can be a huge pain in the neck.
Black and White with a Splash of Colour. Email One of the techniques people most often ask me to teach them is making a photograph like the one on the right that is black and white with one other colour.
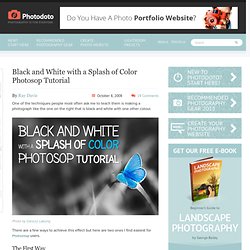
There are a few ways to achieve this effect but here are two ones I find easiest for Photoshop users. The First Way 1) Open a suitable photograph, this can be any subject but ideally it needs an area of bright colour that will have an impact when it’s finished while the rest of the photo looks good in black and white. For example: A Complete Beginner’s Guide to Masking in Photoshop. What Is a Mask?
Layers are probably the single most important addition to Photoshop since the original version, but layer masks are a close second. I would posit that until you thoroughly understand how and why to use masks, you simply don’t understand the power of Photoshop. The term “mask” isn’t immediately understandable to someone outside the realm of graphic design. Photoshop Tutorials - Where Anyone Can Learn Photoshop. 20 Handy Photoshop Tips For a Faster Workflow. We all use Photoshop on a daily basis, but I bet there’s at least one tip in this post that will give you the old ‘Why didn’t I know of this before’ moment!

It’s tips like these that make the most common of tasks quicker and easier than ever to help speed up your Photoshop workflow. Hold Spacebar to move a selection Drag a selection with the Marquee tool, but before releasing the mouse button, press and hold the Spacebar to relocate the selection. Display larger font previews. Photoshop Tutorial - How to Know if Your Image is Properly Isolated on White. How To Use The Pen Tool In Photoshop. Written by Steve Patterson.
When it comes to making selections in Photoshop, there's really two types of people - those who know how to use the Pen Tool, and those who struggle. Most people put off learning how to use the Pen Tool for as long as possible, while others never get around to learning it, believing it's just too confusing, too complicated, and just plain unnatural. Ultimately, their work in Photoshop suffers for it, since they're stuck relying on the Lasso Tool for just about everything they can't select with the Rectangular or Elliptical Marquee Tools.