
DarkBalloons by darkballoons. The 30 Minute $6 Dress Tutorial. Guest post by Rachael at Talk 2 the Trees.
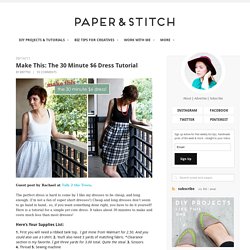
The perfect dress is hard to come by. I like my dresses to be cheap, and long enough. (I’m not a fan of super short dresses!) Cheap and long dresses don’t seem to go hand in hand.. so, if you want something done right, you have to do it yourself! Here is a tutorial for a simple yet cute dress. Here’s Your Supplies List: 1. Here’s How you Make it: 1. 2. 3. 4. 5. 6. 7. 8. 9. 10. 11. This is What Happens When You Give Thousands of Stickers to Thousands of Kids. This December, in a surprisingly simple yet ridiculously amazing installation for the Queensland Gallery of Modern Ar, artist Yayoi Kusama constructed a large domestic environment, painting every wall, chair, table, piano, and household decoration a brilliant white, effectively serving as a giant white canvas.

Over the course of two weeks, the museum’s smallest visitors were given thousands upon thousands of colored dot stickers and were invited to collaborate in the transformation of the space, turning the house into a vibrantly mottled explosion of color. How great is this? Given the opportunity my son could probably cover the entire piano alone in about fifteen minutes. The installation, entitled The Obliteration Room, is part of Kusama’s Look Now, See Forever exhibition that runs through March 12. How to make roses from maple leaves. Most gawked all-time. DIY Sweat-sacoche diy-laptop-sweat – the Trendy Girl.
Nails. 520 214 516 278 567 107 831 1006 920 762 1273 472 570 715 1160 567 828 778 293 261 459 700 688 181 901 1206 1010 844 1145 641 824 308 174 53 300 63 830 4063 168 292 677 358 638 173 361 203 528 191 112 904 144 335 477 746 148 419 280 585.
DIY Ideas. Do-it-Yourself DIY String Wedding Lanterns Yarn Chandeliers. Jessica of Wednesday Inc shows us how to make those gorgeous twine chandeliers from the inspiration shoot she shared with us this morning.

Using balloons, glue and twine, you can also make these lanterns for your wedding – and then bring it home and use it as your very own mid century lampshade. What you will need are: balloons, glue, yarn, tray for glue, corn starch 1/2 cup of Corn starch, 1/4 cup of Warm water, clear fast drying spray paint, hanging lamp cord or fishing line (depending on your desired final product), and a lighting kit if you’re looking for a fully functional lantern. Jessica recommends using a sharpie to mark on the inflated balloon how much room you need to leave for the lighting cord.
She also recommends coating the balloon with vaseline prior to wrapping the yarn coated with glue so it doesn’t stick on the balloon once it’s dry. You can see all the details on Jessica’s blog. Are you getting excited to try to do this at home as much I am? Instructions: 1. Super Fast Spray Paint Artist. Wooster Collective. Tutorial: Homemade Sidewalk Chalk.
By Michelle Vackar, Modern Handmade Child One of our favorite outside activities at our home is drawing with chalk on the driveway.

You can play hopscotch, four-square, and of course draw and create silly stories. My daughters and I were talking one day as we played hopscotch about how to make chalk and I thought to myself, let’s try it! It ended up being quite a lot of fun. What you will need: • Toilet paper or paper towel tubes • Scissors • Duct tape • Wax paper • Small bucket or disposable container to make the recipe • ¾ cup of warm water • 1 ½ cups Plaster of Paris • 2-3 tablespoons of tempera paint • Paper bag or a “mess mat” ** we made six tubes of chalk – we simply doubled the above recipe Step 1: If you are using paper towel tubes, cut each tube in half, so it is roughly the length of a toilet paper roll tube.
Step 2: Cover one end of each tube with duct table to hold the contents within. Step 3: Cut as many pieces of wax paper as you have tubes. Silk. Solitude - 2010/2011 - A work in progress on the Behance Network.
Stencil with freezer paper (harry potter tee) Yes, I am a nerd.

I came up with a brilliant idea for a Harry Potter t-shirt and I couldn't resist. "Expecto Patronum! " However, you can make whatever kind of design you want with a freezer paper stencil. It doesn't have to be Harry Potter related. (Although it would be awesome if it was.) I learned about the joys of freezer paper back in my early college days. Basically, freezer paper is backed with a plastic coating that will stick to soft surfaces when ironed, but it peels off cleanly and easily.