
Crystal Egg Geodes - Martha Stewart Easter. Geodes can be grown without using egg dye.

The resulting crystals are clear to milky white, like quartz. While large chicken eggshells are suggested in this process, larger eggshells can be used. Simply increase the size of the plastic or glass container and double or triple the amounts of dye (1 packet), alum (3/4 part), and water (2 parts) used to create the growing solution. This Easter craft from Jim "Figgy" Noonan doubles as a science project, offering an opportunity to show kids the crystallization process at work. To make a fluorescent variation for Halloween, substitute the water and egg dye solution with glow water. Resources: If you don't want to blow your own egg or would like to try a larger eggshell, pre-blown shells are available from The Eggery Place. Crafts: Bottle Fish. Can you believe this nice craft was made from trash?

It was a simple plastic bottle. Now it is transformed to an awesome piece of art or decoration. Before I start the instructions how to make it, let me tell you a story. One morning, I was driving on Riverwatch Pkwy (Augusta, Georgia). While driving, I saw a guy doing some exercise. Here are the list of material needed: A plastic soda bottle. This project uses a plastic soda bottle. First, we need to remove the wrap and wash the bottle. Cut the bottleneck and the bottom. Now, we can dry the inside of the bottle using a paper towel.
Using scissors, cut each side first, as the photo shows. Proceed to make two cuts, 'V' shaped, on the bottleneck. it will be the fish mouth. Gently, Pull each gill and each fin (sides) of the fish. Using spray paint, with a clear color first, paint the entire bottle. Glue the eyes on each side of the fish (a.k.a. plastic bottle). Do you remember where is the base of the plastic bottle? That's it. Yoda Free Paper Model from www.ss42.com. Bendy Straw Shrimp Tutorial. How to make a snow globe. Do stuff! & Ten minute no-sew recycled t-shirt bag! - StumbleUpon. Tutorial time!

I got a gig teaching a recycled t-shirt project at the library a few months ago, with a request for a recycled tee bag – the only bags I’d made from tees in the past had required sturdy sewing, and I didn’t want hand-sewing to be the only thing holding the bottom closed in a class version of the bags, so I started brainstorming about some kind of hand-sewing-friendly or no-sew bag idea…. and here’s what I came up with! The simplest version of these bags is great for smaller tees, or the more light-weight kind of girl-tees – just turn the bottom of the shirt into a drawstring and tie it closed! As you can see, even with a not huge tee, this will still leave a significant hole in the bottom of your bag, but for purposes like grocery shopping, this size hole shouldn’t really matter… But to make smaller holes, just make more than one of them!
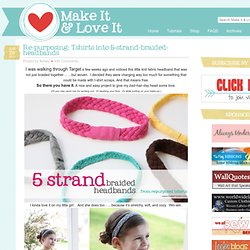
Print Hula Hoop Rug Page. Re-purposing: Tshirts into 5-strand-braided-headbands. I was walking through Target a few weeks ago and noticed this little knit fabric headband that was not just braided together…….but woven.

I decided they were charging way too much for something that could be made with t-shirt scraps. And that means free. So there you have it. A nice and easy project to give my bad-hair-day head some love. (Or you may need one for working out. Tutorials for Recycling Books - StumbleUpon. We rode bikes around our neighborhood this weekend and stopped at all the garage sales we found along the way. Make Your Own Gifts LIGHT BULB TERRARIUM – Green Holiday Gift Guide. Do-it-Yourself DIY String Wedding Lanterns Yarn Chandeliers - StumbleUpon. Jessica of Wednesday Inc shows us how to make those gorgeous twine chandeliers from the inspiration shoot she shared with us this morning.

Using balloons, glue and twine, you can also make these lanterns for your wedding – and then bring it home and use it as your very own mid century lampshade. What you will need are: balloons, glue, yarn, tray for glue, corn starch 1/2 cup of Corn starch, 1/4 cup of Warm water, clear fast drying spray paint, hanging lamp cord or fishing line (depending on your desired final product), and a lighting kit if you’re looking for a fully functional lantern.
Jessica recommends using a sharpie to mark on the inflated balloon how much room you need to leave for the lighting cord. She also recommends coating the balloon with vaseline prior to wrapping the yarn coated with glue so it doesn’t stick on the balloon once it’s dry. You can see all the details on Jessica’s blog. Are you getting excited to try to do this at home as much I am? Instructions: 1. How To Make a String Tree Wall Mural Home Hacks.