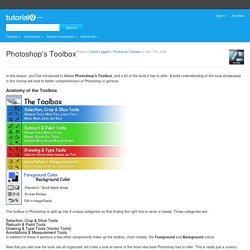

Photoshop’s Toolbox. In this lesson, you’ll be introduced to Adobe Photoshop’s Toolbox, and a lot of the tools it has to offer.

A solid understanding of the tools showcased in this tutorial will lead to better comprehension of Photoshop in general. Anatomy of the Toolbox The toolbox in Photoshop is split up into 4 unique categories so that finding the right tool is never a hassle. Those categories are: Selection, Crop & Slice ToolsRetouch & Paint ToolsDrawing & Type Tools (Vector Tools)Annotations & Measurement Tools In addition to these 4 sections a few other components make up the toolbox, most notably, the Foreground and Background colors. Now that you see how the tools are all organized, let’s take a look at some of the most vital tools Photoshop has to offer. Selection Tools The Marquee Tools are used for selecting objects such as rectangles, squares, and ellipses.
The Move Tool is used to move selections, objects, and layers. There are several Lasso Tools which are used to make irregular selections. Tilt-Shift Photography Photoshop Tutorial. This tutorial will walk you through how to create a tilt-shift image in Photoshop. It has been produced using Photoshop CS2 on a PC. Once you finish your tilt-shift image, make sure you upload your image for everyone to see. You should also check our our gear page to find all of the latest gear you need to create tilt-shift images. Gear PageSubmit Your Images Step 1: Photo Selection When choosing a photograph for the tilt-shift effect, bear in mind that you want to give the impression of a miniature model.
For this tilt-shift photography Photoshop tutorial, we are using a picture of Times Square during a typical day: Even before the tilt-shift effect has been applied, it’s not too hard to imagine the scene as if it were a model. To find an appropriate image, we suggest you browse through the flickr tilt-shift fakes pool. Step 2. Open the image in Photoshop and enter Quick Mask Mode by pressing Q on the keyboard, or select the Quick Mask icon as shown in the Tool Palette below: Step 3. Photoshop For Beginners: The Power of Layers. This is the third of a series of tutorials thought for Photoshop beginners.

I’ll explain in depth those features that can result difficult to understand for a newbie. In the previous two articles I’ve explained how the pen tool works and some useful extracting techniques. Today I want to go one step backwards, and deal with Photoshop power core: layers. It’s like to ask: how does Photoshop work? The answer is: with layers. How Photoshop works: A graphics designer who understands layers mechanism in Photoshop is like a soccer player who understand the offside rule. This example will show you the meaning of what I’m saying. In the bottom right you should have the layers window. Here you can visualize, select and modify all the layers that compose your final result.
Set the foreground color to black by clicking on the foreground color thumbnail to open the color picker and selecting black (#000000). Now grab the Paint bucket tool (G) and click on the canvas to fill it with black. Photoshop. Adobe Photoshop Create powerful images with the professional standard.

To view this content, you need the latest version of the Flash Player. Adobe TV uses the Open Source Media Framework (OSMF) to deliver a superior video experience. Please upgrade your Flash Player to version 10.2 to benefit from this technology. Gain unprecedented creative control with new expressive features and visual performance improvements in Adobe Flash Player 10.2.
Flash Player is a cross-platform browser plug-in that delivers breakthrough Web experiences to over 99% of Internet users. Featured Episode Perspective Warp Show: Learn Photoshop CC Senior Digital Imaging Evangelist, Photoshop & Lightroom Worldwide Creative Suite Design Evangelist Senior Creative Director at Adobe. Season 1 » You Suck At Photoshop #1: Distort, Warp and Layer Effects.