
The H Open - Kali Linux arrives as enterprise-ready version of BackTrack. Plant Link: Listen to your plants by Oso Technologies. How do I setup an ad-hoc (peer to peer) wireless network? Wireless Networking Forum FAQ. Follow these simple steps:•1.
Get one wireless network card for each computer•2. Go into the network card properties and set the SSID to something unique. Make sure to set the SSID to the same value on each machine. If you don't, the network will not work properly.•3. Go into the network card properties and set a channel for the wireless network to use.
If you don't want to share your internet connection, this should get you up-and-running. If you do want to share your internet connection, follow these steps: •1. Also, keep in mind, when sharing your internet connection over an ad-hoc network, the host computer must be on, and connected to the internet, if you want the second machine to be able to access the internet. What channel should I choose for my wireless network? Wireless Networking Forum FAQ. A.
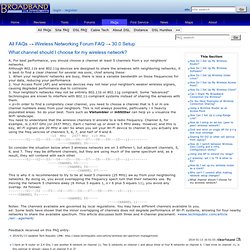
For best performance, you should choose a channel at least 5 channels from y our neighbors' networks. Although 802.11b and 802.11g devices are designed to share the airwaves with neighboring networks, it is best to find a clear channel for several rea sons, chief among these: 1. When your neighbors' networks are busy, there is less a vailable bandwidth on those frequencies for your data, reducing your performance 2. 3. < p>In order to find a completely clear channel, you need to choose a channel that is 5 or m ore channel numbers away from your neighbors. You need to understand that the wireless channels tr anslate to a radio frequency. . -10 MHz 2437 MHz +10 MHz---------01---02---03---04---05---06---07---08---09---10---11--------- ~~~~~CHANNEL 06~~~~~ So consider the situation below when 3 wireless networks are on 3 differen t, but adjacent channels, 5, 6, and 7.
8 Linux Commands: To Find Out Wireless Network Speed, Signal Strength And Other Information. Linux operating systems comes with various set of tools allowing you to manipulate the Wireless Extensions and monitor wireless networks.
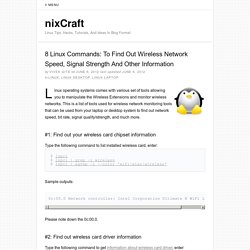
This is a list of tools used for wireless network monitoring tools that can be used from your laptop or desktop system to find out network speed, bit rate, signal quality/strength, and much more. #1: Find out your wireless card chipset information Type the following command to list installed wireless card, enter: $ lspci $ lspci | grep -i wireless $ lspci | egrep -i --color 'wifi|wlan|wireless' Sample outputs: 0c:00.0 Network controller: Intel Corporation Ultimate N WiFi Link 5300 Please note down the 0c:00.0.
Aircrack-ng. Configuring Synaptics Touchpad on a Macbook Under Linux « /pseudomorph. It has been a while since I’ve posted anything up but today I’ve got a couple of little touchpad tips.
My current everyday machine is an old Macbook 2,1 that I’ve had for quite a long time, just over 4 years if memory serves me correctly. Now most of the time I really enjoy the Apple hardware in this machine, if not the software. There is, however, the more than occasional time that I need to make the hardware play nice with the software I choose to use. Most of the time it’s not a case of a piece of hardware not working at all but – because it is Apple after all – it working in a way I don’t want, or mostly working but not just not perfectly.
The Synaptics touchpad is one of these devices. Today, after finally getting the shits with accidentally getting somewhat near the touchpad with my palm and again finding myself editing the wrong damn sentence of my PhD thesis, I got my google fu out to find a solution. Tuning the Macbook touchpad in Linux. The default synaptics driver settings in Linux are a little wonky, and are far from the feel of using the touchpad in OSX. I have spent some (read: too much) time tweaking these settings to a much more usable config. Getting under the hood Most distributions will automagically load the synaptics driver in X, so I’ll spare those details. If your distro doesn’t do this, a quick google search should lead you to documentation on how to get the driver installed. The binary you will use to view and tune your touchpad settings is “synclient”. Sensitivity The touchpad was far too sensitive by default. An ARM GNU/Linux box for $25. Take a byte!
Mimo USB Monitor and Raspberry Pi - Anup Narkhede, Ruby on Rails developer, London. Since past few weeks, I’ve been trying to put my Mimo UM-740 touchscreen monitor to a good use.
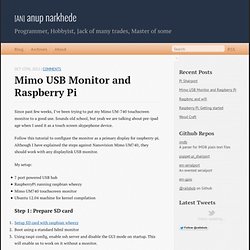
Sounds old school, but yeah we are talking about pre-ipad age when I used it as a touch screen skypephone device. Follow this tutorial to configure the monitor as a primary display for raspberry-pi. Although I have explained the steps against Nanovision Mimo UM740, they should work with any displaylink USB monitor. My setup: 7 port powered USB hubRaspberryPi running raspbian wheezyMimo UM740 touchscreen monitorUbuntu 12.04 machine for kernel compilation Step 1: Prepare SD card Setup SD card with raspbian wheezyBoot using a standard hdml monitorUsing raspi-config, enable ssh server and disable the GUI mode on startup. Step 2: Compile Kernel with udlfb support First, we need to enable Displaylink framebuffer support in the kernel. 2.1: Install dependencies. Raspberry Pi Kernel Compile.
This tutorial will demonstrate how to cross compile the kernel for the Raspberry Pi on Ubuntu 12.04 LTS.
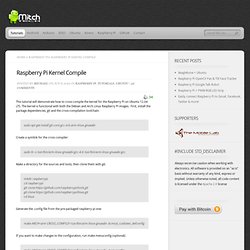
The kernel is functional with both the Debian and Arch Linux Raspberry Pi images. First, install the package dependencies, git and the cross-compilation toolchain: