
Windows Installation. Windows installation is very simple and works on Windows 2000 / XP, Vista and Seven.
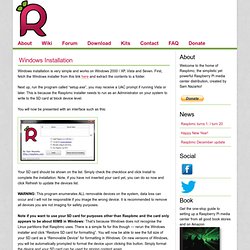
First, fetch the Windows installer from this link here and extract the contents to a folder. Next up, run the program called “setup.exe”, you may receive a UAC prompt if running Vista or later. This is because the Raspbmc installer needs to run as an Administrator on your system to write to the SD card at block device level. You will now be presented with an interface such as this: Your SD card should be shown on the list. WARNING: This program enumerates ALL removable devices on the system, data loss can occur and I will not be responsible if you image the wrong device. Note if you want to use your SD card for purposes other than Raspbmc and the card only appears to be about 60MB in Windows: That’s because Windows does not recognise the Linux partitions that Raspbmc uses. Index of / Raspberry Pi OS Image Downloader. When I first started out playing around with the Raspberry Pi I used the pre-made SD Card images available on the website, however I soon noticed these were out of date, and then found it a challenge to find up to date (usually nightly builds) of some of the Operating Systems.

So I decided to automate this process to make it easier, and to provide a GUI interface for new users. The application scans a customisable (XML based) list of distributions and binary sources using a defined search pattern, if it finds any builds it adds them to a selectable list, allowing you not only to download the latest available builds but also older builds. Each Operating System distribution can have multiple sources so various flavours can be included. When you select and download an image, it is also cached so you don’t need to download the same file twice, cached files are marked so they can be easily spotted.
You can downloaded the latest release here. *Update 16-06-2012* *Update 15-08-2012* SD Formatter 3.1 for SD/SDHC/SDXC. SD Formatter 4.0 for SD/SDHC/SDXC This software formats all SD memory cards, SDHC memory cards and SDXC memory cards.

SD Formatter provides quick and easy access to the full capabilities of your SD, SDHC and SDXC memory cards. The SD Formatter was created specifically for memory cards using the SD/SDHC/SDXC standards. It is strongly recommended to use the SD Formatter instead of formatting utilities provided with operating systems that format various types of storage media. Using generic formatting utilities may result in less than optimal performance for your memory cards. The SD/SDHC/SDXC memory cards have a "Protected Area" on the card for the SD standard's security function.
System Requirements. Build a $35 Media Center with Raspbmc and Raspberry Pi. If you’ve been holding off on setting up a Kodi-based media center computer because they’re loud, expensive, don’t fit in your media rack, the Raspberry Pi is your savior.
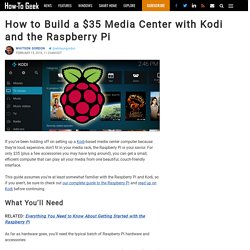
For only $35 (plus a few accessories you may have lying around), you can get a small, efficient computer that can play all your media from one beautiful, couch-friendly interface. This guide assumes you’re at least somewhat familiar with the Raspberry Pi and Kodi, so if you aren’t, be sure to check out our complete guide to the Raspberry Pi and read up on Kodi before continuing. What You’ll Need RELATED: Everything You Need to Know About Getting Started with the Raspberry Pi As far as hardware goes, you’ll need the typical batch of Raspberry Pi hardware and accessories: RELATED: How to Use Flirc to Add Any Remote to Any Media Center Which Version of Kodi?
Code & Using your Raspberry Pi: (PART 3) Music and HD Video playback, adding Network devices. XBMC & YouTube on the Raspberry Pi! How to turn your Raspberry Pi into an XBMC media centre. Cases for yo' Raspberry Pi. Raspberry Pi Beginners: Preparing an SD Card in Windows.
User Wiki. Installation et configuration du Mediacenter XBMC. Un Mediacenter est un ordinateur ou un appareil vous permettant de lire des fichiers vidéo, audio, d’afficher des diaporamas de photos.
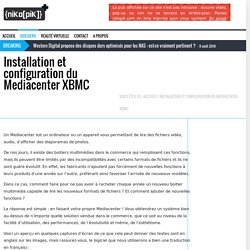
De nos jours, il existe des boitiers multimédias dans le commerce qui remplissent ces fonctions, mais ils peuvent être limités par des incompatibilités avec certains formats de fichiers et ils ne sont guère évolutif. En effet, les fabricants n’ajoutent pas forcément de nouvelles fonctions à leurs produits d’une année sur l’autre, préférant ainsi favoriser l’arrivée de nouveaux modèles. Dans ce cas, comment faire pour ne pas avoir à racheter chaque année un nouveau boitier multimédia capable de lire les nouveaux formats de fichiers ? Et comment ajouter de nouvelles fonctions ? La réponse est simple : en faisant votre propre Mediacenter ! Voici un aperçu en quelques captures d’écran de ce que cela peut donner (les textes sont en anglais sur les images, mais rassurez-vous, le logiciel que nous utiliserons a bien une traduction en français) : 1. 2. 3. 4.