
Real Weddings. Alle Produkte von cogitatio. Fotostream von flickr monkey. Tuesday Tutorial: Paper Lantern Ornaments. Want a cute, simple decoration that you can make in minutes?
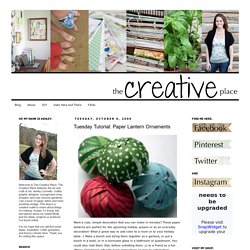
These paper lanterns are perfect for the upcoming holiday season or as an everyday decoration! What a great way to add color to a room or to your holiday table :) Make a bunch and string them together as a garland, or put a bunch in a bowl, or in a hurricane glass in a bathroom or guestroom. You could also mail them (flat, before unfolding them ;)) to a friend as a fun "Merry Christmas" gift with quick instructions on how to unfold them. I decided to use holiday paper, but was thinking these would also be fun as everyday decorations with leftover scraps of scrapbooking paper or found/vintage paper. What you'll need: - Paper - enough to cut 15 strips - ½"x4" (7.5"x4") - 2 small brads - Ruler, 1/16" hole punch or pushpin to poke holes, exacto blade or rotary cutter and a cutting mat 1. 2. 3.
(Back) 4. 5. 6. Make a gift bow from a magazine page. In gift wrap emergencies when you've got the present but need some wrapping, here's an idea for turning a magazine page into a bow.
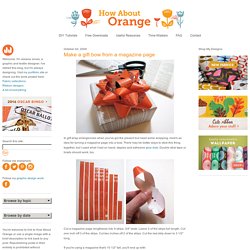
There may be better ways to stick this thing together, but I used what I had on hand: staples and adhesive glue dots. Double stick tape or brads should work, too. Cut a magazine page lengthwise into 9 strips, 3/4" wide. Leave 3 of the strips full length. Cut one inch off 3 of the strips. How to make a fabric rose. It's the last stiffened fabric project and then I'm moving on!
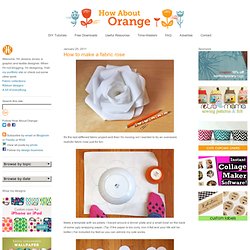
I wanted to try an oversized, realistic fabric rose just for fun. Tiny Polaroid Magnets. Hi there!
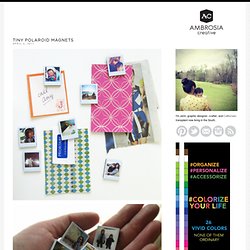
It’s felt like forever since I’ve last blogged, and has felt like an eternity since I’ve done anything crafty and nifty. Since my morning sickness has gone into full speed (yes, we’re expecting our third this fall!) I haven’t felt like myself. But nothing like inspiration to wake one out of a reverie — or nightmare, in my constantly sick state. I came across these DIY Pantone chip magnets on How About Orange and wanted to do something similar. You will need: Cardboard (mine was the backing of a sketchbook — much thicker than the back of a regular spiral bound notebook) or 2-3 sheets of white cardstock or poster board spray-mounted together to use as a sturdy backing to the magnetsOpaque white marker (necessary only if your cardboard is not white) Craft knife Metal straight edge/ruler Clear packing tape or frisk film.
Step 1: Download a Photoshop file of the Polaroid frames below. Step 2: Print out photos onto photo paper. Step 4: Trim out photos with craft knife. STC Craft Presents: The Repurposed Library by Lisa Occhipinti. Amigurumi Teddy Ornaments. This was our first year setting up our Christmas tree in our new house.

We bought our tree last year at Walmart after Christmas when all the prices were heavily reduced, so we had to wait almost one whole year before we could set it up! As we assembled our tree and placed the lights and ornaments upon the branches, Ryan and I thought how it’d be so adorable if we could somehow incorporate our love of amigurumi onto our tree. DIY Ideas & Tutorials. Make It and Love It.
Housewarming for Jenny. I've been a bad friend.

Several months ago, one of my best friends from high school told me that she was moving. And she wanted some suggestions for decorating and setting up home in her new location.... First of all it took me forever to reply! Craft Affection: Super Cute Bracelets!!! ---Update---12/3/2011--- This post has been pinned like crazy on Pinterest and because of that a lot of readers have tried these out and have had a lot of questions.

So I wanted to answer them as best as possible. --- I felt like soaking was better than boiling but some sticks may take longer to soak then others. The shorter, thinner ones are going to be harder to bend so just work them gently, re-soak and repeat. --- You will break some. Plus I think some batches of sticks from the manufacturers break easier then others. --- Be sure to let them dry completely! If you don't they will expand.
Triple Max Tons: Easy Holiday Hair. Pebble Boot Tray. Ten Minute Table Runner. *Before I get started on this project, let me just say that I am HORRIBLE at thinking of post titles. Mine are soooo boring! I was just going to put “striped table runner” but that’s so blah! I like the alliteration with this one, but if your table runner takes any more than 10 minutes, you’ve got issues. Unless you’re making something spectacular like this. 2011 Top Ten Posts. Brooklyn Bride - Modern Wedding Blog. Laundry room sign {{tutorial}} One of my BIGGEST pet peeves is when I do the laundry and after I pull it out of the washer or dryer I find TONS of chap sticks, coins, markers, gum,trash, you name it falling out of my nice clean laundry!!!

Anyone else have that problem???? Well not anymore :) With the help of my friend SHELLEY over at WONDERFULLY WORDY VINYL I will no longer have the pockets full of STUFF problem… I introduce you to my NEW….