Zoom
Trash
Related: Arduino / Elec
- Electronique&robotique
- Adicciones
- SSI
- Пентест
- вкладки ноута
- network
- HS2.0
- computer science
- JHenry
- Education
- Enterprise

Very DeepSleep and energy saving on ESP8266 – Part 1: Basics – Arduino, ESP8266, ESP32 & Raspberry Pi stuff. Intro: For the seasoned ESP user I might be over explaining things here, but apparently some people struggle with basic things around deepsleep, hence my perhaps somewhat overly long explanation.
For battery fed projects, low energy consumption is a must. De ESP8266 can help with that, using DeepSleep. Earlier I published a rather simple DeepSleep program, combined with MQTT, but from an energy conserving point of view there are more things in setting up DeepSleep that can make a difference. There are also couple of other things to take into consideration. The ideas here are not new.
ESP32-C3 WiFi & BLE RISC-V processor is pin-to-pin compatible with ESP8266. When we reported about ESP32-S2-MINI modules last September, we also noted Espressif teased us with ESP32-S3 and ESP32-C3 with close to no details.

ESP32-S3 is expected to be a multi-core WiFI & Bluetooth processor with AI instructions/accelerator, but there were no details about ESP32-C3 at all, and we only found out it would be a RISC-V processor several weeks ago. But Twitter user Johnny Wu posted a screenshot in Chinese and its translation claiming ESP32-C3 was finally released by Espressif Systems. [Update: The datasheet has been released. See comments.] Untitled. The ESP8266 as a microcontroller - Hardware While the ESP8266 is often used as a ‘dumb’ Serial-to-WiFi bridge, it’s a very powerful microcontroller on its own.
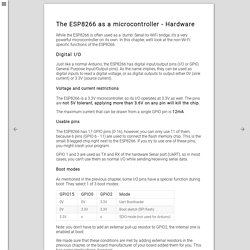
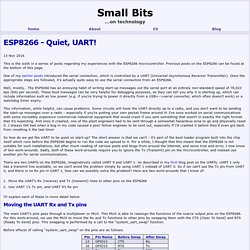
In this chapter, we’ll look at the non-Wi-Fi specific functions of the ESP8266. Digital I/O Just like a normal Arduino, the ESP8266 has digital input/output pins (I/O or GPIO, General Purpose Input/Output pins). As the name implies, they can be used as digital inputs to read a digital voltage, or as digital outputs to output either 0V (sink current) or 3.3V (source current). Voltage and current restrictions The ESP8266 is a 3.3V microcontroller, so its I/O operates at 3.3V as well.
The maximum current that can be drawn from a single GPIO pin is 12mA. Untitled. I was wondering whether the ESP8266 SPI flash could be used for atomic (or sort-of-atomic) write operations - so I wanted to understand how the underlying SPI operations work.
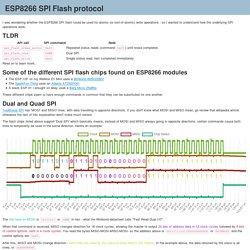
Read on to learn more... Some of the different SPI flash chips found on ESP8266 modules The ESP-12F on my WeMos D1 Mini uses a Winbond W25Q32BVThe SparkFun Thing uses an Adesto AT25SF041A black ESP-01 I brought on ebay uses a Berg Micro 25q80a These different chips seem to have enough commands in common that they can be substituted for one another. Dual and Quad SPI Traditional SPI has 'MOSI' and 'MISO' lines, with data travelling in opposite directions. The flash chips listed above support 'Dual SPI' which basically means, instead of MOSI and MISO always going in opposite directions, certain commands cause both lines to temporarily be used in the same direction. <h1><span>Hello, noscript users! d1 v2. Pieter's little GitHub Page. Guide to PROGMEM on ESP8266 and Arduino IDE — ESP8266 Arduino Core 2.4.0 documentation. Intro¶ PROGMEM is a Arduino AVR feature that has been ported to ESP8266 to ensure compatability with existing Arduino libraries, as well as, saving RAM.
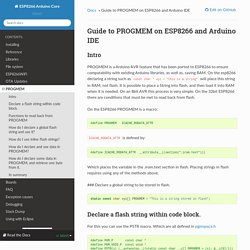
On the esp8266 declaring a string such as const char * xyz ="this is a string" will place this string in RAM, not flash. It is possible to place a String into flash, and then load it into RAM when it is needed. On an 8bit AVR this process is very simple. Me-no-dev/EspExceptionDecoder: Exception Stack Trace Decoder for ESP8266 and ESP32. My ESP crashes running some code. How to troubleshoot it? — ESP8266 Arduino Core 2.4.0 documentation. Introduction¶ Your ESP is self restarting.

You don’t know why and what to do about it. Do not panic. In most of cases ESP provides enough clues on serial monitor, that you can interpret to pin down the root cause. The first step is then checking what ESP is saying on serial monitor when it crashes. Totally confused about serial swap function on ESP8266... I have already read that manual, but it is too sparse with details when one compares to the source for Serial::swap: void HardwareSerial::swap(uint8_t tx_pin){ if(!

_uart) { return; } uart_swap(_uart, tx_pin);} Notice the parameter tx_pin! And what about this: void HardwareSerial::pins(uint8_t tx, uint8_t rx){ if(! Why need to program the module? Reference · ESP8266 Arduino Core. Table of Contents Pin numbers in Arduino correspond directly to the ESP8266 GPIO pin numbers. pinMode, digitalRead, and digitalWrite functions work as usual, so to read GPIO2, call digitalRead(2).
Digital pins 0—15 can be INPUT, OUTPUT, or INPUT_PULLUP. Pin 16 can be INPUT, OUTPUT or INPUT_PULLDOWN_16. At startup, pins are configured as INPUT. Pins may also serve other functions, like Serial, I2C, SPI. Digital pins 6—11 are not shown on this diagram because they are used to connect flash memory chip on most modules. Note that some boards and modules (ESP-12ED, NodeMCU 1.0) also break out pins 9 and 11. Pin interrupts are supported through attachInterrupt, detachInterrupt functions. ESP8266 - Quiet, UART! This is the sixth in a series of posts regarding my experiences with the ESP8266 microcontroller.
Previous posts on the ESP8266 can be found at the bottom of this page. One of my earlier posts introduced the serial connection, which is controlled by a UART (Universal Asynchonous Receiver Transmitter). Once the appropriate steps are followed, it’s actually quite easy to use the serial connection from an ESP8266. 2nd Serial Port Access - ESP32 Forum.
Taking @ESP_me_no_dev's advice "@a2retro You can attach all 3 UARTs to any pins you like (almost).

Pins 9 and 10 are tied to your flash chip, so I would not use them for Serial. You can check esp32-hal-uart.h if you want C style api to the serial or just use HardwareSerial Serial1(1); and then Serial1.begin(baudrate, SERIAL_8N1, rxPin, txPin); to start and use it like any other Arduino Serial" I seem to be stuck trying to access my serial jpeg camera (Adafruit_VC0706) So I have confirmed the camera functions correctly when directly connected to a PC and using the provide utility software.
I have my FT2232 based programmer sending compiled code down to the esp32 via the default serial port. Software Serial - Everything ESP8266. - Tue Jun 23, 2015 8:22 pm#21447 Is this similar to SoftwareSerial as used in Arduino ? This from Github ESP8266/Arduino - Read me SerialSerial object works much the same way as on a regular Arduino. Apart from hardware FIFO (128 bytes for TX and RX) HardwareSerial has additional 256-byte TX and RX buffers. Both transmit and receive is interrupt-driven.
Write and read functions only block the sketch execution when the respective FIFO/buffers are full/empty.Serial uses UART0, which is mapped to pins GPIO1 (TX) and GPIO3 (RX). However if you feel this would be useful then I suggest you go to the ESP8266/Arduino site and write a new issue and see what Igrr thinks.I am sure he could get it in easily enough. Plerup/espsoftwareserial: Implementation of the Arduino software serial for ESP8266. Problem manually handling WiFi reconnect · Issue #2735 · esp8266/Arduino. Esp8266/arduino-esp8266fs-plugin: Arduino plugin for uploading files to ESP8266 file system.
Connect your ESP8266 to any available Wi-Fi network - Ubidots Blog. The ESP8266 is a microcontroller developed by Espressif Systems. Known as a WiFi Module, this microcontroller has the ability to perform WiFi related activities like Internet of things applications and home automation. Ranging in price and features, there are many types of ESP8266 modules available, but all of them are incredibly useful for IoT world. Regardless of the IoT application you’ve developed, when using the ESP8266, you must set the WiFi credentials into the ESP8266’s firmware to establish the required connections and be able to send data to the cloud. This is one way to connect, but you can also build your own access point into the board making a universal firmware which will establish a connection in any network available just by pressing a button.
Requirements Step 1. Note: The Ubidots team made some modifications in the ConfigManager Library to implement a routine the begins the AP mode simply by pressing an external reset button. Step 2. Into Tools > Board > Select the board. HttpClient: HTTPS request without specifying certificate fingerprint? · Issue #3417 · esp8266/Arduino. Bug in WPA2 EAP - Page 3 - ESP8266 Developer Zone. @ESP_Deng Xin @ESP_Faye @ESP_igrr We have been trying to get this going with the latest release but it seems there are still issues with getting the IP. Can you please look at all the related discussion too at In my latest attempt, the Radius Server does accept the request and seems to successfully authenticate (atleast it looks like from the Radius server logs), but the ESP cannot complete the process. Code: Select all.
Solar Powered WiFi Weather Station : 19 Steps.