Recyclable Crafts: Carton Wallet. This photo originally appeared in FamilyFun Magazine Total Time 1 hour Ages school-age Recycle a milk or orange juice carton into a clever carrying case for change, trading cards, and more.
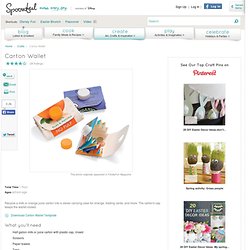
The carton's cap keeps the wallet closed. Download Carton Wallet Template What you'll need Half gallon milk or juice carton with plastic cap, rinsed Scissors Paper towels Tape Wallet Template Ballpoint pen Ruler Craft knife (optional) Butter knife How to make it Cut open the carton so it lies flat, as shown; put aside the cap for now.
Holiday bazaar creativity. Normally, I save sharing about my Stampin' Up!

Goodies for my Stuck on Stampin' blog, but I just had to share it all here first! Enjoy!! A couple of Saturdays ago, I participated in my first craft bazaar as a Stampin' Up! Demonstrator. Not only did I set up my own booth, but I was coordinating all of the other 40+ vendors who would be there. Although, yes, indeed, it was super stressful with getting everything ready to have a great looking table, in the end I was glad I was able to pull off the projects that I did! My upline and friend, Andrea joined me for the bazaar, which made our table double in size! Our Booth Christmas Cards3 designs in packages of 5I was so surprised that NONE of them sold! Reindeer FoodMikayla helped me make these.
Sprinkle on the lawn at night, The moon will make it sparkle bright. Post It Note & Pen HolderI found this cute tutorial here and had so much fun making these! Decoupaged Christmas Stars. Nuovo tutorial. Eccomi qua con un nuovo tutorial.

Ammetto che ne ho più di uno in cantiere, tra cui quello della cornice multipla alterata che mi è stato richiesto in coro, abbiate pazienza che piano piano arrivo ^__^ Intanto ieri sera ho fatto al volo le foto per il porta foglietti, un progettino che questi giorni mi sta piacendo proprio tanto. Nella foto sotto potete vedere il materiale di inizio. Ovviamente ho fotografato solo le parti in cartoncino bianco perché il resto della decorazione sarete voi a sceglierlo. In questo caso ho utilizzato un foglio di Fabbriano liscio da 220g ma va benissimo anche il ruvido o del Bazzil.
Quindi dovete preparare: - 2 quadrati 10,5x10,5 cm dal bianco -1 quadrato 9x9 cm dal bianco - 1rettangolo 25,2x10 cm dal bianco e lo cordonate a 10cm da un lato e 10 cm dall'altro ( vi ho aggiunto adesso i 2mm in più perché altrimenti farete difficoltà a far chiudere la scatolina!) -2 quadrati 10x10 cm da un cartoncino pressato. Una volta tagliati questi pezzi siete pronti ad iniziare. Browsing Artisan Crafts on deviantART. Winter Crafts.
Homemade Gift Ideas Blog. DIY Pantone chip magnets. I try to keep loose Pantone chips in an envelope for future projects, but these nice colors escaped and attached themselves to my file cabinet.
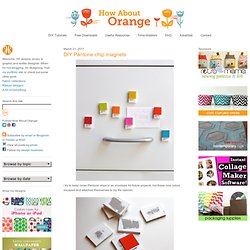
If you happen to own a Pantone chip book or can beg a few chips from someone you know, here's how to whip up some little candy-like magnets. Cut small pieces of bookboard or other thick cardboard with an X-acto knife. (Bookboard is likely available at your local art store or PaperSource.) Make the pieces exactly the size of the Pantone chips. Then paint the edges white; I used acrylic paint for this. Attach the chip to the cardboard. Then cover the face of the chip with paper glaze. Finally, attach a magnet to the back. DIY Projects - Craftbits.com.