
Free Arts & Crafts Books. 5 Ways to Turn Zippers into Awesome Arm Candy. UPDATE: By popular demand, Zipper Bracelet Kits ($15) and readymade Zipper Bracelets ($20) are now available in the Brit + Co. shop!

You know we love turning unconventional materials into wearable accessories. Today, we’re tackling zippers! We figured out 5 simple, beautiful ways to create bracelets, cuffs, and bangles out of metal, plastic, and repurposed zippers. Materials: - zippers - E-6000 quick hold contact adhesive - velcro or snap buttons - leather crimps + clasps - Tools: needle nose pliers, sharp scissors First thing to do is get your zippers! 1. These bangles are sweet, and have a definite friendship bracelet vibe. Use colored zippers for these, in whatever colors you like. DIY Braided Bead Bracelet. It’s been awhile since our last bracelet DIY.

I don’t know about you, but our wrists have been begging for another colorful addition for months now. So after playing with some materials that were already on hand, we’ve created a tutorial for a braided bead bracelet, which is a not so distant cousin of the hex nut and wrap bracelet. Because honestly, you can never have too many . . .
You’ll need: Cut the waxed linen cord into a 26″ and 19″ piece. Tie a knot about half an inch down from the loops. Start braiding the strands. Push the bead against the base of the braid, and cross the left strand over the middle. Keep a finger at the base of the braid, holding the beads in their place and keeping the braid tight. Finish the bracelet with another inch of braided cord, measuring it against the wrist. Thread on a two hole button – two strands through one hole and one strand through another. Trim the end. Your bracelet is finished! (all images by HonestlyWTF)
First Kumihimo Braid. I had a go at using this Kumihimo plate the other night and found that the instructional pictographs were a bit difficult to understand.
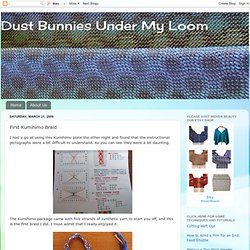
As you can see they were a bit daunting. The Kumihimo package came with five strands of synthetic yarn to start you off, and this is the first braid I did. I must admit that I really enjoyed it. I enjoyed it so much that I pulled 60” of gold ribbon, purple orlec and navy orlec to braid. Crafty Stuff. Kumihimo. DIY Unique Weave Bracelet ❥ 4U // h. Summer bracelets DIY. When M. came home from her camp with school, she showed me this yellow bracelet she made with 'scoubidoo' strings.

One of her friends taught her how to make these and of course I wanted to have a go at it too. Instead of scoubidou string I used strips of fabric for one and leather - what did you think?! - shoelaces in offsetting colors for another one. I believe both resulting bracelets look really nice. The possibilities in terms of material to braid with are endless. So, in case you 're in need of a fun summer project here's a how-to in 16 pictures with a short description below.
This is what you'll need for an adult size leather bracelet. Steps: 1. This is the kind of craft you could easily do with kids - have them cut strips of fabric, no need to worry about the strips being straight and regular, and teach them how to braid. With special thanks to my little girl M. for teaching me how to make these... Modern DIY Bracelets.
28 Jun As a girl, I spent a lot of summer days lounging around making friendship bracelets of one form or another.
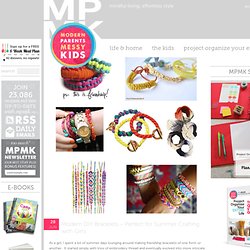
It started simply with trios of embroidery thread and eventually evolved into more intricate creations involving beads and other such adornments. Lately, all sorts of inspiring DIY bracelet posts have cropped up around the web and it’s made me nostalgic for those uncomplicated summers. So today I’ve rounded up a dozen wonderful bracelet crafts. Share them with a special young girl in your life and carry on the tradition. Dip dyed nautical rope bracelets DIY at …love Maegan.