
Button Statment Rings | It’s September and that means it’s time to add another statement piece to your collection…. obviously! I heart almost every piece Nicole Richie designs for House Of Harlow 1960, especially her oversized rings. As amazing as these rings are they’re also an easy DIY. Buttons, buttons everywhere!! Materials: Buttons, Clippers, Glue, Rings With Flat Tops (available at the jewelry supply store) Use your clippers to remove the shank from the back of the button. Once you’ve made the back of the button flat, use an ample amount of glue to secure the ring to the back of the button. Here’s another hint: If you can’t find a flat ring base, Ring Pops are a fun alternative. Once the base has dried, glue on the button. I now thing I have enough new statement rings to get me through the month.
How to make wrapped leather bracelets « Rings and Things Triple-wrap leather bracelet with blue tigereye beads Let me begin by stating the obvious – this style of wrapped leather bracelet is EVERYWHERE this season. Everywhere! Five different leather wrapped gemstone bracelets designs: green opal, mookaite, African turquoise, hematite and rhodonite The supply list is pretty short: 4-6mm round beads We used gemstone beads, but glass, crystal beads or pearls would also be lovely. Wrapped bracelet made with green opal gemstone beads and natural Greek leather. The technique: Choose your bracelet length and cut your leather. If your button has a small loop, you might need to miter (angle) the leather end and pull it through with pliers. Other design options: Have fun creating your own wrapped bracelets! Need supplies? Other how-to’s: How to etch copper | How to wire-wrap a brioletteHow to dap & dome metal jewelryHow to make interchangeable magnetic jewelry with 1″ buttonsHow to make Pi-day earrings using mini bottle caps as pans
Bottles Full of Light The other day, I wrote about attempting to drill through glass and I finished up the project this weekend. I think it turned out beautifully — I love the idea of bottled light! These would be pretty by a wintery window or under an entry table. I like the way the gold paint makes the bottom of the bottles look misty and glow-y, even during the daytime. I’ve got a ton of images and DIY instructions below if you’d like to try this too. I started with these apple juice bottles from Whole Foods. Next, I used my handy scraper tool to take off the label. Once the bottle was clean and label free, it was time to drill through the glass. [UPDATE: Hah! Next we painted. I used a disposable sponge brush and Liquid Leaf paint — but any metallic enamel paint should work. Once the paint was dry (it dries very quickly), we started stuffing the lights in. And that’s it! This is another project as a True Value Blog Squad Member.
Geek romance: How to make a Storm Glass pendant : SciencePunk Toward the end of last year, being in possession of two novelties – a girlfriend and a steady job – I decided to spend my free evenings crafting a very special piece of jewellery. I was inspired by a visit to Barometer World in the late summer, where I discovered the curious material known as storm glass (tragic backstory recounted here). In short, a storm glass is a weather divination tool so old that nobody really knows where they came from. It’s likely they were borne out of alchemy experiments performed during the medieval period. Inside a sealed glass tube, crystals bloom, wither and vanish spontaneously, apparently spurred on by weather fronts. It was a thing of wondrous beauty. Nobody knows what exactly makes storm glasses act this way. It was around then that an idea hatched in my head: if it was really heat that caused a storm glass to sigh and sway from one condition to another, then why couldn’t it be turned into a pendant?
How to make wrapped leather bracelets « Rings and Things Triple-wrap leather bracelet with blue tigereye beads Let me begin by stating the obvious – this style of wrapped leather bracelet is EVERYWHERE this season. Everywhere! Five different leather wrapped gemstone bracelets designs: green opal, mookaite, African turquoise, hematite and rhodonite The supply list is pretty short: 4-6mm round beads We used gemstone beads, but glass, crystal beads or pearls would also be lovely. Wrapped bracelet made with green opal gemstone beads and natural Greek leather. The technique: Choose your bracelet length and cut your leather. If your button has a small loop, you might need to miter (angle) the leather end and pull it through with pliers. Other design options: Have fun creating your own wrapped bracelets! Need supplies? Other how-to’s: How to etch copper | How to wire-wrap a brioletteHow to dap & dome metal jewelryHow to make interchangeable magnetic jewelry with 1″ buttonsHow to make Pi-day earrings using mini bottle caps as pans
DIY Wrap Bracelet You should all know by now that we are all about stacking bracelets on our wrists. The more, the better. In fact . . . the most, the best! You’ll need (for a double wrapped bracelet) :* Lengths will vary depending on the size of your wrist (see comments for suggestions). Fold the length of leather cording in half to form a loop. Place the ball chain along the leather cording with the end of the chain meeting the end of the wrap. Continue wrapping while checking it for fit around the wrist. When you have reached the end of the ball chain wrap the linen cording around the leather strands 2-3 more times. Thread the hex nut through the strands and tie a second knot. Trim with scissors and your wrap bracelet is finished!! The materials are listed for a double wrap bracelet. It’s a party! (tutorial adapted from Ornamentea; top image via Jak & Jil, rest of image by Honestly…WTF)
Zip-up Earbuds & LauPre - StumbleUpon I love to have my music with me everywhere I go, but I hate the tangled mess my wires become when I toss them in my bag or pocket. Last night I whipped up a fun and functional solution by adding a zipper to my earbuds. This project took me around an hour to do (perfect for catching up on some t.v. from hulu.com). The first step is to pull the earbuds apart, to separate the wires all the way down to the plug. Next, take one side of your headphones and one side of the zipper tape and start stitching the wire into the tape. It’s as easy as that! Then unzip them to the length I want and put them on so much faster than having to untangle the mess!
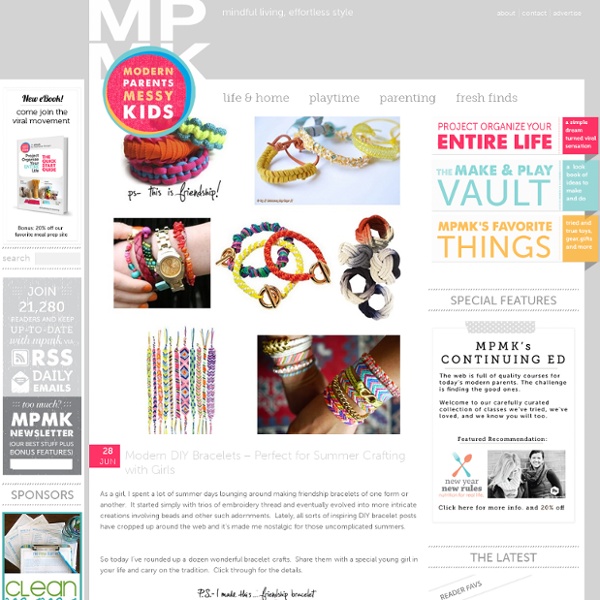
untitled DIY Friendship Bracelet For several months now, we’ve been receiving emails requesting a friendship bracelet DIY. Well, friends, ask and you shall receive! Today, we’ll give you a step by step tutorial on the classic chevron pattern. You’ll need:embroidery threada safety pin or tapea pair of scissors Start by cutting several strands of embroidery thread at about 24 inches each. Start on the left side with the outermost color (shown here in red) and make a forward knot by creating a 4-shape over the 2nd color, loop it under and back through the opening. Pull up and to the right to tighten. Now pick up the outermost color on the right side (show here in red) and make a backward knot, creating a reverse 4-shape over the 2nd color, loop it under and back through the opening. Continue knotting towards the left until the outermost strand reaches the middle. Remembering the color order is important for the first few rows but after the 3rd or 4th row, the strands will fall nicely in place.
Mason Jar Key Hook - StumbleUpon Hey guys! Hope you all had a great Wednesday I have a fun project to share today! I started with a 1×8 board from Lowe’s that I cut to about 2′ long. I also purchased 3 hooks and a pipe clamp from Lowe’s. My next step was attaching them to my board. Then it was time to attach the clamp. I used a 3/4″ wood screw to attach it to my board. Finally, I added to picture hangers to the back of it and hung it up. I love it. I’m thinking these would be super cute hand towel hooks for the bathroom. Thanks for stopping by! I will show you my new paint method in my next post so stay tuned. ~Whitney
Nini Makes Summer bracelets DIY When M. came home from her camp with school, she showed me this yellow bracelet she made with 'scoubidoo' strings. One of her friends taught her how to make these and of course I wanted to have a go at it too. Instead of scoubidou string I used strips of fabric for one and leather - what did you think?!- shoelaces in offsetting colors for another one. I believe both resulting bracelets look really nice. The possibilities in terms of material to braid with are endless. So, in case you 're in need of a fun summer project here's a how-to in 16 pictures with a short description below. This is what you'll need for an adult size leather bracelet. Steps: 1. This is the kind of craft you could easily do with kids - have them cut strips of fabric, no need to worry about the strips being straight and regular, and teach them how to braid. With special thanks to my little girl M. for teaching me how to make these...
A Tutorial: Fabulous Ric Rac Flowers & Matilda Jane Clothing Rocks - StumbleUpon Let me start out with a warning or sorry of some sort. The warning is because I have never done a Tutorial before, so I hope this is helpful and easy to follow. The sorry is for how horrible my nails look. I promise I did them after looking through these pics. WOW! I thought I would start off with a Flower, I too, just learned how to make. Material: Time-Roughly 20 minutes about 28 inches of Ric Rac ( This will make a flower about 2 inches in diameter) Suggestion: The thicker the Ric Rac the better Felt (Any Color) One sheet will be fine depending on how many flowers you want to make. Optional: Hair Clips, leaves or buttons Step One: Take the two pieces and hot glue them together. Note: You want to glue them together as if they are a mirror of one another. Step two: Lock in each curve of the first piece with the second. Say to yourself “over,under,over, under”. *If your piece does not look like this, then you most likely glued the two pieces going the wrong direction. Pretty right? Cute right?