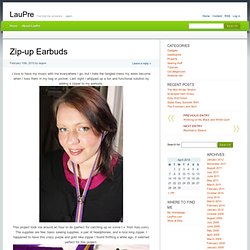
How to make gift bags from newspaper. When I bought something at a store recently, the clerk handed me my purchase in a bag made from a newspaper.
I liked it very much and had to make some more—thus today's DIY recycled newspaper project: gift bags made from the Wall Street Journal. You can vary the dimensions, of course, but here's what I used to create a bag that's 5" tall, 4.5" wide, and 3" deep. Stack two sheets of newspaper on top of each other. This will be a two-ply bag for extra sturdiness. Cut out a rectangle that's 15.5" wide and 8.25" tall. Fold a flap 1.25" down from the top.
Cut two pieces of cardstock or chipboard to 4.25" x 1", then glue them on the widest two panels just under the top fold. Put glue on the outside of the 0.5" tab and bring the left-most panel over to form the body of the bag, aligning the cut edge of the panel with the folded edge of the flap. Upend the bag so the 2" flap is now up. Put glue on both flaps and fold them inward to form the bottom of the bag. Recommended Reading: 65 Craft Blogs We Love. It's April, which means it's officially stashbusting month!
It's time to dust off all of the supplies hiding at the back of your closets and create using what you already have on hand. Think of it like spring cleaning, only much more fun! If you're planning to plow through your excess stash this month, you'll be needing plenty of ideas and inspiration. Heather and Rhonda put their heads together and came up with this list of must-visit blogs to help steer your way through your stashbusting odyssey.
Do-it-Yourself DIY String Wedding Lanterns Yarn Chandeliers. Jessica of Wednesday Inc shows us how to make those gorgeous twine chandeliers from the inspiration shoot she shared with us this morning.

Using balloons, glue and twine, you can also make these lanterns for your wedding – and then bring it home and use it as your very own mid century lampshade. What you will need are: balloons, glue, yarn, tray for glue, corn starch 1/2 cup of Corn starch, 1/4 cup of Warm water, clear fast drying spray paint, hanging lamp cord or fishing line (depending on your desired final product), and a lighting kit if you’re looking for a fully functional lantern. DIY Faux Curled Rosewood Wreath {Made From Rolled Recycled Book Pages} I have seen various versions of Faux Rosewood Wreaths in just about every store and catalog for the upcoming season; most with a price tag running upwards of $40 or more.

Some are crafted of paper and other of real wood shavings. Last year I made a few rolled flower gift toppers from recycled book pages and they remind me so much of the curled wood roses I thought they would make a good substitute. {with a much lower price tag} Materials Needed:Foam Wreath FormRecycled Book PagesLots of Hot GlueRibbon to Hang The full step by step tutorial I posted last year can be found {here}.Basically you layer three book pages together and draw a spiral circle.
Starting with the outside of the spiral, roll the paper inward to create the flower shape. Give the wreath form a light coat of white {or light color} spray paint to help camouflage any see-through spaces. It seriously takes quite a few roses to fill the entire wreath, however I think the finished project has such a unique look.
{Simply Lovely} Psimadethis.com. What to do with your new ring? DIY Toner - Homemade Facial Toner Recipe. Steampunk Keyboard. Judah Method - Bleaching Experemnet on the Behance Network. Instructables - Make, How To, and DIY. Book.jpg (896×3147) Gift Ideas for poor creative souls (6) Gift Box. Gift Box This box made from two bills.
The bills/box can be the gift itself, but it is also just about the right size for a ring box. (Perhaps a dollar-bill ring?) Get yourself two fairly new, crisp bills. Older "soggier" bills are much harder to work with. Lay the bill on a flat surface, face up. Fold the note top-to-bottom just to the right of the portrait, then unfold. Starting at the top left corner (as illustrated), close the top third fold to about 90 degrees. Inside this corner will be a remaining portion that you will crease along the natural 45 degree line to complete the corner. Complete the previous step for the other three corners. Bath and Body Recipes - Index - Bath and Body Recipes You Can Make at Home. Crafts by Carolyn - Exploding Box. 66 Things You Can Grow At Home: In Containers, Without a Garden - Planet Green.
Make Your Own Shrinkable Photo Jewelry. Fashion Sewing Projects. Zip-up Earbuds. I love to have my music with me everywhere I go, but I hate the tangled mess my wires become when I toss them in my bag or pocket.