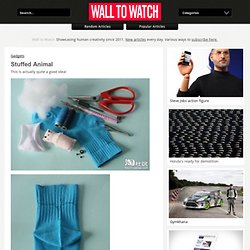
Tutorial: Gathered Round Basket. I had a few requests for instructions on how to make the gathered round basket that I made last week.

This is an easy project and the baskets can be made in any size, are fully reversible, and are useful for so many things. Materials: (to make a basket measuring 4 1/2 inches diameter and 1 3/4 inches high) 2 pieces of cotton fabric cut into circles with a 8 inch diameter (I used a small side plate as a template)1 piece of fusible wadding (such as parlan or pellon) cut into a circle with an 8 inch diameterstrip of fabric measuring 2 1/4 inch x 14 inch (for binding) Instructions: 1. 2. 3. 4. 5. 6. 7. 8. 9. Edit 07/ 2012 – Just wanted to clarify in response to a few emails – The circles are 8 inches in diameter (the measurement you get if you rule a line through the centre of the circle) and when they are gathered they measure 12 inches in circumference (i.e all around the outside of the circle).
Quick fix grocery bag. We had grapes this weekend.
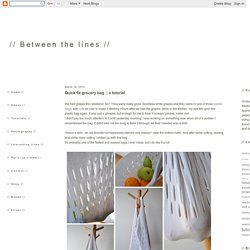
So? They were really good. Seedless white grapes and they came in one of those plastic bags, with cuts all over to make it stretchy. Hours after we had the grapes, while in the kitchen, my eye fell upon the plastic bag again. It was just a glimpse, but enough for me to hear it scream: please, make me! I found a shirt - an old favorite but hopelessly stained one (bleach* near the bottom hem). In case you want to give this super fast and easy grocery bag a try as well, keep on reading as I wrote down some instructions for you.
What you need: - an old T-shirt- scissors- matching thread- a button- a piece of ribbon- sewing machine. Not martha - to make: marble magnets. I finally gave in and made marble magnets.
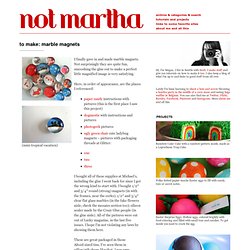
Not surprisingly they are quite fun, smooshing the glue out to make a perfect little magnified image is very satisfying. Here, in order of appearance, are the places I referenced: paper candy instructions with pictures (this is the first place I saw this project) dogmestic with instructions and pictures photogeek pictures ugly green chair cute ladybug magnets – pictures with packaging threads at Glitter:onetwothree I bought all of these supplies at Michael’s, including the glue I went back for since I got the wrong kind to start with. I bought 1/2″ and 3/4″ round (strong) magnets (in with the frames, near the corks); 1/2″ and 3/4″ clear flat glass marbles (in the fake flowers aisle, check the mosaics section too); silicon sealer made by the Crazy Glue people (in the glue aisle). These are great packaged in those Altoid-sized tins, I’ve seen them in office/gift shops like that. DIY Macrame Bracelet.
Growing up by the beach in Southern California, the ability to knot a macrame bracelet was practically a right of passage.

Although those days are long behind us, we’ve never forgotten the ever-so-simple square knot technique. This time, however, we’re replacing hemp and wooden beads for more updated elements like colorful nylon cord and glossy metal charms. Happy knotting! You’ll need: Start by cutting the knotting cord into two 30 inch, two 20 inch and one 10 inch lengths. Center the 30 inch cord under the two middle strands. Pull tightly and slide the knot up to the top. Finish the 2nd half of the square knot by folding the left cord over the middle strands and under the right cord. Pull tightly and repeat the steps – left, right, left, right . . . To finish the knots, thread one of the cords onto a needle and sew up the center of 3-4 knots along the backside. Repeat the same step on the other cord. After sewing up both knotting cords, trim away any excess. Stuffed animal. Gadgets This is actually quite a good idea!