
Tutoriel : Trousse à fermeture éclair à dentelle - Fée-Main le blog! A pair and a spare . diy fashion. Morning by Foley. Blog féminin, créatif et très DIY (do it yourself) Cococerise – le blog. Le Meilleur Du DIY. Hummm, mais que veut dire ce titre ?

Aujourd’hui je vous propose un DIY pour... Il y a quelques jours je vous ai montré un DIY pour customiser un tote... Ce jour je vous présente deux DIY ! Un pour fabriquer votre Tote bag et... Bonjour ! Il est MA-GNI-FIQUE, se réalise en quelques minutes, avec une paire de ciseaux, j’ai nommé... DIY envelope clutch. (vintage romper, river island feather headband) I’ve been wanting an oversized clutch for a while now, especially since I laid eyes on that Celine clutch shot by Tommy Ton for style.com.

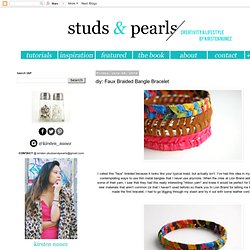
Its minimalism is so beautiful. Then, I saw the Clare Vivier La Pochette on ofakind.com and instantly knew what my next DIY would be. DIY. Faux Braided Bangle Bracelet. I called this "faux" braided because it looks like your typical braid, but actually isn't.

I've had this idea in my mind for a while; I've been contemplating ways to use thin metal bangles that I never use anymore. When the crew at Lion Brand asked me if I'd like to try out some of their yarn, I saw that they had this really interesting "ribbon yarn" and knew it would be perfect for this project. I love trying out new materials that aren't common (or that I haven't used before) so thank you to Lion Brand for letting me try it out! Of course, after I made the first bracelet, I had to go digging through my stash and try it out with some leather cord and satin ribbon. I also love how this particular way of wrapping and weaving creates a subtle chevron look. Supplies: - 4 thin metal bangles (or less/more, depending on the thickness of each bracelet and your desired look) - Measuring tape, scissors, Scotch tape - Any kind of flat fiber of your choice, such as ribbon or leather cord.
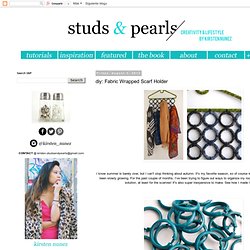
Fabric Wrapped Scarf Holder. I know summer is barely over, but I can't stop thinking about autumn.

It's my favorite season, so of course my collection of scarves has been slowly growing. For the past couple of months, I've been trying to figure out ways to organize my room and closet. This is one solution, at least for the scarves! It's also super inexpensive to make. DIY - Blog Do It Yourself - Loisirs Créatifs. Simple luxury giant shawl. We´ve worn the orignal Simple Luxury Shawl so much that we though we´d give it a shot on larger needles.

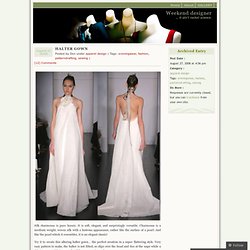
We´ve used Abuelita Worsted with the Silk Mohair this time, and the result is as giant, soft and warm as you´d think it´d be:) YarnAbuelita Merino Worsted 200 gPickles Silk Mohair 50 g (2 balls)We used yellow and honey NeedlesLong circular needles US 36 Gauge4 s=4" MeasurementsHeight 39"Width 106" Knitted in garter stitch from bottom up. Cast om 3 stitches with one strand of each yarn (use double strands for the whole project). HALTER GOWN. Silk charmeuse is pure luxury.

It is soft, elegant, and surprisingly versatile. Charmeuse is a medium weight, woven silk with a lustrous appearance, rather like the surface of a pearl. So You Think You're Crafty. Thanks to those of you who voted in our last challenge.

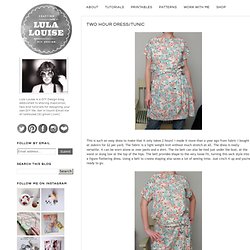
We continue to have record numbers voting in our weekly challenges and I cannot tell you how much it means to me to have our competitors projects seen by so many… For those of you who are visiting from Pinterest today, welcome. SYTYC is a craft and DIY competition. Each Monday we feature themed projects created by our competitors. Please help us out and cast your vote… The winner of our scraps challenge is Crystal. Crystal’s on something of a roll having picked up our In the Kitchen Challenge with her chalkboard serving tray… And then picked up our Fall Challenge with her reversible fall pillow… Lula Louise: Two Hour Dress/Tunic. This is such an easy dress to make that it only takes 2 hours!

I made it more than a year ago from fabric I bought at JoAnn's for $2 per yard. The fabric is a light weight knit without much stretch at all. The dress is really versatile. It can be worn alone or over pants and a shirt. The tie belt can also be tied just under the bust, at the waist or slung low at the top of the hips. Below are my notes from when I made the dress. Below is a nice clean diagram of the pattern. The steps are simple. According to my notes, if I made it again, I would curve the underarm seam, shorten the sleeves and increase the length of the dress. Whip Up Tutorials. Lark Craft’s upcoming book Heart-Felt Holidays: 40 Festive Felt Projects to Celebrate the Seasons is the follow-up to Fa La La La Felt. The book comes out in April, but Lark Crafts are starting the fun early by offering this Mushroom love brooch project by Lisa Jordan . Smaller: Small craft- Zsa mask.
We are really excited about this cool hat project!

It's easy enough for even a beginner like me to make so I am going to try and get one done for Christmas. You can find other great projects and get some crafting inspiration from the prolific and talented Dutch blogger- Mme ZsaZsa. Although the design looks complicated, it’s actually just a piece of knitted fabric with the sides stitched together. The ears don’t have to be knitted but are shaped by wearing the hat, and the eyes are openings made by casting stitches off in one row and casting them back on in the next row. Take a look at the pattern drawing: You knit a rectangle of 31 stitches to a length of 40cm. Ok, we’re starting. - Cast on 31 stitches and knit 4 rows in stockinette stitch, that is knitting one row (RS) and purling the next (WS). - Row 5: knit 8 stitches, cast off 6, knit 3, cast off another 6 and knit the remaining 8.