background preloader

Cewing

Facebook Twitter

Chandra

Flutter Sidewalk Surfers for Women | Sanuk. Pasta with Cherry Tomatoes and Almond Pesto. HOW TOs | Page 2. The Five Hotel – Experience Boutique Hotel Paris- OFFICIAL SITE. Tempt your 5 senses: your sense of smell, touch, taste, hearing and your sight. • Your sense of smell: choose one of our 5 fragrances to use in your room: - The gourmet touch: Fig & wood, a soft, fruity fragrance with warm and sweet tones. - The tonic touch: Cologne inspiration, a subtle smell of invigorating green mint. This pure scent will refresh your body and mind. - The relaxing touch: Sandalwood, a scent that will relax you and enable you to escape during your sleep. - The sensual touch: the Jathikai, an aphrodisiac and spicy smell which will awaken your senses with its smooth and intense features. - The natural touch: a natural fragrance which will provide a sensation of well-being (odorless). • Your sight: you will be captivated by the fiber optics integrated in the decoration of each room, both in the glass desks or in the ceiling, in the form of a starry sky.

Design and Boutique Rooms. BOUTIQUE HOTEL in Paris ! SEVEN HOTEL ****, Official Site ! Design Hotel Paris Design Hotel Paris Trocadero Room | Hôtel Secret de Paris | Design Hotel. Hôtel Design Paris France | Hôtel Secret de Paris | Site Officiel. DualMate Plus lV - Sewing & Craft Club. DIY Christmas Stockings: a Sewing Tutorial | MarySew » How To: Make a Steampunk/Burlesque Fascinator Hat.

Hey everyone! I made myself a pretty fascinator hat today for my Steampunk outfit on Friday. I thought you might be interested in how I did it, so here is my How To for you :) I will wear my hair up and wear the hat to the side. I hope it will look as pretty as I imagine it :D So, here is what you need: thin cardboard (I recycled cookie packaging)hot glue gunsewing machinescissorsstaplerbias bindingfake leathertullepearls, feathers, watch parts, organza, buttons, ribbons, flowers etc to embellish your hata small hair comb or bobby pins to fixate the hat in your hair Get started by drawing a circle the size your hat should become on the cardboard and cut it out.

Make a cut to the middle the cardboard circle, get it into a small cone shape and use the stapler to fixate it. Now use the glue gun to glue the leather to the cardbpard cone. Now turn your hat over and cut the overlapping leather every few inches, flap it over and glue it to th inside of the cardboard. Enjoy! Xoxo Trisha. Strung Sewing Button Sculpture. More Fabric Flowers. Reversible Coffee Cup Sleeves. I’m gonna tell you right now, you can’t throw a rock and not hit a tutorial for a coffee cup sleeve out there on the web. Reversible, not reversible, buttons, Velcro, skinny, wide, you name it. For that matter, you can probably work a pattern out yourself. However, just in case your rock lands here, I’m going to share my version with you. I’ve made a few of these for Christmas and birthday gifts. You can see the one I made for my grandma here. I was trying to decide which fabrics to use for a new one and my wandering eyes landed on my seasonal fabric stack.
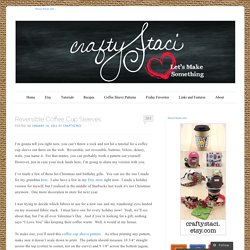
To make one, you’ll need this coffee cup sleeve pattern . Cut one from cotton batting, two from ironing board cover fabric and two from cotton fabric. I happen to have scraps of batting and ironing board fabric, but if you don’t and will be buying the supplies, another product you can use is InsulBrite. You’ll only need half of the hair tie, so zigzag stitch through the center, about 3/8” long, then clip through the center. Lay flat. Beginner's Bias Tape Bag with Free Downloadable Pattern. Stepping Thru Crazy: Round Braid Bracelets. I've got another EASY tutorial. GASP! This one is pretty easy, but since I watched a video on how to do a round braid, I won't take credit for the instructions. Here's the video I watched on YouTube: Instead of using leather, like in the video, I cut up four pieces of scrap fabric, in this case patriotic for the Fourth of July.

Using my sewing machine, I stitched the ends on one side together. I followed the instructions in the video, and once the braid was long enough to be a bracelet that I could slip my hand through, I sewed the ends together and trimmed the excess fabric off. I made three more the same way, and then using a piece of white scrap fabric, I tied them all together with a bow. Pretty Felt Flowers. At the book launch party, there was a table devoted to crafting with felt. I made several flower pins and some templates for others to use. I thought it would be fun to show you how to make a couple of those flowers. I drew inspiration from two Japanese crafting books: this book and this book. I love working with wool blend felt! It just feels so nice as you play with it, and it cuts cleanly without all the shredding that cheap felt does.
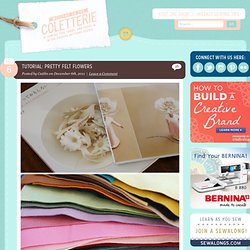
Tools Needed wool felt pin back scissors, embroidery scissors are excellent hand sewing needle thread glue gun, optional For both flowers Draw your templates. Cut out the felt using your templates. Flower 1 Fold the rectangle lengthwise and snip into it all the way across. Repeat the previous step for the smaller piece. Keep the felt folded over and sew a basting stitch through the bottom layers. Pull the thread tightly to gather.

Repeat the previous steps for the smaller piece. With a couple of stitches, sew the smaller piece into the middle of the flower. Stepping Thru Crazy: Men's Button-Up Refashion... into Ladies Tank! A few years ago, when the hubby and I lived in Florida (this was pre-kids, so make that 5-ish years...) I bought him a button-up shirt for his work. The deal was that he had to wear blue or white button-ups, so I thought, "Why not both at the same time? " And I got him this:Apparently when he wore it to work, his boss told him he looked like a picnic basket, aaand the shirt was retired to the closet. Well, I don't care if I look like a picnic basket, so I decided to turn it into a tank top for myself! It was actually really easy to do... let me try once again to tell you how I used a sewing machine... eh....
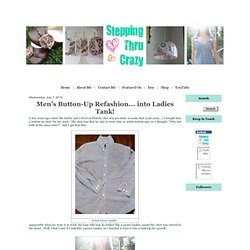
First things first, I chopped the sleeves off. Then I slipped the shirt on and pinned in the sides so that it fit. I took off the shirt, flipped it inside out and sewed up the sides where my pins were, trimmed off the excess, flipped it rightside out again, and tried it on to make sure it fit. Then I pinned the armholes the way I wanted them... carefully......and sewed them.

That's it! Fashion, Sewing Patterns, Inspiration, Community, and Learning | BurdaStyle.com. Fleece Dog Bed Tutorial | Dog Under My Desk. Loki got a new bed today and the weather held out for photos, so you all get a new tutorial! Read below to learn how to make this cute fluffy fleece dog bed! I’ve made… four of these now? At least four. Anyway, you can make these all different heights and diameters (π is your friend). Loki already loves it, he’s sleeping on it right now under my desk. You’ll need 1 1/4 yards of fleece. I cut the 26″ square first, then folded in it fourths. (If you buy 1 1/3 yards, you can squeeze out 28″ circles, but not much more than that.) Now, sew the long pieces together on the short side, right sides together, to make once long piece. Now mark the halfway points on both circles. Now take one circle and place it right sides together with the long piece, matching the center seam to the center point.
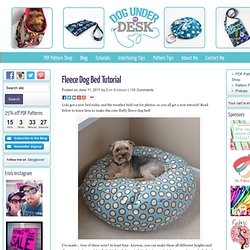
Sew in both directions starting from this center point/seam to 4″ from the other center point. This diagram will help: Sew the other circle in the same manner. Turn it right sides out: Keep sewing… Done! Easy iPhone Sleeve Tutorial | Dog Under My Desk. **UPDATE 10/31/12 – Welcome to all the new visitors finding their way here from some of the holiday tutorial roundups! When you are making this, please keep in mind that if you or your intended gift recipient has an iPhone 5, this sleeve won’t fit. The iPhone 5 is .37″ taller than the iPhone 4/4s. Adding .75″ to the total length of the fabric piece that you cut out should compensate nicely.

One of these days I will redesign it with a front pocket and a strap closure, but right now I need to focus on my patterns. I’ve been using my wristlet for my phone, which I love! Download here: Easy iPhone Sleeve Tutorial PDF Please feel free to ask any questions or leave me comments in this post! This sleeve will fit the iPhone 4 with a lightweight case like the Incipio Feather or the Incase Snap Case. This sleeve is supposed to fit very snugly so the phone does not fall out. Anthro Trimmed Necklace Knockoff. Have you entered the Black Friday Giveaways?? You have a couple more days to enter! Click here for links to all 18 Giveaways! How are you doing on your handmade Christmas presents? Need any quick, easy, super cute, jewelry ideas?? I thought you might. ;) I was browsing around and found the perfect thing. And here’s the original – with a $38 Price Tag: (photo credit: Anthropologie) I love the simplicity of this one. Ready to get crafting? 2 Colors of small beads (if you want to do the two color bow) I bought two tiny strands from Michael’s17″ of 26 gauge wire3 crimp beads18″ chain3 small/medium Jump rings1 large Jump ring1 lobster clasp1 Head Pin (optional)wire cutters, round and flat nosed pliers Begin by adding a crimp bead to one end of your wire piece.
Add beads onto your wire until the row of beads measures 11 1/2″. If you are doing the two color bow, add the beads in these measurements. White: 1 1/2″…Pink: 1 5/8″…White: 1 3/4″…Pink: 1 5/8″…White: 1 3/4″…Pink: 1 5/8″…White: 1 1/2″ Comments. Drafting a Princess Line Dress Pattern from the Basic Bodice Block. Taste-Test Recipe Binder. I’ve mentioned that I love to cook. And eat of course – but that usually takes cooking first. And while I have a great selection of cookbooks – I also have a ton of recipes that I’ve printed out from the web or copied from magazines. I’ve filled up a binder that my Mom made me – and more. It was time for a new one. You’ll never guess where I went “shopping” for ideas. I loved the design of theirs – and that little spoon – but I wanted a Binder version. I even did the little fork on the back of the book. I’m really pleased with how it came out. Here’s the original: Here’s the supply list if you’d like to make your own. Fabric for covering the binder – a little more than twice the size of the binderA Binder or notebook - mine is a 1″ BinderEmbroidery Floss and Coordinating ThreadA spoon :)Hot Glue Gun and GluePosterboard or light cardboard We’ll start with flattening the spoon.

Lay your spoon on an old towel outside. Wasn’t that satisfying? On to the binder! Pull the thread through. [dm]7[/dm] Adjustable Button Necklace « Trash to Treasure - tutorials | Craftwerk.ee. This wonderful tutorial is made by Petronella Luiting specially for our project "Tarbetust tarvilikuks" (Trash to treasure) - in witch we share tutorials of recycling and reusing things. This project is in Estonian language but some of the texts will be available in English as well... There are plenty of fab tutorials in Estonian version of the page - you can check them out HERE.

Don't speak Estonian? No problem just crab Google Translate and follow clear and good photos of the instructions. Happy discovering! Project is supported by EAA and Norwegian Financial Mechanisms through Fund for NGOs. Click the link and... Do you have old buttons in the house ? Material needed: Step 1: Measure about 150 cm of the cord and cut it off; thread this piece on the needle you are going to use. Step 2: Step 3: Repeat step 2 as long as you like the necklace to be (I made it here about 50 cm long). Step 4: the adjustable closure.

Now you knot each end, so that they cannot slide out of the button. Untitled. Here’s the tutorial for Sadie’s pleated headband she wore with her Winter Wonderland dress. Click below for more! You’ll need: scrap of fabric (mine was about 3″x11.5″)scrap of interfacing (same size, ish)elastic headband (I found mine at both Target and the dollar store)pearls or buttons if you wantscrap of matching feltglue gun First, cut your piece of fabric out.. Iron on your interfacing…(obviously mine wasn’t exact, it doesn’t need to be, just close enough) Then, I serged (or you could zig zag stitch), each short end. Folded it over, towards the wrong side of the fabric, and ironed it. Then, I folded it in half lengthwise like so, (right sides together) and serged down the edge…making sure to keep the ironed edges tucked down like so. (no pic, sorry!) I also dabbed a little bit of fabric glue between the fabric on the short ends to keep them closed. I then cut a piece of felt to fit, rounded the edges… Then I also glued on some flat backed pearl beads for some extra glamour!

Tada! The junebug dress. And now for the Junebug dress tutorial/sew along. (without much fanfare apparently) You’ll need: 1-2 yards of fabric, depending on child’s size. I barely scraped by with one yard for my 2T size 6 buttons-for the pattern I provide no larger than 5/8″ thread, sewing and pattern making stuff (ie sewing machine and paper) You can download the free 2T/3T pattern here. Ok, if you’re not using the pattern, let’s get going and make your own! This will be the back piece of your bodice-so trace the back neckline. Next, cut out your back piece, and trace it again. Then cut out that pattern, trace the back piece again, and draw your bodice flap pattern. Then I drew a sleeve shape like this one for my gathered sleeve. There. Tomorrow: bodice and buttonholes! Braided headbands. I am STILL growing my hair out and while I have surpassed the really difficult stage, it seems I am always one bad hair day away from shaving my head.

I've done it before and could do it again- once you know how easy it is to have short hair or very little hair, it is SO tempting to go back. That is why having lots of hair accessories on hand is a MUST! I have a variety of ways that I like to pull my hair back and lately I've been having fun making my own braided headbands. They are really easy to make and super cute to wear on a bad hair day :) Start with a blank headband or even upcycle one that you are ok covering up. Using fabric (pretty much anything), cut into strips a little longer than the headband and braid the strips.

I used a thin and stretchy jersey fabric. Using craft glue or hot glue, wrap the headband with a strip of the same fabric. Glue the braid to the top of the wrapped headband. You could use just about any kind of fabric, fiber, lace, ribbon, etc to braid. The Knotted Headband Tutorial. My husband came home one day with a headband he had found in a parking lot (I know...sooo sanitary) and said "I bet you could make one of these" so I did...because I'm all for stealing awesome ideas. Difficulty: Medium Time: 30 minutes Cost: Under $10 Fun-ness: Why would I do a boring project?

Materials: Yarn (100% cotton for a crisp look, acrylic for a softer look) Size H or J hook Ribbon (approximately 1/2 inch wide) Hot Glue Gun Directions Step 1: Creating the Chains And that's it! So wear your headband with pride! Love the headband, but don't want to make it yourself? Page corner bookmarks | I Could Make That. Felt Poppy tutorial and pattern. Bear: Tutorial and Pattern. Joyful braided bracelet tutorial.