DIY+Pregnant Brain. Without getting into too many details-the baby is going to be a little longer than we thought. We were afraid that she was going to be early, and now that she isn't, I sort of feel like I'm living life in limbo.I don't know if it's just me, or women in general, who find the strangest tasks to pass time until a baby arrives. Suddenly, the weirdest things pop on to our 'to do' lists, and become oddly important.
And the tasks seem to grow weirder and weirder with each baby. Right before I had Reuben, for some reason, I decided that my living room futon needed a new cover. Not great timing, but not so strange. Before I had Zeke, I needed to get all my Christmas cards done early-not just written, that wasn't good enough. My mom also contributes to this fun little routine-I think that she nests right along with us. That, and that's what her Mom always did to "help". Well, maybe not stranger than the salad dressing. Mom had suddenly decided that it was time to pair my family's odd socks. Mason Jar Decorating Ideas — Budget Wise Home. Organizing: Entryway Organizing Ideas - Martha Stewart. DIY. Creativity is essential for me as an individual, spouse, mom & friend. However, with five kiddos running crazy in the house I don’t have lots of time for projects that can’t be finished during nap time.
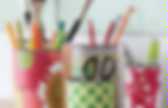
Below you will find some of the diy posts I’ve done in the past. Most are my unique ideas. A few are inspired by someone else, the tutorials will give credit where it is due. If you take the time to make one of my diy projects, please share a photo with me on facebook or instagram. I’d love to see what you create. A Mason of One’s Own. One thing that we get a lot of envy of over in the Land Beyond Beyond, are the beautiful little mason jars.
These beauties are ubiquitous when it comes to the expectations that we have of weddings Americana style. But, well the closest that we come to here are the Robinson’s marmalade jars – which really don’t do it for us – we love the look and feel of the lovely Mason’s. They have this chunky solid feel that we just love. So, of course you could colour us happy when we happened upon the Pure and Noble blog (check it out there are a whole load of lovely finds up in there). The photographic glory goes to: Brooke of Pure and Noble About the author I'm the big kahuna with the whole shebang. Hula Hoop Rug | No-sew Projects. Easy Organic Living. Tutorial – How to Design and Sew a Slipcover, Part 1. So you’ve got a perfectly comfortable, functional couch… it just looks like hell.
With a custom made slipcover, no one will know what evil is lurking underneath all that handmade awesomeness! We scored a couch, loveseat, and chair set at a secondhand furniture store when we first moved in. The upside is that it’s the most comfortable couch I’ve ever had the pleasure of napping on. The downside is that the couch takes quite a beating, especially from our two cats. I’d been thinking about slipcovering it for a while, and once Spring Fever hit me, I decided now was the time to do it.
Step 1 I decided on the fabric first. I saw a commercial a few years ago that featured two women sitting on a couch that was covered or slipcovered in a sort of crazy quilt type patchwork. Too busy. To choose my fabric, I did a few sketches on the computer, inserting various Home Dec fabrics I found online, until I found the ones I liked. Just right! . Fabrics! I also wanted something I could wash. Step 2 Step 3. Scraproom: paper storage. Candles in Seashells.
Butterfly wall hanging tutorial. I'm so excited to share my Butterfly Wall Hanging today! I created this project as part of "All About Easter"...so welcome to all of you who popped over from Kiki Creates! (And the rest of you should really check out the other posts if you haven't already...all kinds of Easter goodness going on over there.) Keeping with the butterfly theme I've got going this year, I wanted to add something bright and cheerful to my spring/Easter decor. And this little beauty is so easy and inexpensive to make. To create one of your own you'll need: a photo frame craft paint/paintbrush or spray paint mod podge butterfly images an xacto knife scissors or a paper cutter a page from an old book wire wire cutters/pliers hot glue a marker scrapbooking tape I actually had all of these things on hand, except for the frame which I picked up at the dollar store.
Now you might be thinking, "She just happened to have some vintage butterfly illustrations on hand? Well, no. Next, paint your frame the color of your choice. Wallflowers. I never seem to grow tired of flowers. And this version reminds me of being a kid, with a grown-up twist. Did you ever make those tissue paper flowers in grade school? You know, where you fold them up like a fan and then pull the petals back? Yep, that’s what we’re doing here! And the white ones look like real magnolias to me. These are very easy to make and add a lovely touch to any sort of Celebration or even your day-to-day decor. Let’s get started! I used nice 3-ply, party-style paper napkins for this project. I purchased my napkins at IKEA because they usually have unique colors, such as the Chartreuse below. You can use any size of napkin you’d like but I really liked the large over-sized look for a wall, so I used the largest size IKEA napkins (and some smaller ones for the centers).
Okay, no rocket science here. Grab about 4 Large napkins: Unfold them and lay them on top of each other in a pile: Now start folding your stack of napkins up like a fan, or accordion: Should look like this: How To Make Magnetic Tie Backs for Curtains. Diy: reclaimed book cardholder | Life and Art of Andrea Rodgers. It’s Monday again! Yaaaayy. But that means it is time for another DIY so, YAY! Today I am going to share a super easy card holder. I made this is in a panic for my first craft show. I decided I Really Really needed an awesome business card holder/display, but I didn’t have much time or the funds for a fancy one. Here’s how you do it… There you have it. Have a great one and I will be back tomorrow. also, check out my Facebook page. All tape and starburst clipart is from puglypixel. Like this: Like Loading...
Filed under DIY, Inspiration, Photos, Recommendations, techniques Tagged as business cards, display, DIY, easy, Fun, how-to, learning, scrap wood, tutorial. Wipe Off Weekly Menu Board. I am a meal planner. I refuse to go grocery shopping without my week’s worth of meals planned out and list made. (It’s either that or wander aimlessly around the grocery store for two hours and then make ten more trips back during the week to get things I forgot.)
Once I get the groceries unloaded, I usually forget what I planned for, so I put together this super easy wipe-off menu board to keep track of what’s for dinner each night! Wipe-Off Menu Board Tutorial Supplies: Picture frame with glass front (I love these 12×12 frames I found at Ben Franklin for only $7!) 1. 2. 3. 4. Now everyone in the family knows what’s for dinner each week! I decided my frame would look better black in my kitchen, so I spray painted it black. Little Birdie Secrets are regular contributors to Make and Takes and was born from the crafting obsession of three friends living in the Pacific Northwest.