
Persimon Dreams. I’m too excited about my Scrap Quilt Contest piece to blog about anything else.
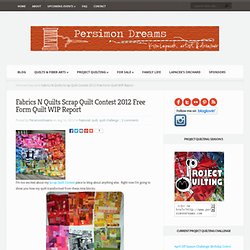
Right now I’m going to show you how my quilt transformed from these nine blocks: to this ‘Amazing Technicolor Dream Quilt’ top. I had a difficult time deciding what was the easiest and best way to ‘blend’ my nine blocks together. Where does one start? I finally just started. I chose to start with the black/white center and the orange block. I soon realized that when you’re just worrying about 3 colors (black/white, orange, and brown) it is much easier than you’re working about 5… (black/white, orange, brown, yellow and green) which was the case as I started my ‘blending’ process on the yellow block. Dresden Blade - ... by Toni-Michele. Corona 2: Solar Eclipse, © 1989 AQS Best of Show quilt by Caryl Bryer Fallert, Paducah KY. Since the time I was a young child in a grade school science class, I have been fascinated by the dramatic storms on the surface of the sun, which can flair out into the sky for hundreds of miles.
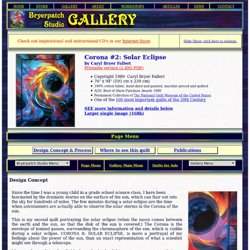
The few minutes during a solar eclipse are the time when astronomers are actually able to observe the solar storms in the Corona of the sun. This is my second quilt portraying the solar eclipse (when the moon comes between the earth and the sun, so that the disk of the sun is covered.) The Corona is the envelope of ionized gasses, surrounding the chromasphere of the sun, which is visible during a solar eclipse. CORONA II: SOLAR ECLIPSE, is more a portrayal of my feelings about the power of the sun, than an exact representation of what a scientist might see through a telescope. Starlight Diverging ... by soma1773. Oh, Fransson! — TOKYO SUBWAY MAP QUILTS pdf quilt pattern. This is a 20-page pdf quilt pattern that includes complete instructions for making a two-sided quilt in four sizes, as follows: 40" x 40" wall quilt 60" x 60" lap quilt 80" x 80" full bed quilt 90" x 90" queen bed quilt Please scroll through the listing images for more information about yardage and block sizes.
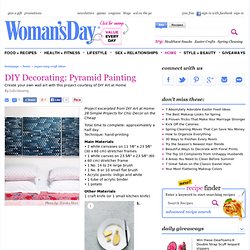
Inspired by colorful maps of the Tokyo Subway System, this quilt is based on a grid of 1,600 squares divided into 25 unique blocks that come together to make a stylized transit “map”. Wall Art Project - Craft Ideas at WomansDay. Project excerpted from DIY Art at Home: 28 Simple Projects for Chic Decor on the Cheap Total time to complete: approximately a half dayTechnique: hand-printing Main Materials • 2 white canvases on 11 7⁄8" x 23 5⁄8" (30 x 60 cm) stretcher frames • 1 white canvas on 23 5⁄8" x 23 5⁄8" (60 x 60 cm) stretcher frame • 1 No. 14 to 24 large brush • 1 No. 8 or 10 small flat brush • Acrylic paints: indigo and white • 1 tube of acrylic binder• 1 potato Other Materials1 craft knife (or 1 small kitchen knife) 1.
Windmills at Night- Free Quilt Pattern Series. My latest quilt pattern is called Windmills at Night. I designed it specifically for beginning quilters, using pre-cut fabric strips called “jelly rolls”. The bright red fabrics touch off the black and white fabrics beautifully, and this striking lap quilt will make a fabulous addition to your decor. Although it may look complicated, Windmills at Night is a simple pattern. A beginning quilter can easily tackle this project, and a more experienced quilter can easily finish this 40″ x 52″ lap quilt in a weekend.
Now, you can always select your fabric at your local shop and cut the 2.5″ wide strips to make this project, but I do want to let you know of an alternative. So many Unique Quilts of Art. Basics Tutorial: Prepping a Binding. Preparing a binding for your quilt takes a few minutes, but it’s not difficult!
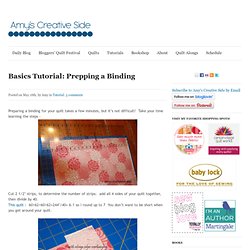
Take your time learning the steps - Cut 2 1/2″ strips, to determine the number of strips: add all 4 sides of your quilt together, then divide by 40.This quilt : 60+62+60+62=244″/40= 6.1 so I round up to 7 You don’t want to be short when you get around your quilt. Next, you need to sew all your strips together to make one continuous strip. Basics Tutorial: Straight Line Quilting. At this point you should have your quilt basted, and your machine clean.

Here’s a look at how I use straight lines to quilt. For straight lines – I use my walking foot . They all look something like this.
Free eBook How to Applique and Create Applique Quilts. Access to our blogs, forums, videos, freebies, and more! The ability to share ideas with the Quilting Daily online Community - accessible 24 hours a day, 365 days a yearThe Quilting Daily email newsletter filled with expert tips, techniques, and special offers (including contests and giveaways)More great Free Stuff in the members only section of our websiteAnd much more! Your email address is safe. Patterns. Basics Tutorial: Basting a Quilt. A few things you will need: masking tapesafety pinsan hour or so of time To begin, clear a flat surface large enough for your entire quilt back to be spread out, in this case the floor, you may have a quilt you can baste on a table top, be sure you can pull it taut on a flat surface.
Then tape your edges down, notice I don’t have my corners taped – you don’t want to pull it out of square. Put down a couple pieces on one side then move to the other, adjusting the tape as needed. When you feel it is nice and flat, but not stretched you can move on. Learn how to Paper Piece - Quilting Tutorial from ConnectingThreads.com. By Karen Johnson In this tutorial, I'll demonstrate how to achieve perfect points by machine stitching your fabric directly onto paper.
This is commonly known as Paper Piecing, or Foundation Paper Piecing, or around here, it's affectionately known as FPP. FPP is ideal for small blocks with intricate angles. Points that might be difficult to achieve with regular piecing can be a breeze when using FPP. The Paper - The main concept behind FPP is to use a paper foundation to stitch your fabric block.
In this video, I'll show you four different foundation papers: Carol Doak, Vellum, copy machine/printer paper, Stitch 'n Wash Dissolvable Foundation Paper. The papers I didn't demonstrate was tracing paper and freezer paper. If you are only making one block, like our free bib pattern, you can use any tracing paper to hand trace the project. Some quilters love freezer paper, because you can press that first piece directly onto the pattern. Now it's time to stitch. Here's the video: Basics Tutorial: Prepping A Quilt Back. As promised I have a number of Basics Tutorials for general quilt-making.
Preparing a quilt back can be as simple as sewing two pieces together, or pieced until large enough for your quilt top. As a general rule 3″ all around is sufficient for quilting at home with your machine, if you are sending it out to be quilted check with your quilter for specific requirements. Here’s the most basic method of prepping a quilt back: This quilt measures 60″x62″, so I folded the longer length over. Then lay out my backing fabric beside it, it’s folded as it came off the bolt, and I double it back the width (in this case) of the quilt. Leaving 3″ – cut away excess fabric. Go back to the folded edge and cut along the fold so that you have 2 pieces of equal length fabric.
Trim away selvage edges. Sew long edges together, using 1/2 seam. How to Build a Quilt Frame for Free. Build Your Own Quilt Frame : Video. Img_4781.jpg (JPEG Image, 2448 × 2448 pixels)