

Facebook. Untitled. Untitled. The Crafty Blog Stalker: What Can You Make With a Pool Noodle: Part 2. The Crafty Blog Stalker: What Can You Make with a Pool Noodle? The homemade beauty chandelier - muttering Network - collection of HD beautiful picture video, share your love, and to get to know the heart of a friend. He Jams A Blue Crayon Into A Hot Glue Gun. The Results? STUNNING! When I bought my first glue gun, I was convinced that I’d never find any use for it — but a few years later?

Oh, how wrong I was! From quick repairs to long-term solutions — like helping to keep those slippery tank tops in place for good — glue guns are some of the handiest craft supplies ever invented. But recently, I learned that glue guns aren’t limited to purely practical uses. She Bought Frames From The Dollar Tree And Turned Them Into Elegant Decor Inspired By Pottery Barn. Ceiling Fan Direction. Covert Cabinets - Covert Cabinets. Science Experiments. Magic Sand at Steve Spangler Science. Primitive Snowman - Decor Winter. The 1 Hour Custom Kydex Knife Sheath – IN YOUR KITCHEN. CHEMISTRY HOME EXPERIMENT : Make Things Glow In The Dark. Have you ever wondered what makes certain things glow under black lights?

For this experiment you will need: • a black light• petroleum jelly• a piece of paper First we’ll use the petroleum jelly as a kind of invisible ink. Dip your finger into the jelly, then use your finger to write a message on the piece of paper. Use more jelly if you need to – but this probably isn’t the time to write a long speech! Can you see the message? First, let’s talk about the light. You may have heard of ultraviolet light if you know about sunburn. If we can't see ultraviolet light, why does the petroleum jelly glow under the black light? Most of the time when we look at an object, we see light reflected from the surface of the object. Can you find anything else in your home that glows under black light?
One thing that usually glows brightly under black lights is a white shirt. Instructables - Make, How To, and DIY. Suet Cakes. Welcome to SaiFou – Inspiring images. Vintage belt frame. I’m sure you’ve seen plenty of wayward western belts at vintage shops and thrift stores.
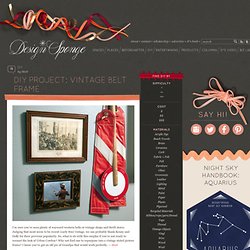
Judging that most seem to be recent (early 80s) vintage, we can probably thank Kenny and Dolly for their previous popularity. So, what to do with this surplus if you’re not ready to reenact the look of Urban Cowboy? Why not find one to repurpose into a vintage styled picture frame? I know you’ve got an old pic of Grandpa that would work perfectly. — Matt See the full how-to after the jump! It’s pretty simple. Materials vintage western beltwood panel and trim stockplexiglass pieceglue Tools sawrotary kniferulerawlthread and needle Instructions 1.
Make a Bouncing Polymer Ball - Experiment with Polymers. Introduction Balls have been toys practically forever, but the bouncing ball is a more recent innovation.
Bouncing balls were originally made of natural rubber, though now bouncing balls can be made of plastics and other polymers or even treated leather. You can use chemistry to make your own bouncing ball. Once you understand the basic technique, you can alter the recipe for the ball to see how the chemical composition affects the bounciness of the ball, as well as other characteristics. The bouncing ball in this activity is made from a polymer. Bouncing Polymer Ball Materials. Writingfonts - Make Your Own Handwriting Font. Special ALT Characters. Special ALT Characters§The chart below is a graphic image of how all the characters should look.
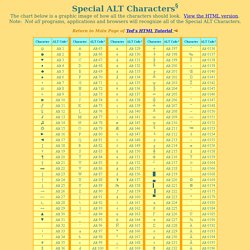
View the HTML version. Note: Not all programs, applications and browsers will recognize all of the Special ALT Characters. Return to Main Page of Ted’s HTML Tutorial §To obtain an ALT Character: Make certain that the Num Lock key has been pressed to activate the numeric key section of the keyboard. *There are some gaps in the numerical sequence of ALT Character codes because either those items do not exist, or else they are duplicates of characters listed elsewhere. Some word processing programs and browsers will not recognize all Alt characters.
Go to Special HTML Characters. Free truetype fonts - downloadable fonts for windows and mac at fonts101.com. Pinterest Pick of the Week! Ah, Monday.

And not just any Monday. Brenda Abbott / Pinterest. Recycled shotgun shell art Browning by SilverThornDesignArt. Blow It Up! Exploring Gas with Balloons, Baking Soda & Vinegar. Pin It The Lil Divas LOVED, LOVED, LOVED they also adore balloons (I always have to keep some on hand) so I knew they would get a kick out of this one!
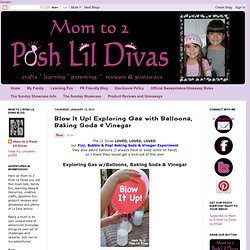
Exploring Gas w/Balloons, Baking Soda & Vinegar. Mad Science Theme. Pin It It's President's Day so I thought it was the perfect time to do some penny experimenting (Abraham Lincoln is on the penny, after all!).
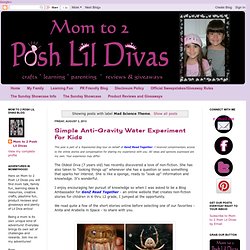
The Lil Divas LOVE our experiments, so they were instantly intrigued by the idea of performing some experiments with our pennies. This is another fun & easy experiment/observation to do with the kids at home or school. Before you begin: Compare a newer penny to an older one. Ask child why they think the older penny is darker and not as shiny and coppery as the newer penny.
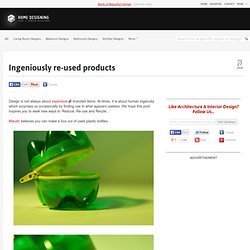
I then asked them to tell me how we could clean the dirty pennies. Brenda Abbott / Pinterest. Ingeniously re-used products. Design is not always about expensive branded items.
Put A Cork In It. Put A Cork In It You may have spotted our little DIY cork vases back in the big office reveal (and the follow up guest bedroom/playroom post).
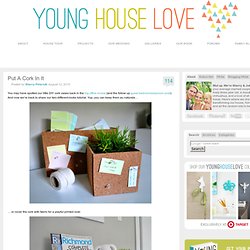
And now we’re back to share our two-different-looks tutorial. Yup, you can keep them au naturale… … or cover the cork with fabric for a playful printed look: We first got the idea to create cork vases for pinning up little reminders and paint swatches that we loved from seeing an expensive designer cork lamp a while back. The four squares of cork in the pack provided more than enough material to cover both vases. 31 Insanely Easy And Clever DIY Projects. Kitchen Craft: Soap Clouds! {And homemade kiddie tub soaps} You know what question Kate and I get a lot? “How do you girls do it it all??” Our schedules are full, just as many of yours are, and it comes with the constant struggle of balancing Mom-life with work-life. And like most other Mothers out there, when it comes down to it and one has to take priority, the Mom gig wins- no contest.