
Visual guide to SSH tunnels. Transparent access to remote resource on a private network Let's say there's a git repository on a private network that's only accessible through a private server on the network.
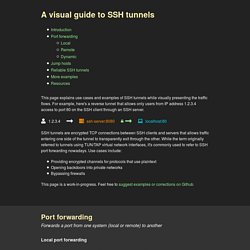
This server is not accessible to the public internet. You have direct access to the server, but don't have VPN access to the private network. For convenience, you'd like to access this private git repository as if you were connecting to it directly from your local system. If you have SSH access to another server that's accessible from both your local system and the private server, you can accomplish this by establishing an SSH tunnel and using a couple of ProxyCommand directives. ssh -L 127.0.0.1:22:127.0.0.1:2222 intermediate-host This forwards port 2222 on intermediate-host to port 22 on the private server.
Ssh -p 2222 user@localhost If you'd like to make the backdoor even more convenient, you can add some directives to your local ~/.ssh/config. Why use www? – www. is not deprecated. This page is intended for webmasters who are looking for information about whether or not to use www in their canonical web site URLs.
First, a bit of terminology. The domain name without www is sometimes referred to as a naked domain, and I’ll refer to it as such here. Why should I use www? You should use www because today you have a small web site, and tomorrow you want a big web site. Really big. The technical reasons to use www primarily apply to the largest web sites which receive millions (or more) of page views per day, web sites with a large number of services across several subdomains, and virtually any web site hosted in “the cloud” by an application service provider.
Heroku, for instance, strongly recommends against using naked domains. Another reason has to do with cookies. You may not run into any of these issues today, but as your web site grows, you eventually will. How Tor Works: Part One - jordan-wright. Introduction Tor is an anonymity tool used by those who want to stay private and uncensored when browsing the Internet.

Over time, it’s grown to be pretty darn good at this. This makes the security, stability, and speed of the underlying network critical to those depending on it. But how does Tor work under the hood? In this series of posts, we’ll take a deep dive into the structure and protocols used by the Tor network in order to see first-hand how Tor operates. Brief History of Tor The concept of Onion Routing (more on why it’s called this later) was first proposed in 1995, where it was first funded by the Office of Naval Research (ONR) and later helped out by DARPA in 1997. The Tor software as we know it today was originally open-sourced in October of 2003, and is the 3rd generation of Onion Routing software. Tor 101 Now that we know a bit about Tor’s history, let’s talk about how it works. Currently, there are about 6000 relays routing traffic through the Tor network.
Types of Relays. The Difference Between URLs and URIs. Decrypting TLS Browser Traffic With Wireshark – The Easy Way! Intro Most IT people are somewhat familiar with Wireshark.

It is a traffic analyzer, that helps you learn how networking works, diagnose problems and much more. One of the problems with the way Wireshark works is that it can’t easily analyze encrypted traffic, like TLS. It used to be if you had the private key(s) you could feed them into Wireshark and it would decrypt the traffic on the fly, but it only worked when using RSA for the key exchange mechanism. As people have started to embrace forward secrecy this broke, as having the private key is no longer enough derive the actual session key used to decrypt the data. Session Key Logging to the Rescue! Well my friends I’m here to tell you that there is an easier way! Setting up our Browsers We need to set an environmental variable. On Windows: Go into your computer properties, then click “Advance system settings” then “Environment Variables…” On Linux or Mac OS X: You can also add this to the last line of your on Linux, or Setting up Wireshark.