
Reader Tutorial: Easy Digital Painting in Photoshop. This tutorial will walk you through the simple steps used to turn a regular photograph into an interesting digital painting illustration, using Photoshop's Filter Gallery and the Smudge Tool. Depending on the photograph you choose, it shouldn't take you more than a couple of hours to complete. Before I begin, I must give a huge thanks to @kidhelios / George Auckland (my old boss from the BBC) as the source for this illustration.
Preview The first thing to do is to resize the photo to your desired output size. This is important as the Filter Gallery effects are heavily pixel based and if you resize after you've finished your work, it can blend them all back together and lessen the overall effect. Next we need to drop out the background, fix any problems and prepare the photo for the filters. Now we are finished with our basic image adjustments, it's time to apply the filters.
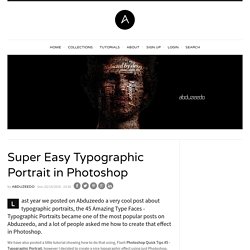
Select the bottom layer of the three and apply the 'Poster Edges' effect from the Filter Gallery. Amazing Obama 3D. This is a personal project that I've been planning for quite some time, and will be part of my demo-reel.
Being aware of the amount of work ahead of me, the hours spent, and considering this will last for only a few seconds on the video, I decided to go ahead and model with all there is to it, starting on concepts, then on a simple but functional Basemesh, refining it on ZBrush, Multipass rendering and post-production in Photoshop. It is all part of the pipeline on character development, and there are many other steps in Maya that weren't necessary on this case, such as rigging for animating the model as a digital puppet, blend shapes that form the face expressions, and all the animation process with timeline, manipulation of animation curves, trax, etc.
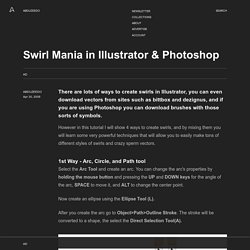
After going through all these steps, there's still rendering, post production, sound editing, final edition, etc. Let's get to the point, Obama's making of. Must-See Illustration Tutorials from DeviantART. Super Easy Typographic Portrait in Photoshop. Last year we posted on Abduzeedo a very cool post about typographic portraits, the 45 Amazing Type Faces - Typographic Portraits became one of the most popular posts on Abduzeedo, and a lot of people asked me how to create that effect in Photoshop.
We have also posted a little tutorial showing how to do that using, Flash Photoshop Quick Tips #5 - Typographic Portrait, however I decided to create a nice typographic effect using just Photoshop. So in this tutorial I will show you how to create a really cool and super easy typographic portrait in Photoshop. We will use the Displace filter and some Blend Modes to achieve the effect. The whole process is quite simple but it might take you some time to add the texts and elements, but once you do that the rest is very straight forward.
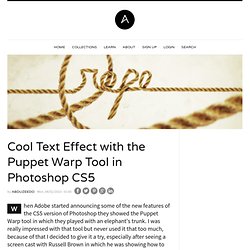
Swirl Mania in Illustrator & Photoshop. There are lots of ways to create swirls in Illustrator, you can even download vectors from sites such as bittbox and dezignus, and if you are using Photoshop you can download brushes with those sorts of symbols.
However in this tutorial I will show 4 ways to create swirls, and by mixing them you will learn some very powerful techniques that will allow you to easily make tons of different styles of swirls and crazy sperm vectors. 1st Way - Arc, Circle, and Path tool Select the Arc Tool and create an arc. Cool Text Effect with the Puppet Warp Tool in Photoshop CS5. When Adobe started announcing some of the new features of the CS5 version of Photoshop they showed the Puppet Warp tool in which they played with an elephant's trunk.
I was really impressed with that tool but never used it that too much, because of that I decided to give it a try, especially after seeing a screen cast with Russell Brown in which he was showing how to manipulate a rope with the Puppet Warp Tool. So in this tutorial I will show you how to create a text effect using a photo of a rope and the Puppet Warp tool. Beautiful Vector Illustration in Illustrator and Photoshop by Carol Rivello. Hey guys!
For this tutorial/making of I created a fun illustration for my sister Stella's blog. In her blog she writes about funny daily situations and I thought that it would be nice to develop an illustration that expressed that somehow. I hope that this step by step help the new designers and illustrators. So, prepare yourself, and continue reading because even though it is a quite long post I hope it might be useful for your illustration projects. Also, feel free to share your thoughts with comments. Step 1 - Brainstorming ftw. Old to Young Case Study in Photoshop by Cassio Braga. Reading the comments about the Photoshop Battle and I noticed the a lot of people were interested in knowing and seeing the images that were created during the event.
Because of that I decided to recreate one of the images I did in my first battle, which was my favorite. Simple Roy Lichtenstein Style in Illustrator and Photoshop. I have been playing with the Halftone filter in Photoshop for the past few weeks and trying different things we can do with it.
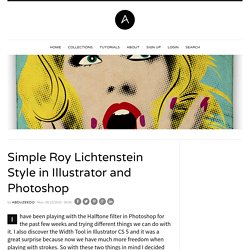
I also discover the Width Tool in Illustrator CS 5 and it was a great surprise because now we have much more freedom when playing with strokes. So with these two things in mind I decided that I had to create an image using them, and then the idea of a design inspired in Roy Lichtenstein. There are quite a few tutorials showing how to create this type of image, but I decided to try it myself. I haven't checked any tutorial because I wanted to play with the tools, so the technique might be the same as other tutorials but I really don't know. Reader Tutorial: How to create an awesome action picture in GIMP. This tutorial is a remake from a Photoshop tutorial, that can be found at It was written by Paulo Canabarro.
This tutorial is intended for people that have a general idea of layer masks, as layer masks are a big part of this tutorial. Some things you will need before we get started: A few pictures, that were shot in the “burst” mode of your camera. (See step 1 for more info about this) Step 1 The most important part about this whole tutorial, is having pictures that will work. Step 2 Load all your photos into GIMP, and find your first image. Money Style Illustration in Photoshop. Last Saturday I went to the movies to watch Wall Street Money Never Sleeps.
It was a nice movie, even though I was expecting something much better in terms of story and special effects, there were some cheesy ones, however in the end during the credits the design they created a really nice animation with money illustration, I don't know the name of the effect in english, but I loved it, so I came back and decided to try to do that in Photoshop. So in this tutorial I will show you a nice technique to create a simple money style illustration using a regular photo, it's not as perfect as the money illustrations we see in the dollar bill for example, but it's a quick tip. There might be different ways so if you know another one share with us, this was the one I came up with and it's very easy.
Step 1. A Perfect Lie in Photoshop #2. By Cameron Mon, 09/06/2010 - 12:16.
Reader Tutorial: Making Little Planets in Photoshop. In this tutorial I will show you how to create little planets using a regular photograph or a panoramic one and Photoshop. It's very a very simple technique but with a really cool end result. Before we start let's take a look at the final result! Step 1. Tips on Creating Fluffy Characters.
One of the best things about clients is that they're always surprising us with some random and misterious pitch works. Mentaway Logo Design Case Study. A few weeks ago my brother Eduardo Sasso showed me an idea he had for a web service that would be perfect for those who travel a lot or simply want to keep track of their adventures when they are away from their places. I loved the concept and I joined him along side with Gisele Muller and Fabiano Meneghetti to make that app become real. The name was already chosen, Mentaway. Talking to my brother and Gisele, the creators of the whole idea, they gave me some insights on how they see the service, the goals and philosophy behind it. My role would be come up with the design. The first thing I did was list some keywords: Traveling Map Route Compass Direction Away Pinpoint I started looking for compass, map and direction images.
Manipulation Basics: Illumination and Coloration. When comes to photo manipulation, the basics and most important parts are the illumination and coloration, these are the main things that if you know how to work around it pretty much will assure you of a good result at the end, so open up the photoshop and get ready to learn some tricks. Click on the images for a bigger view, and make sure to visit my behance to check out more of my work. To create a good photo manipulation you have to make sure all the photos that you put together end up looking like one real photo, that’s the beauty of a good photo manipulation, that question that pops on your head; Is that real or no it can’t be real it has to be photoshoped. That’s when you know a good job is done and that’s what we are looking for.
Some of the most important things are to keep the same illumination and coloration while mixing up multiple photos, and so I will show a sample of how to do it. Katanaz Stock Shutter Stock Now just set the layer mode to Soft Light and the Fill to 54%. Cool Flying Eye Illustration in Illustrator CS5. Reader Tutorial: Planet X Matte Painting in Photoshop. In today's feature film industry, productions are in constant need of digital set extensions or matte painting, the correct term for this type of work. If you don't know exactly what it is, a matte painting is a painted representation of a landscape, set, or distant location that allows filmmakers to create the illusion of an environment that would otherwise be too expensive or impossible to build or visit.
Historically, matte painters and film technicians have used various techniques to combine a matte-painted image with live-action footage. At its best, depending on the skill levels of the artists and technicians, the effect is "seamless" and creates environments that would otherwise be impossible to film. Creating a Super Detailed Illustration Step by Step with OwaikeO. This is your chance to learn from the one of the best illustrators out there, with an incredible and very detailed style Ahmed Alrefaie aka owaikeO is teaching us all the steps of the creation of his new piece "scribble". Quick Tips: Instagram your images using Photoshop.
Instagram reinvented the photo sharing on our social media structure. Easy 3D Globe in Photoshop. Reader Tutorial: Wind Blow by Francesco di Pietro. Nike Hair in Photoshop. Create a Stylish Rifle on Illustrator. Reader Tutorial: Cartoon Character in Photoshop. I have been thinking of doing a cartoon version of one of my favorite characters, Agatha Christies’ Detective Hercule Poirot, always portrayed as a strong willed and serious man. Vintage Typography Experiment in Illustrator and Photoshop. We all love typography and especially the vintage/retro ones. Photoshop Quick Tips #10: Using Pattern Overlay. Beginner Tutorial: Create Dexter on illustrator. Create Sonic The Hedgehog Opening on Illustrator. Reader Tutorial: Wrestlerish Album Artwork by Chris Valentine. Digital Painting Tutorial by Vitaly Alexius.
Tutorial. Mini-layout inspired on 9rules design. Realistic Letterpress Effect in Photoshop. Create a Creamy Ice Cream Poster on Illustrator. Easy Wax Seal in Illustrator and Photoshop. Playing with Vectors in Pixelmator. Icon Design in 5 Steps - Free Icon Set from Ramotion. Creating a web 2.0 blog. Starting a Design Project. Create an Angry Birds Parody in Illustrator. Creating a web 2.0 blog - part 2. Paint Tool SAI : SheezyArt. Vector effects. Joyful Illustrations by Nzinzi Fabrice.