background preloader

Simple Roy Lichtenstein Style in Illustrator and Photoshop
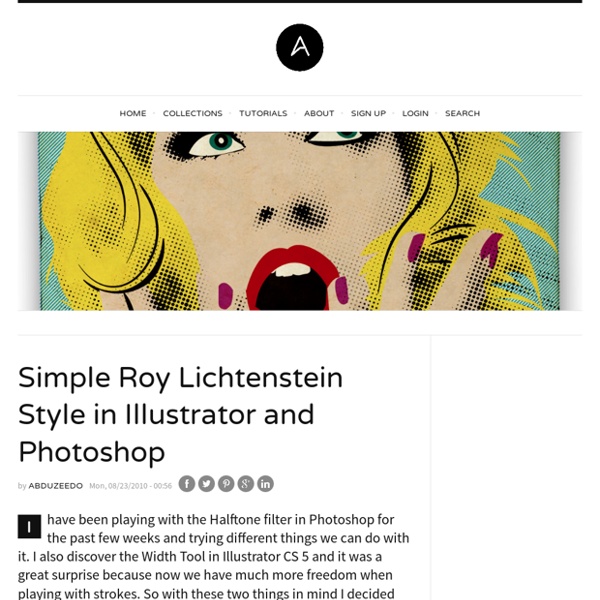
Simple Roy Lichtenstein Style in Illustrator and Photoshop
I have been playing with the Halftone filter in Photoshop for the past few weeks and trying different things we can do with it. I also discover the Width Tool in Illustrator CS 5 and it was a great surprise because now we have much more freedom when playing with strokes. So with these two things in mind I decided that I had to create an image using them, and then the idea of a design inspired in Roy Lichtenstein. There are quite a few tutorials showing how to create this type of image, but I decided to try it myself. I haven't checked any tutorial because I wanted to play with the tools, so the technique might be the same as other tutorials but I really don't know. Besides I think a tutorial on Roy's style is always a great add to the tutorials section of Abduzeedo. Roy Lichtenstein (October 27, 1923 – September 29, 1997) was a prominent American pop artist. Step 1 Let's start the tutorial in Illustrator. Step 2 Step 3 Step 4 With the Pencil Tool (N) create the contour of her hair. Step 5

Dalton Ghetti creates amazing art on the tips of used pencils Most of us will agree with the age-old saying that “patience is a virtue.” How many of you, however, would actually hang on for two years and a half to bring a piece of art into existence? Dalton Ghetti, 49, a Bridgeport artist, has spent 25 good years working with a razor blade, a sewing needle and a sculpting knife for carving his unique art on the graphite of pencil. The artist says: I don’t make money from it but I would love a gallery owner in England to fly me over and put on a show. The inclination to fashion something new did not surface all of a sudden.

Reader Photoshop Tutorial: Sisters by Marcos Torres Celebrating Halloween, Marcos Torres will show us how to create a sort of creepy composition playing with some textures, photos and blend modes in Photoshop. The name of this piece is called Sisters and it's perfect for this halloween time. Step 1 First off, open Photoshop and create a new document. Step 2 Then you have to duplicate this layer (ctrl + J / command + J) and desaturate it (ctrl + shift + U / command + shift + U). Step 3 Now go to Adjustments > Brightness / Contrast panel and adjust Brightness to 0 and contrast to 100. Step 4 Go again to Adjustments, then the Levels panel and adjust the levels to 26 / 1,00 / 255 , just like the picture below. Step 5 Go again to Adjustments, then Curves. Adjust the second one with Output 24 an Input 34, just like the picture below. And finally, adjust the third one with Output 148 an Input 176, just like the picture below. Now we’re done with the Background, the result should be like this: Step 6 Now download this little girls photo here. Step 7

Classic Light Effect in Photoshop Light effects are my favorite type of effect, I don't know why but I always liked to play around in Photoshop trying to recreate them. Then once I discovered the power of the Blend Modes, especially the Color Dodge, creating this effects became much easier. So in this tutorial I will show you how to create a super cool text light effect mixing some photos to give more realism. Step 1 Open Photoshop and create a new document, after that make sure that the background is in black. Step 2 To make the effect more realistic let's use a stock photo, the one I am using is courtesy from Shutterstock and you can find it at Step 3 Go to Layer>Layer Mask>Reveal All. Step 4 Now let's delete the filament area where we will add the text with the light effect later on. Step 5 With the Horizontal Type Tool (T) add the word light in white. Step 6 With the text selected go to Filter>Blur>Gaussian Blur. Step 7 Step 8 Step 9 Step 10 Step 11

Magical Work of Electric Heat by paul0v2 Thu, 11/04/2010 - 11:35 Nigel Evan Dennis aka Electric Heat is a 27-year old Chicago artist who entered the professional design world in 2004 bearing the stamp 'Electric Heat'. Since then, he has proved himself a prolific designer. Nigel's work has effectively blurred the line between fine art and innovative designer-advertising. For more visit cargocollective.com/electricheat "Champion" Outtakes Pomegranates 'One of Us' Selita Ebanks / Color Suns The Audition "Champion" Goapele "Change It All" History Invades "IVVI" The Kidcrash Surface 2 Air Paris About the author of this post

How to Turn a Photo into Oil Painting in Photoshop In this tutorial, we’ll learn how to turn a photo into oil painting in Photoshop. If you will be using a different photo, you may have to make some slight adjustments to the settings used for the effect. If everything goes right, this is what you will end up with: Step 1 Create a new 1000 x 1500px document with a white background and place the picture of the man on top of the background layer. Step 2 Duplicate the photo, change the layer’s blending mode to Soft Light, delete the Accented Edges filter, go to Filter > Stylize > Glowing Edges and use the settings shown below. Then, go to Filter > Artistic > Cutout and use the settings shown below. Go to Filter > Noise > Median and use the value shown below. Step 3 Duplicate the photo again and delete all the filters except for Glowing Edges. Step 4 Duplicate the photo again, go to Filter > Brush Strokes > Ink Outlines and use the settings shown below. Now, go to Filter > Noise > Median and use the value shown below. Step 5 Step 6 Step 7 Step 8 Step 9

Abstract Photo Manipulation in Photoshop CS 6 The new promotional images for Photoshop CS6 are really amazing, they were created by Alberto Seveso, an incredible digital artist from Italy. Seveso has been pushing the limits of creativity and the use of Photoshop for a long time and we are great admirer of his work. Intrigued with artworks we decided to create something inspired by his work. It's amazing to see that such amazing images are most of the times done by simple techniques. This tutorial will show you how to achieve similar effect using Photoshop with Masks and Layer Effects. It's an intermediate tutorial but I am sure you will have so much fun doing as we did. Step 1 Open Photoshop and create a new document. Step 2 Now let's create some brushes to use for our masking exercise. Step 3 Copy some parts of the previous image and paste in a new document. Step 4 Here's the second one, simply do the same thing as the previous step. Step 5 Now using a different image, this one from NatUlrich called Ink in water. Step 6 Step 7 Step 8 Step 9

How To Create a Double Exposure Effect in Photoshop Traditionally the double exposure effect is produced by photographers using nothing but their camera to combine two separate photographs to create an abstract and surreal image. However, we can also mimic the effect in Photoshop, which actually gives us more control over the final output with the ability to adjust and preview the effect as we go. Follow this step by step tutorial to create a double exposure effect yourself, we’ll blend two existing photographs together with the help of some simple clipping and masking techniques. The double exposure effect isn’t just popular with photographers, it’s a technique that artists and designers can use to create cool abstract artwork. You can see this effect used in the real world on album covers and even during opening titles of popular TV series. A popular combination of photographs is a portrait with a scene of nature, so I’ve picked out some cool images from free stock photo websites. Now let’s work on that rough hair line.

Vintage Stencil Style in Photoshop Last week we posted a tutorial showing how to create simple artwork in Illustrator and then in Photoshop we added a few effects to make it look old and with that vintage/hipster feel. Some people asked about some of the steps in Photoshop so I decided to make a simple walkthrough about how to use Photoshop to create this kind of effect. It's a simple technique but it can be very handy for this kind of artwork. So in this tutorial I will show you how to create a simple vintage look stencil in Photoshop. The whole process will take around one hour and you won't need anything special besides time and a few dirty brushes. Step 1 Create the artwork you want to apply the effect. Step 2 In Photoshop now, place the stencil. Step 3 Group the black layer with the white stencil and convert it to a smart object. Step 4 Go to Layer>New Adjustment Layer>Levels. Step 5 Create a new layer on top of the stencil and then with a regular dirty brush add some of the texture. Step 6 Step 7 Step 8 Step 9 Step 10

Create Colourful Fiery Portrait in Photoshop - Photoshop Tutorials, Digital Art Tutorials and Showcase In this tutorial, I will show you the steps I took to create this awesome fiery portrait in Photoshop.This is a beginner-intermediate level tutorial aiming to give some practices on layer blending, selection and coloring techniques in Photoshop. Some steps can be a little tricky, but why not have a try! Note: The Photoshop tutorial is done in CS6 – therefore some screenshot may have slighting different layout as in the earlier version. Here is a preview of the final effect I have for this tutorial: (click to enlarge) PSD File Download You can download the PSD File for this tutorial via the VIP Members Area for only $6.95/Month (or less)! To complete this tutorial, you will need the following stocks: Model by MariaAmanda Fire Texture Background Texture Step 1 Create a new document sized 800px * 1132px with black background. Add the following image adjustment layers to this background texture layer: Black and White Curves and here is the effect you will have: Step 2 Levels Step 3 Step 4 Step 5

Related: