
Using flash to darken your background. If you have been following along so far you have learned about the exposure triangle (Understanding exposure - exposure triangle) and how it controls timing and depth of field.

Now were going to completely confuse you and throw in a fourth element; flash. In a previous post we learned how to use fill light in high contrast scenes. When using flash for fill we are simply taking our existing exposure and adding light to the dark areas. The nice thing about using flash is that we can control the way the camera captures ambient light just by using the power of the flash unit to compensate our exposure. One simple technique to illustrate this is the "invisible black background" technique as illustrated in the photo at right. 10 Street Photography Tips from an Anonymous Street Photographer. I recently got these 10 street photography tips from an anonymous street photographer who wanted to share this information with you.
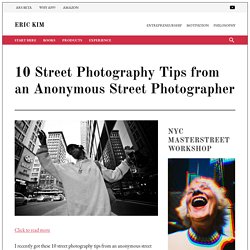
I found these tips to be very insightful, and I hope you will too! Keep reading more to learn about all the goodness. 1. Digital Photo Secrets » The Sunny 16 Rule. Have you ever heard of the sunny 16 rule?

It seems to have all but disappeared in most modern discussions of photography. As a matter of fact, it’s one of many rules that photographers seem to have forgotten. That’s a shame because the sunny 16 rule serves as a nice way to check your current exposure settings. How to Get the Perfect Exposure Using Your SLR Digital Photography Camera's Histogram. Edit Article Edited by Robert Benson, Teresa, Flickety, Maluniu and 4 others The most important tool in digital photography besides the camera - the histogram!

Learning to expose photos properly can be a headache for new photographers. If you are relatively new, you are probably using your camera's automatic functions to shoot most of your images. Not only is that a poor habit to get into but you are wasting some of the extra $1,000 or so that you paid for a digital SLR vs. a "normal" digital camera. Ad Steps 1Understand what a histogram is. 4Read the next section for the explanation of how to use the histogram to gauge a proper exposure. Tips So, you stack all the black tiles (tone 0) in one pile all the tiles that are one tone lighter than black (tone 1) and so on all the way to white and there are all stacked in order in a straight line, that is a histogram.A Histogram ExampleReading a histogram.
A Simple Explanation of F-Stop. 10 Ways to Take Stunning Portraits. How do you take Portraits that have the ‘Wow’ factor?

Today and tomorrow I want to talk about taking Portraits that are a little out of the box. You see it’s all very well and good to have a portrait that follows all the rules – but it hit me as I was surfing on Flickr today that often the most striking portraits are those that break all the rules. I want to look at some ways to break out of the mold and take striking portraits by breaking (or at least bending) the rules and adding a little randomness into your portrait photography. I’ll share ten of these tips today and a further ten tomorrow (update: you can see the 2nd part here). 1.
35mm or 50mm for street photography ? » Yanidel Street Photography. Obviously, any focal length will do in street photography and your creativity is really the only limit to how you perform with them.

It is therefore not uncommon to see people hit the street with a 21mm, 28mm or even 75mm lens as their standard focal length. Nevertheless, the 35mm and 50mm focal lengths have traditionally been favorites of street photographers due to their versatility and ability to reproduce a field of view similar to the human vision. Many photographers, especially in reportage, actually do use both focal lengths (or have a zoom that covers both), yet they most often do have a preference for one or the other. The correct way to hold a DSLR camera (Great tips!) Hold your mouse over the picture and click "PIN IT" to put this pic on your Pinterest!

Introduction My inbox is filled each morning with questions from students in my online photography classes asking various photography questions. I’m glad to get the questions because it helps me to think of what I should write about here on Improve Photography. Lens Elements and Groups. Lens Elements and Groups When shopping for camera gear, you've undoubtedly encountered listings detailing how many "elements" and "groups" certain lenses have.

They generally don't come right out and say it, but such listings often imply that more is better. But is this really true, and just what the heck are elements and groups anyway? In order to answer the first question, we need to start with the second. "Elements" are the individual pieces of glass used in the construction of lenses. Rule of Thirds. The Rule of Thirds is perhaps the most well known principle of photographic composition.
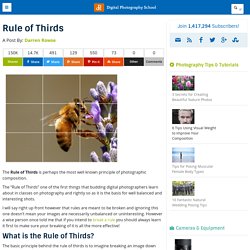
The “Rule of Thirds” one of the first things that budding digital photographers learn about in classes on photography and rightly so as it is the basis for well balanced and interesting shots. Canon EOS Beginners' FAQ III - Lenses. Flash exposure lock and compensation. Exposure for flash photography used to involve time consuming calculations based on guide numbers, subject distance and apertures.

Evaluative through-the-lens (E-TTL) flash metering has changed all this. DLC: Article: Speedlite Tip Series, Part 2: Beyond the Instruction Manual. As long as your shutter speed is at or below the flash sync speed and your subject is within flash range, your Speedlite will automatically output the correct amount of light for your foreground subject.
This is the second part of a three-part series on Canon Speedlite flashes, written for the Canon Digital Learning Center by Gordon Lewis: Having once been a technical writer myself, I have great sympathy for the people who write instruction manuals. They often have to write while the product itself is in development and while the only samples available are prototypes. They also have to be economical in how they explain things. DLC: Article: Using Auto Exposure (AE) Lock. All EOS camera models, film and digital, have a button on the back of the camera that's marked with an asterisk or star icon. This is the AE Lock button. Auto Exposure Lock (sometimes called AEL) is a feature on all Canon EOS camera models, as well as some PowerShot cameras.
It’s an excellent method of gaining added control over exposure, without losing the speed and convenience of automation. In fact, since most photographers today use some form of auto exposure the majority of the time, an understanding of how AE Lock operates can add a new dimension to their photography. Depth of Field. A Simple Guide to Depth of Field. Online Depth of Field Calculator. Danny Santos II - Street Photographer in Singapore.
Danny Santos II - Street Photographer in Singapore. Photo above taken by photography hobbyist Paulo Legaspi. 10 Things Not To Do As a Street Photographer. (Above image “Untitled” by Christos Kapatos) I just finished reading “The Black Swan” by Nassim Nicholas Taleb, where he discusses many misconceptions and fallacies that we face as humans. He talks from a scientific-philosophical viewpoint, and has many fascinating insights. One of them was about knowledge—and that it isn’t necessarily additive—rather something subtractive.
Flash Photography with Canon EOS Cameras - Part I. Flash Photography with Canon EOS Cameras - Part I. Copyright © 2001-2014 NK Guy Version 1.8. 12 December, 2010. The invention and subsequent automation and miniaturization of electronic flash revolutionized photography. If you’re a photographer you’re no longer tied to available light. Depth of Field Strategies for Street Portraits. Over the years we’ve covered portraits, both shooting and post processing them, and we’ve provided you with an amazing guide to depth of field, but never covered specific strategies. The 7 Keys to Improving Your Photography This Year. I'm Rob, the editor of Light Stalking. I try to keep this ship on course. 17 Excellent Examples of Narrow Depth of Field. Crop Factor (Focal Length Multiplier) The Crop Factor is a term that can be heard quite often in the world of digital photography.
Crop factor and interchangeable lens cameras. Bernie’s Better Beginner’s Guide to Photography for Computer Geeks Who Want to be Digital Artists. Illustrated with photos wot I 'ave taken. Bernie’s Better Guide to Depth of Field for Geeks Who Want to be Digital Artists. Being a guide to portrait photography cleverly masquerading as a technical analysis Like the topics we covered in the beginner's guide last month, depth of field might initially seem complex, but behind it is some relatively simple logic and maths. Field of View Crop Factor (Focal Length Multiplier) With the advent of Digital SLR Camera Bodies, the term Field of View Crop Factor has come into our world. The source of this term is the smaller-than-35mm sensor present in many of Canon and other manufacturers' DSLR sensors.
A Tedious Explanation of the f/stop. Photography Tips – FroKnowsPhoto.com.