
Facebook. DIY T-Shirt Quilt. Head Scarf Tutorial. After many requests, I finally made a tutorial on how to tie a simple head scarf.
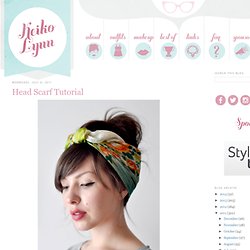
It's really, really easy. I did this without looking in the mirror, so that should tell you how easy it is. Intricately Patterned Animal Illustrations. It would be hard to tell from these strikingly detailed animals but artist Iain Macarthur got his start drawing cartoon characters. Now he carries his sketchbook on the bus, to the cafe and everywhere else as he includes more realism and in this case pattern in his illustrations. See more of his animals (and even some cartoons) at iainmacarthur.carbonmade.com.
유진 박's pin:Bookbinding tutorial. Cook Healthy Mozzarella Sticks. Photo credit Who says our favorite cheesy foods have to be off limits?
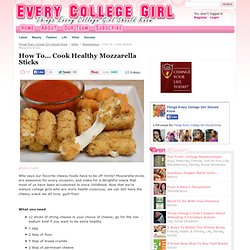
Mozzarella sticks are awesome for every occasion, and make for a delightful snack that most of us have been accustomed to since childhood. Now that we’re mature college girls who are more health conscious, we can still have the cheesy snack we all love, guilt-free! What you need 12 sticks of string cheese in your choice of cheese, go for the low sodium kind if you want to be extra healthy1 egg2 tbsp of flour5 tbsp of bread crumbs2 tbsp of parmesan cheeseA dollop of olive oil, or cooking spray Preparation Cut the cheese sticks in half, making 24 slices, then freeze the slices in the freezer until completely frozenBeat the egg in a small bowl. How to do a perfect knot. When you're traveling or running to dinner, there's nothing sexier than twisting your hair into a top knot.

It gives you the ease and nonchalance of a classic French starlet. Lucky for us, my hair-genius friend Caroline shares the steps below, and the fabulous Jamie Beck took photos... Steps and "after" photos below... "When I need a quick hairstyle, the messy top knot is my go-to. Carrie’s Messy Beehive Tutorial « WishWishWish.
[ylwm_vimeo height="346" width="615" portrait="false" byline="false"]19071764[/ylwm_vimeo] I’ve posted an updated version with clearer imagery right here – do take a look!

I Can’t Do Hair! I’ve always been rubbish at anything to do with hair, which is why it baffles me that so many of you have asked for a tutorial! If you’ve already pressed play on the video above you’ll see that I do it without any care or precision..those of you that are any good at styling your hair are probably gasping – no clean lines, just luck. On the plus side, it’s a super quick up-do that rarely fails me, and I like that it’s messy rather than perfect as I don’t like to feel too put-together and ‘done-up’
50 Fun Manicures. CWTS reveal - the book clutch + how-to. Did you see this week’s Crafting with the Stars?
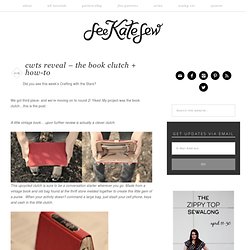
We got third place- and we’re moving on to round 2! Yikes! My project was the book clutch…this is the post:A little vintage book… upon further review is actually a clever clutch. Dye - Dyes From Plants - Pioneer Thinking. Did you know that a great source for natural dyes can be found right in your own back yard!

Roots, nuts and flowers are just a few common natural ways to get many colors. Yellow, orange, blue, red, green, brown and grey are available. Go ahead, experiment! Gathering plant material for dyeing: Blossoms should be in full bloom, berries ripe and nuts mature. Remember, never gather more than 2/3 of a stand of anything in the wild when gathering plant stuff for dying. Solid perfume pocket watch locket. Try as I might, I cannot seem to grasp even the most basic of feminine beauty rituals.
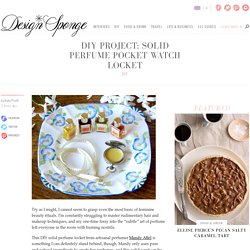
I’m constantly struggling to master rudimentary hair and makeup techniques, and my one-time foray into the “subtle” art of perfume left everyone in the room with burning nostrils. This DIY solid perfume locket from artisanal perfumer Mandy Aftel is something I can definitely stand behind, though. Home Organization Ideas: Up and Away. Bimbo1. Skin Condition as Art. Beauty is especially skin deep if you’re artist Ariana Page Russell.

She has dermatographia, a condition in which lightly scratching your skin causes raised, red lines where you've scratched. It affects roughly 5 percent of the population, but Ms. Russell is the only one who has turned her puffy, ruddy, sensitive skin into elaborately patterned high art. Read More In her latest show, “Blouse,” which is currently hanging at the Magnan Metz Gallery in New York City, she created photographs, video art, and temporary tattoos using images of her rosy body designs to make a powerful and prideful statement about being comfortable within one’s own skin. Photo 46- 8 Gorgeous, New Summer 'Do How-Tos. Strapless Apparently there aren't a lot of styles that don't work with this type of dress — as long as they aren't too over-the-top and don't interfere with the simple neckline of the dress — but Cole loves the look of classic, undulating waves.

"A strapless dress showcases beautiful, sexy shoulders and the collarbone; waxy waves cascading over the shoulders are the ultimate accessory," he says. Just as you can't really go wrong with a hairstyle for a strapless dress, there aren't many accessories you can't wear, either. "Strapless dresses are suggestive without being trashy," says Rose. "Let your accessories do the same: Keep the neck and clavicle bare, with minimal jewelry. Rebecca Taylor Lil Bit Leather Strapless Dress, $495, available at Rebecca Taylor.
Anthro-Inspired Mirror. You all know we love a good Anthropologie knockoff around here – so a couple of days ago when I was browsing online I came across this mirror.
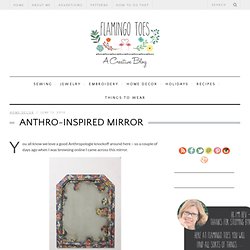
Oh I definitely need that. Hold the presses – did that say $498??? Huh. THE MODERN BRIDE. Photo: angela+ithyle/thebeautydepartment.com post designed by kristin ess I’ve been getting tons of emails about hair for the do-it-yourself bride. We’ll start off with this super simple chignon and work toward more intricate looks down the line. No Heat Curls - Moms Who Wear High Heels and Swear. Fun Summer Hair in Minutes. Happy Friday ladies! I just love this time of year- summer is just around the corner!
Naturally, as weather changes so does my hairstyle. However, I am feeling like I need something new. My usual summer top knot, braids, or loose pony tail is just getting a bit…well, boring. Use an Aluminum Can as a Wi-Fi Extender. Hang a Picture with an Old Soda Can Tab. Uni-ball Jetstream Ballpoint Pen - 0.7 mm - Rubber Body Series - Metallic Orange Body. I wanted a smooth-writing pen that writes with a very fine line. Not knowing what to choose, I bought a Pilot Hi-Tech-C 0.25mm, a Pentel Slicci 0.25mm, a Uniball Signo 0.28mm, and the Uniball Jetstream 0.38mm, all with black ink. The Jetstream was really an afterthought - I expected the gel pens to be superior to a lowly ballpoint. And how fine could a 0.38mm ball write, anyway?
Increasing Your Thrifting Luck www. Printable Paper. T-Shirt Underwear. I know you've got them, lurking in drawers, the back of the closet, in the "giveaway" pile: those T-shirts that are, for various reasons, both unwearable and indispensable. They are too small, too big, too short, have a stain, a hole, or some other flaw, and yet you cannot bear to part with them.
The Convertible “Infinity” Dress: How it almost defeated me, and what you need to make one. Jumper. These are the pieces you are going to need. The measurements are half the garment, so make sure you get them right. First, measure from under your bust to your waist. Add a few inches for seam allowances and a hem. Make a Dress from a Button-Down Shirt. Learn How to Tie a Tie. How to Exercise While Watching TV. How to Make Book Earrings (with pictures)
How To Style Maiden Braids. Last month I did a makeover story with Kelsie and had many requests for a maiden braid tutorial. Yesterday she came in and we photographed these simple step by steps. Kelsie has extremely long and thick hair, but anyone with shoulder length or longer can do these braids (see my photo below for an example). Steps 1-2: Braid two strands on each side of a center part. 30Day.jpg (JPEG Image, 600x776 pixels) - Scaled (68%) Easy Origami Envelope. If you’d like to make these cute little “Flap Lock” Origami Envelopes–all you’ll need is a piece of square paper…any size.
I used Christmas scrapbook paper. 1. Fold the paper in half to form a triangle. Make sure your edges are even. 2. 3. fold the right corner about 1/3 of the way to the left. 4. 5. 6.