
Akismet Privacy Policies. Help/irc – Freetz. Telnet bei der Fritz!Box (z.B. 7270) ohne Telefon und Mod aktivieren und Verbindung herstellen. Hier eine kurze Anleitung, wie man an der Fritz!

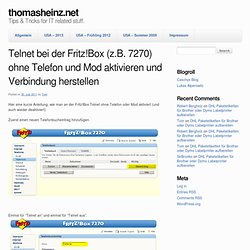
Box Telnet ohne Telefon oder Mod aktiviert (und auch wieder deaktiviert): Zuerst einen neuen Telefonbucheintrag hinzufügen. Einmal für “Telnet an” und einmal für “Telnet aus”. Danach die Wählhilfe aktivieren. Dann im Telefonbuch auf die Rufnummer klicken. Alle eventuell erscheinenden Abfragen mit OK bestätigen. Dann kann auch schon die Verbindung mit Putty (–> HIER downloaden.) hergestellt werden. Putty fragt beim Verbindungsaufbau nach einem Passwort, dies ist das selbe wie das der Weboberfläche der Fritz! Schon habt Ihr eine Telnet-Verbindung. Um Telnet wieder zu beenden, das Putty Fenster schließen und auf die Rufnummer von “Telnet aus” im Fritz! Informationen zu dieser Vorgehensweise wurden aus diesem Thread des IPP-Forums entnommen. Wie immer gilt: Ich übernehme keine Haftung für Schäden oder Beeinträchtigungen die durch Benutzung bzw.
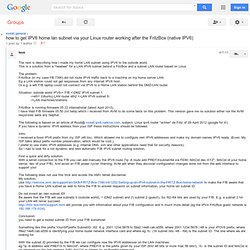
How to get IPV6 home lan subnet via your Linux router working after the FritzBox (native IPV6)–Google Groups. The next is describing how I made my home LAN subnet using IPV6 to the outside world.

This is a solution from a "newbee" for a LAN IPV6 subnet behind a FitzBox and a subnet LAN router based on Linux. The problem: FritzBox (in my case FB 7390) did not route IPV6 traffic back to a machine on my home server LAN. Eg a LAN station could not get responses from any internet IPV6 host. Or e.g. a wifi F! B laptop could not connect via IPV6 to a Home LAN station behind the DMZ/LAN router. Situation: outside world IPV6-> F! FritzBox is running firmware 05.22 international (latest April 2013). The following is based on an article of Ruud@ xs4all.ipv6.narkive.com, subject: Linux ipv6 router *achter* de Fritz of 29 April 2012 (google for it!).
Intro I received a fixed IPV6 prefix from my ISP (48 bis). First a quick and dirty solution: With a telnet connection to the F! The following does not use this trick and avoids the AMV telnet disclaimer. FRITZ!Box tuning part 1: Enable remote access over ssh. Recently I changed my Internet service provider to Kabel Deutschland which offers some really good bandwidth for a reasonable price.

You get 32 MBit in the download direction and 2 Mbit in the upload direction. Additionally to this you can order a FRITZ! Box 7270 which allows you to use VoIP for the phone part. As I always try to maximize the usage of new hardware I started to explore what is possible with this combination. In this post I will explain how you get access to your FRITZ! First of all you should register an account at or any other service for dynamic IP resolution. For the ssh server software dropbear is used. After downloading, the server has to be installed on the usbstick by executing In my case the software is installed into /var/media/ftp/FLASH-DISK-01/addons. The FRITZ! You have to note the part between root: and the next colon. The initial starting point for all modifications on the FRITZ!
You have to replace XXXXXX by the password hash you created above. Share: FRITZ!Box tuning part 4: Cross-building and installing additional applications. The articles I wrote about the FRITZ!

Box are pretty popular. They are creating the most traffic on my website. I understand this, cause the FRITZ! Box is a really great piece of hardware and AVM is also a company which knows how to make their users happy by serving regular updates to the firmware. Although I didn't tuned my FRITZ! As already mentioned in the other articles, there is no warranty that this will work on your side and I am not responsible for any damage which may happen. The FRITZ! Here we learn that the FRITZ! If you are working on a Mac like me (where Buildroot doesn't work), VirtualBox with a Linux system as a guest is a good alternative ;).
By executing make menuconfig in the root directory of Buildroot you are able to configure it. The following is based on ideas invented by the guys at Our aim is it to have as little persistent changes on the FRITZ! This script does the previous steps. Now copy the zip archive you have created above to the FRITZ! Share: